
By Robert Van Putten
Issue #162 • November/December, 2016
For a year and a half, we lived in an 18-foot travel trailer while building a straw bale cottage. There isn’t much space in a travel trailer, so all the overflow went into an old metal Montgomery Ward garden shed.
Right from the start, we began having problems with that shed. The first winter we had 15 feet of snow and the shed started to buckle. I had to heavily shore the shed up and keep the roof shoveled off. The sheet metal walls were covered with frost inside and ran with water during any thaw. Critters of all sorts kept getting in and messing about with our supplies. Once, a bear even ripped the padlocked door right off!
Eventually we finished our straw bale cottage, but we kept using the old shed for the usual overflow. After 10 years, it was finally time to build a new shed. We wanted a stout shed that would need zero maintenance, was critter-proof, fire-proof, could handle trees falling on it, could handle any amount of snow load, and could prevail against the occasional marauding bear, too.
What is ferro-cement?
A building technique called ferro-cement seemed to fit the bill. This is basically a thin shell of cement embedded in a wire frame. Cement is very strong in compression but is brittle and has no strength in tension. A thin steel rod or wire is very strong in tension, but weak in compression and will bend. By combining these two materials, we get a substance with the strengths of both. Steel-reinforced concrete isn’t new and I’m sure we’re all familiar with its use in massive monolithic pours for foundations and large buildings. The difference is ferro-cement uses a free-standing wire framework upon which a thin layer of cement is applied, usually by hand.
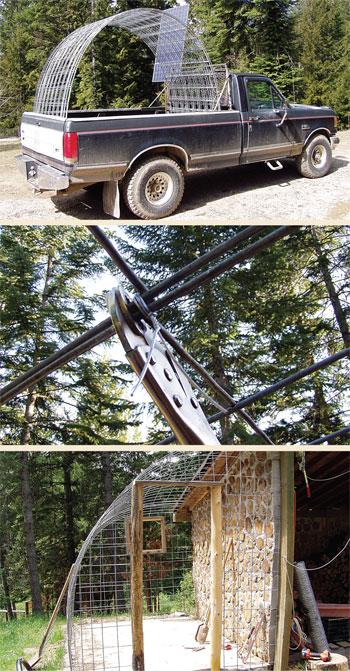
My contribution to the art of ferro-cement building is the use of 16-foot-long cattle panels for the framework. The steel is strong, springy, and easily bowed into useful shapes.
The new shed
Next to our mortared cordwood woodshed, we had a cracked 7×10-foot concrete pad where the old Montgomery Ward shed stood. We decided to build the new shed over the pad in the form of a tapered half-barrel vault, using the wall of the woodshed for one side. The better part of three cattle panels were used to frame up the new shed. I dug a trench around three sides of the pad, about six inches deep and four wide. With bolt cutters, I cut the panels to length and shoved one end down into the trench and nailed the other end to the woodshed. I found it was best to clamp the panels together with vise-grip pliers, then wire up that joint good and tight. I then filled the trench around the pad with concrete to lock the panels in place.
To frame the doorway, I needed something sturdy, or else the tension of the panels would pull it out of shape. Two cedar posts set in concrete did the trick.
The next step was to cover the steel framework with something we could actually plaster with cement.
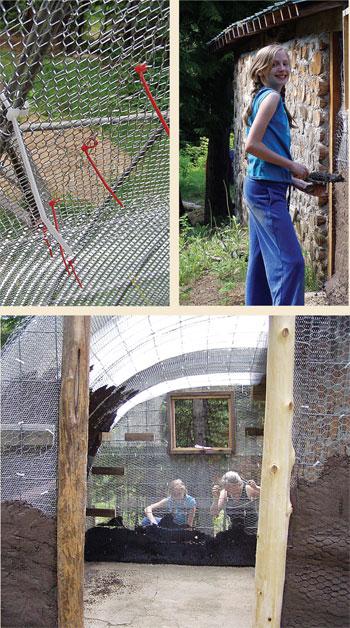
To prevent too much cement from dropping through, I used 2.5-pound plastering lath on the inside of the cattle panels and one layer of chicken wire on the outside. This lath is light-gauge galvanized expanded steel. It is ideal for holding plaster, but costs substantially more than chicken wire. You can’t simply drape a dense mesh of some sort over the cattle panel framework — the dense mesh needs to be solidly attached to the inside surface with concrete for strength.
For the cement, I decided to use a mix of one part Portland cement to three parts sand, with as little water as possible. I’ve since corresponded with a man that did gunnite swimming pools for a few years, and for waterproofing and weather resistance he recommends a 1 to 3 Portland cement to sand mix for the first layer, then a ratio of 2 to 3 or even 3 to 5 for the outer layers. This will give greater strength and be as waterproof as a concrete pool. In a structure with a roof of cement, the material needs to be as impermeable to water as possible. You could add one of the new acrylic concrete fortifying products to improve waterproofing and adhesion, at least in the finish coats.
I used ?-inch minus sand that was available locally. Clean masonry sand might have been better. Whatever you use, be sure to experiment with some test panels and mixes first.
We soon discovered that the job of tying the chicken wire down and the lath up with short bits of wire was a real chore. But then my wife had the wonderful idea of using plastic zip ties instead of bits of wire. Once we started doing this, the chore went much faster.
Tying up the top portions of the framework was difficult because we couldn’t walk on top of the frame, and we resorted to various acrobatic, hanging-off-ladder maneuvers. To attach shelves inside the finished shed, we stoutly wired short, pressure-treated 2x4s to the cattle panel framework on the inside.
I thought the structure would benefit from having the first coat applied all in one day to avoid cold joints between batches of cement, so I rounded up some help. I had three adults and two kids plastering while I shoveled and mixed cement. The kids were the best workers because they still knew how to play with mud and have fun.
At one point, the weight of the cement started to buckle the cattle panel frame. Past that point, the frame needed to be shored up on the inside. I had thought the stiff bow of cattle panel would hold the weight, but cement is very heavy.
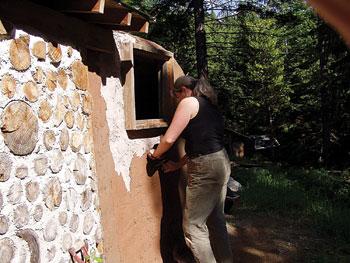
Before too long, the shed was fully plastered. I estimate we used about a ton of material for the first coat. That night we had a gentle rain, and the shed leaked like a sieve. We had lots of holes and small voids in the hastily-applied first layer, but in a few days the shed was perfectly rigid and we could walk on it. In the next few weeks my wife and I troweled on two more layers of cement to the exterior and one more coat on the vertical end walls. The final layer had a bit of cement coloring dye added to the mix. These thinner additional layers were easy to plaster onto the exterior surface, unlike the original layer which had to be worked into the wire mesh.
The interior of the shed
The first coat of cement plaster had penetrated well into the lath on the inside of the shed for a nice, tight bond. But this bond created a very rough and sharp surface on the inside that was dangerous to go near — I would have to cover it with something. A cement-based plaster wouldn’t work on the inside because it isn’t tacky enough, even with lime added. I figured this was a job for gypsum plaster. This stuff is essentially the same thing as plaster of Paris, drywall joint compound, and pre-mixed drywall mud. One could easily plaster a wall with pre-mixed drywall mud, but the expense would be considerable (and apart from some chemical additives all you’re really paying for is some powdered gypsum, water, and the plastic bucket it comes in). This job was big enough to merit buying several 50-pound sacks of powdered gypsum plaster, and mixing 50/50 with sand and enough water to make a nice, thick mud.
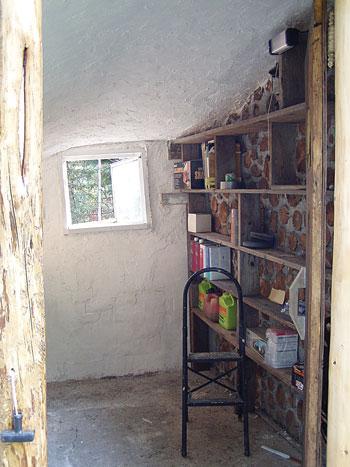
Unlike cement- and lime-based plasters which can be quite alkali, gypsum plaster is safe, non-toxic, and easy to use. It sticks well to surfaces, doesn’t crack, and anyone can have fun smearing it on a wall for a nice textured surface. The drawbacks are that it sets up pretty fast, you can’t mix it up in a cement mixer, and the sacked plaster has a short shelf life. I mixed up small batches in a wheelbarrow and had but 15 minutes to get each batch on the wall, so the resulting texture is a bit on the rough side. These days, few folks do hand plastering anymore, except for crazy “earth-muffins” (I’m not sure what that means but we’ve been called that), so you may not find it in sacks at your local building supply store, but a masonry supply store can special-order it for you.
When finished with the gypsum plaster, we brushed on a coat of whitewash to brighten it up inside. Whitewash is hands-down my favorite “paint.” Every can of paint you buy in the store is overpriced, needs to be tinted and mixed, contains odd chemicals, and outgasses foul toxins. However, whitewash is naturally antiseptic, mold and mildew resistant, does not off-gas, produces a unique surface glow due to the double refraction of calcite crystals, and is very cheap. It adheres well to many surfaces but can leave a thin white film on your hand when rubbed. I decided to make my own recipe for whitewash. I mixed lime and water in a bucket until it looked like milk, then brushed it on the plastered walls. It ran and looked like splashed milk. My wife had several choice words with me about my stupid idea and stomped off in disgust. But the next day, she apologized and showed me the wall. Overnight it had turned a brilliant white! These days it’s often called “limewash,” and is usually made by mixing lime paste with water. Suffice it to say, I’ve had good results simply mixing hydrated lime and water. Hydrated lime is mostly calcium hydroxide which reacts with carbon dioxide in the air and turns into calcium carbonate or limestone, which is back where it started. This stuff also has a shelf life, like gypsum plaster or Portland cement. An old bag of lime looks just like the fresh stuff, but it may be powdered limestone (calcium carbonate) instead of hydrated lime (calcium hydroxide). So use a fresh bag of lime every time. If your whitewash crumbled or turned to dust after it dried on the wall, the lime was probably too old. Whitewash can be colored with cement pigments if you wish, and water glass, eggs, casein, milk, salt, soap, Portland cement, soil, blood, or laundry bluing can all be added for various effects.
Finishing touches
We had some very heavy rains after finishing the shed and occasionally we’d get damp patches on the interior walls. Since the structure still wasn’t sufficiently waterproof, we applied a layer of Quikrete masonry coating to the outside. This stuff is sold in 20-pound pails, mixed with water to the consistency of thick paint, and applied with a brush. I reckon it’s made of Portland cement, fine sand, and a waterproof binder, probably acrylic.
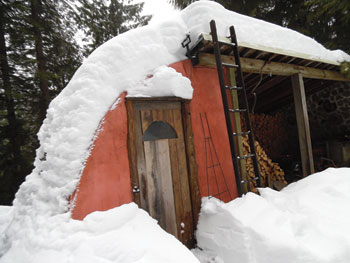
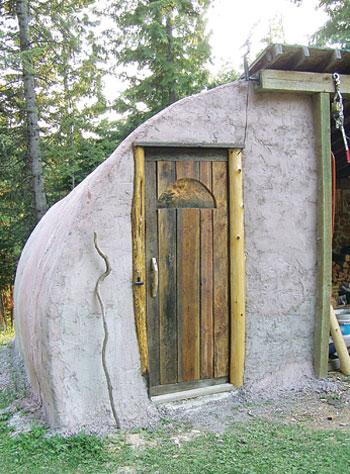
Last, I made a door out of plywood surfaced with old boards, with a semicircular piece of glass we had laying around for a window.
We built this shed nine years ago for $250, and it’s held up well and has met our expectations for a low-maintenance storage shed with a cool sort of Planet-of-the-Apes look to it. With today’s prices, I think this shed could be easily replicated for less than $400.
The structure does weigh well over a ton. Cement doesn’t “dry,” it cures. The water in the mix doesn’t go away; the chemical reaction converts the water and cement (tricalcium silicate) to calcium silicate hydrate, calcium hydroxide, and heat. Thus, the finished weight of cement is the same as the wet weight. It won’t be blowing away any time soon.
The structure is rigid, has not frost heaved, and is self-supporting. It certainly isn’t putting pressure against the woodshed, because that wall of mortared cordwood is built right on the ground with only a pressure-treated plank under it, and the corner posts which support the wood shed roof are simply set in the earth and would be leaning by now as the result of lateral thrust. The surface of the shed has developed a few small cracks in the exterior masonry coating but is apparently still waterproof.
Building with ferro-cement is fun, inexpensive, requires few tools and skills, and is great for creating interesting shapes. My next ferro-cement project will probably be a “stone yurt” guest cabin.


