
By Jackie Clay-Atkinson
When we first looked at the land which is now our off-grid homestead, the realtor mumbled an apology for an old gravel pit on the property from the old homesteading days. But even as he gruffly turned my attention away from the tree-grown hole in the side of the hill, my mind spun with possibilities. We would have a mile-long driveway to improve and maintain — that would take gravel. And the pit had been abandoned because they’d hit water in the easiest-to-access spot.
A few years later, Will bulldozed out a sizable basin in that old gravel pit, finding several strong springs gushing water out of the ground as he pushed the basin deeper and deeper. These springs kept our spring basin filled, letting us irrigate our garden, berry patch, and orchard.
When Will was building a big barn to house our livestock during winter weather, we realized that the barn was 200 feet from the house and even farther from our well. Water would be a problem.
Will decided to put a shallow well on the side of the spring basin nearest the barn. If we dug it ourselves, it would save us thousands of dollars, and we could do it the way he wanted. Around here, well drillers will not drill a shallow well, which is what we wanted and needed.
Making the well point
So Will set out to start our well. I think what gave him the idea in the first place was the pair of six-inch steel pipes which were in his scrap pile. They were given to us by a neighbor to use as a culvert across a wet spot on our driveway, but they turned out to be too short. Instead, they became our well point and casing.
Using the cutting torch, Will cut long slots in all sides of the first eight-foot pipe, then he heated the entire area and gently pounded the far end together to form a point. To further strengthen the point, which would be pounded down through rock and gravel, he inserted a one-inch diameter solid steel rod in the center of the newly-made point, then welded the entire piece together.
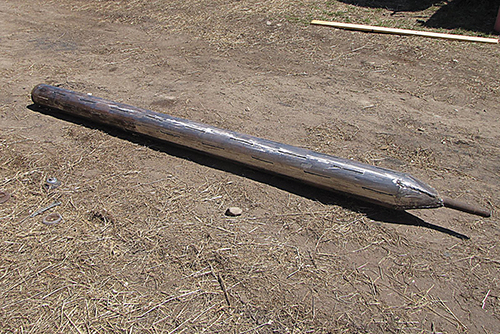
Once he made the point, he had to let the water enter the point. So Will fired up the cutting torch again and cut a series of six-inch slots the full length of the pipe, alternating the slots in each row so the pipe would stay strong. He finished the job by taking the angle grinder to the entire pipe, which cleaned off rust and made the slotted areas smooth.
We already had a homemade backhoe built from parts of an old Allis-Chalmers tractor. It hooks onto the back of a big tractor or our bulldozer like a trailer. Will hooked the backhoe to Old Yeller, our John Deere 1010 dozer, loaded up the new well point, and headed down the trail to the well site.
Driving the well point
He had chosen the site for its direct line to the new barn and because it was on the edge of the old gravel pit, where a grove of tag alder was growing. Alder, in these parts, nearly always grows in wet areas. First, Will dug up the bunch of alder, then he began digging a hole in which to place the new well point.
He hit water four feet down and at six feet, he began to dig up what we call “water gravel,” which nearly always indicates a good water vein. Water gravel is made up of fine, small, uniform stones.
He dug on, until the backhoe couldn’t go any deeper — about seven feet. Water was already filling in the hole. This was not surface water but gushing spring water! He quickly placed the new point in the hole, with the point chained to the backhoe’s bucket, then used the bucket of the backhoe to shove it even deeper into the hole.
Once this was done, he filled in the hole around the pipe, taking care to keep it absolutely straight because he would be pounding in the next eight-foot length. Will left about six inches of the pipe above ground, leaving a small hollow around it so he could weld the next length of pipe onto it. He put a clean plastic pail over the open pipe to keep debris and critters from falling into it.
This spring, Will again tackled the well project. He got out the next length of pipe and cut a small round hole in the side about five feet from what would be the top end. Through this hole, he inserted a pitless adapter. This extremely handy device allows you to run the water line out through the side of the steel casing below the frost line so the water line doesn’t freeze during the winter. You might be saying, “I remember when their water line buried eight feet in the ground kept freezing. And this is only five feet?”
Will planned on removing the check valve from the submersible pump so the entire water line, which is buried three or four feet in the ground all the way up a steep hill to the barn, will drain completely back into the well after each use. When the check valve is left in the pump, water can be held in the line and would freeze, causing problems for us.
The pitless adapter is made with an add-on protrusion which is threaded so a long pipe can be screwed into it. This pipe lets you place and hold it into the hole while it is being attached to the well casing. On the inside, there is a slanted part which holds the water line against an “O” ring by the weight of the water line and the submersible pump (which is heavy). You can pull the water line and pump by later screwing a pipe into the adapter and then just pulling upward. This releases the water line from the pitless adapter and lets you pull the whole works.
Will installed the pitless adapter, then capped it off on the outside with a steel cap because he would be driving the pipe with our tractor-mounted fence-post pounder.
He took the length of pipe down to the well site, then hooked up our post pounder which works off of the tractor’s hydraulic system, raising a heavy steel driver. Once all the way up, there are powerful springs that propel the driving plate downward. We were very careful, because many people have had severe injuries when getting in the way of that driving plate.
Will welded the two pipes together, using the tractor bucket and chain to hold the top pipe perfectly straight.
The next day, we began to drive our well. At first, the post driver would barely fit over the pipe and the strokes were pretty short. It took about three strokes to gain half an inch. But Will kept driving. Soon the strokes were longer and the pipe went down half an inch at a time. As the pipe went deeper, friction and rocks slowed it down. Will had to stop and use the tractor’s bucket to remove a few feet of the gravel along the drive up to the barn where the water line would be buried so the tractor could still keep pounding the pipe; before this, the pounder struck ground before getting a chance to pound the pipe.
As the pipe went in, Will kept digging around the capped pitless adapter with a shovel so it would not be damaged as the pipe was pounded further and further into the gravel.
After several hours, the new well casing was down as far as he wanted it. (It still stuck up out of the ground but by the time he fills back the gravel he removed, the casing will only be a foot out of the ground.)
He then pulled out a tape measure and threaded it down the pipe. Seven feet of the well casing was filled with silt! It was deposited in there by hundreds of repeated poundings.
Will tried using our gasoline-fired irrigation pipe to remove the silt, but it didn’t have enough suction from that depth. So I ran to town and rented a two-inch trash pump for $42, which was also gasoline-fired. It had a discharge hose that reached our spring basin and a stout intake hose that fit into our well casing, once we removed the strainer cage.
The clean-out took all afternoon. First, we ran a hose from the new barn down to the well, then, turning on our house well, we ran water constantly down into the silt, stirring it up so we could pump it out, with the addition of more water. The silt kept plugging up the discharge hose and the pump. I cleaned out the hose; Will took the pump apart and cleaned it out. Finally, we got a rhythm and found just where it would have enough suction without getting plugged. At last, the intake hose couldn’t go down any further — no more silt.
When Will looked down the well casing, water was simply gushing in all the slots in the pipe. He turned the pump back on and let it run. The water coming out the discharge was a bit cloudy at first, but soon it was as clear as a bell and very cold. He measured the flow and, on average, it was putting out more than 20 gallons per minute and the well was filling up while doing so.
Next, we needed to find a 110-volt submersible well pump. We could put in a pitcher pump, but then we’d have to carry buckets of water up the hill to the house or the barn. That would get old fast, especially when both Will and I are more than half a century old. With a 110-volt submersible pump, we can run it off a solar array and battery bank. That would provide running water to our livestock and us, if need be, without the need for gasoline. (We know there are solar pumps, but they require a storage tank and in the northern Minnesota winter, freezing would be a huge issue.)
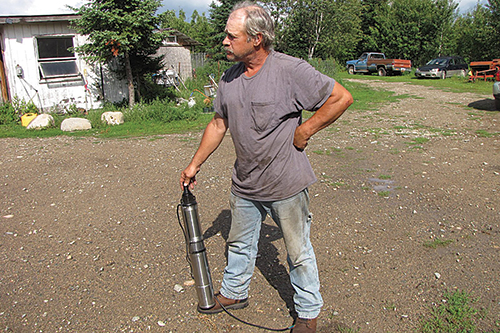
Will went online and found a 110-volt submersible pump for less than $100, shipping included. When the pump arrived, he quickly took the check valve out of the pump and re-assembled it.
We picked up a six-foot, frost-free water hydrant at our local farm and ranch store. This is an odd length because most are eight feet since the frost goes deep here. Because we are only burying our water line three to four feet, it will be drained automatically each time the pump is turned off, so freezing won’t be an issue. We wanted the hydrant three feet up from the ground for ease of use (no bending) and three feet in the ground where it attaches to the 1½-inch black poly water line.
A frost-free hydrant, in case you’re not familiar with the product, is another ingenious invention that looks like a pitcher pump on top of a long galvanized pipe. The water line is attached near the bottom. When the handle of the pump is raised, water comes out, pushed by the pump. When the handle is pushed down, the water is shut off and all that is left in the hydrant’s pipe is drained out underground. Therefore, no frozen faucet to deal with.
Will had to special-order water line because he needed 150 feet and it is most commonly sold in either 100 foot rolls or shorter lengths, cut to order. He didn’t want a splice in the line in case he ever had to run something inside the water line. (One of those “just in case” things that has paid off in the past.)
With our backhoe, Will again set out to dig a trench from the well to the spot just outside the back corner of the barn where the frost-free hydrant would be installed. As soon as he’d gone a few feet up the trail, he hooked the line onto the pitless adapter, leaving the roll of plastic water line in the shallow trench.
As he continued digging the trench up toward the barn, he was very careful to have absolutely no dips in the bottom, as even one dip would hold water and freeze as the line drained in the winter. Lots of raking and leveling was involved in this step. Again, this trench was not deep; only inches down by the well, increasing as he went uphill to four feet at the barn. There was no danger of the trench caving in while we worked and there is a great downward slope toward the well to make sure that water drains off quickly as soon as the pump is turned off.
In the meantime, Will had drilled a ¼-inch hole in the top of the well casing and installed an eye bolt. To this, he fastened a plastic-coated, heavy-gauge wire to act as a safety line, should the pump ever come detached from the water line. This line ran from the pump up and was tied onto the eye, inside the casing.
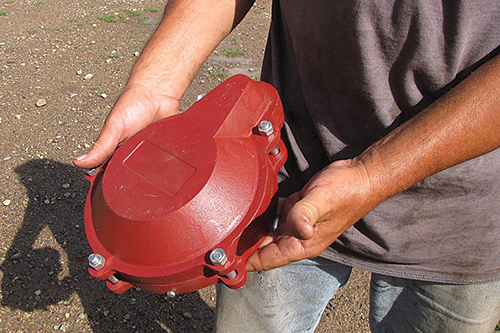
Will then lowered the pump into the well along with the electric wire and safety line, zip-tied to it for neatness, and set the water line into the pitless adapter. The wire was 12-2 (or two hot wires and a ground) coming up through a designated spot in the well cap and then into a conduit into the ground to protect the wire from future damage. Luckily, Will was able to buy a new well cap at an auction for $5. Not only does the well cap protect the well from contamination with a rubber gasket and a tight fit onto the casing, but it also has vents to allow water to equalize the pressure, keeping the water flowing nicely during pumping. It is cast-iron and quite heavy.
We kept unrolling wire and water line up the new trench, almost to the barn. Then Will dug a deeper hole near the corner of the end of the barn (where snow wouldn’t fall off the eaves and bury the access) for the frost-free hydrant. Below the hydrant, we placed a five-gallon plastic bucket — with slits cut in the bottom and sides — into the hole and filled it nearly full with fist-sized rocks. This was to ensure the hydrant could drain completely after each use and that the bottom valve wouldn’t get clogged with silt or debris, making draining difficult.
Will cut the plastic water line and attached it to the hydrant with hose clamps. He then placed the hydrant into the bucket. I held the hydrant straight while Will used a shovel and backhoe to fill in the hole.
He threaded the electric wire through a conduit to protect it, then ran several feet along the barn where a plug was attached.
We are using a generator to power things (for the time being), so we plugged it in and pulled up the handle of the frost-free hydrant.
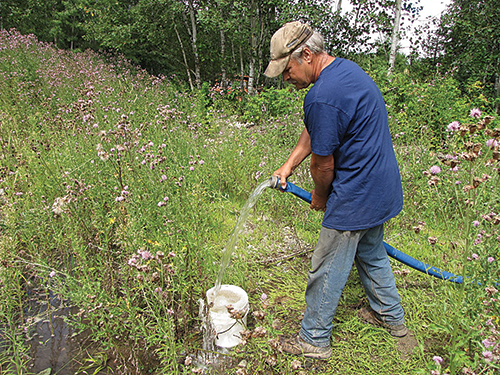
Water soon gushed out the end of the hose we’d attached to the hydrant. We unplugged the pump and were gratified to hear water glugging back down into the well. We plan on placing a big round bale over the well in the fall to ensure it never freezes out in the winter. Will plans on hollowing out the bottom of the bale with the chainsaw so it will fit snugly over the well casing. He’ll use a bulldozer to tip it over into place.
This well was a huge success and one we’ll enjoy for years to come.


")

