
By Patrice Lewis

Before we had our garden established, I routinely purchased chopped garlic at the grocery store. Why? Because it was easier to scoop a tablespoon of chopped garlic out of a jar than to dice up fresh garlic.
Then we grew a garden. The first time I harvested our own garlic, I was overwhelmed by the abundance. The pile of enormous heads nearly filled a bushel basket. My enthusiasm for garlic is second to none, but even I had to admit it was a little much. What could I do with that much garlic?
Most people would simply suggest we store the harvest in our basement or root cellar, but we don’t have a basement or root cellar. Then I remembered those jars of chopped garlic I used to buy at the store and decided, “If they can do it, I can do it.”
Types of garlic
There are two basic types of garlic: soft-neck and hard-neck (sometimes called porcelain-neck). In a nutshell, soft-neck has a milder flavor, has more tightly-packed cloves, stores well, and is often the garlic you see braided. Hard-neck garlic has fewer, but larger, cloves around a central stiff stem. It does not store long-term as well as soft-neck, but it has a sharper bite.
We grow hard-neck garlic. Not only does it do better in northern climates, but I like its zesty flavor as well as the sheer size of the cloves, some of which approach small chicken eggs in scale. But the fact that it doesn’t store as well forced me to consider alternate ways to preserve it.
Why can garlic?
Canning is my go-to method of preserving food. However, two warnings exist about canning garlic. The first is minor: the garlic loses a lot of its “bite” during canning since the heating process removes much of the flavor. However, with so much garlic, I simply compensate by adding more garlic to recipes, which still gives a zesty garlic flavor.
The second caution is more serious: Home-canning of garlic is not “officially” recommended by food safety experts due to the risk of botulism. According to the University of California Food Safety website (http://ucfoodsafety.ucdavis.edu/files/250352.pdf), “Canning garlic is not recommended. Garlic is a low-acid vegetable that requires a pressure canner to be properly processed. Garlic loses most of its flavor when heated in this way. For this reason, adequate processing times have not been determined for canning garlic.”
Therefore, I must extend the following obligatory warning: You will be canning chopped garlic at your own risk.
Because garlic is low-acid, it must be pressure-canned. This is non-negotiable. When I determined processing time for garlic, I referenced the processing time for onions and added five minutes.
Harvesting & processing
Hard-neck garlic produces scapes, the curlicue immature flower stalks. These should be cut off so growth is directed into the bulbs. Don’t waste the scapes — they’re delicious. They can be eaten raw, cooked, stir-fried, braised like asparagus, chopped into soups and salads, and minced for a pesto blend.
Hard-neck garlic is harvested when the foliage changes from green to brown. Soft-neck garlic is harvested when the foliage starts to fall over. Once the garlic is harvested, remove the stems and let them air-dry for a few days out of the sun (I use wire shelves), until the outside husks turn dry and papery. I set aside the largest untrimmed cloves for re-planting.
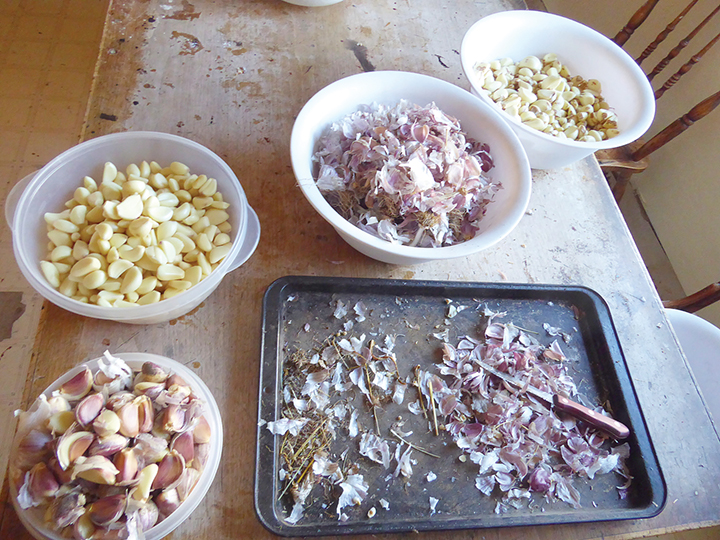
The next step is to peel and trim the garlic. Because we grow so much, peeling and trimming can take several days. Personally, I find it a soothing pastime, akin to doing puzzles or knitting. I like to peel and trim garlic in the shade of the barn where I can watch cows and chickens as I work.
However, there are faster ways to peel garlic. To peel one clove at a time, whack or press the clove with the flat of a knife. Alternatively, slip a clove of garlic inside a flexible silicone or rubber tube, and rub the tube back and forth.
To peel an entire head at once, whack the whole head on a hard surface to loosen the cloves. Put the cloves — skins and all — into a metal bowl with a metal lid (or two metal bowls held together) and shake vigorously for about 20 seconds. The hardness of the metal bangs the cloves around and removes the skins.
Canning garlic
After the garlic is peeled, wash any cloves with clinging dirt, then start running the garlic through a food processor to chop it up. Depending on the size of your harvest, this may have to be done in batches.
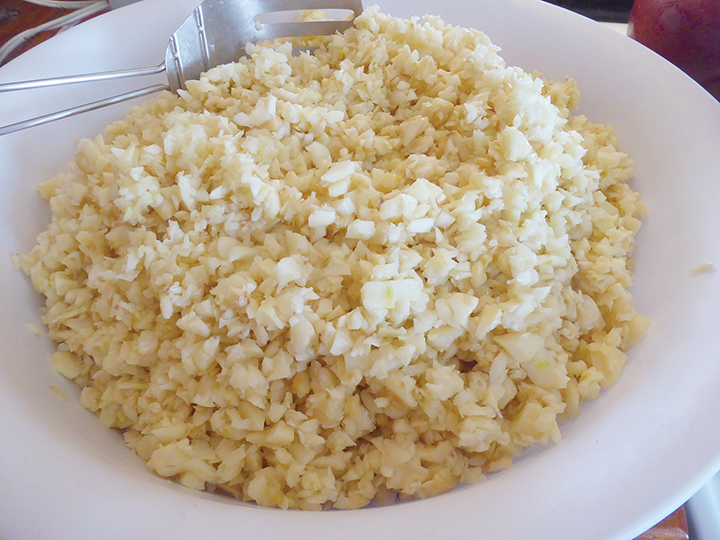
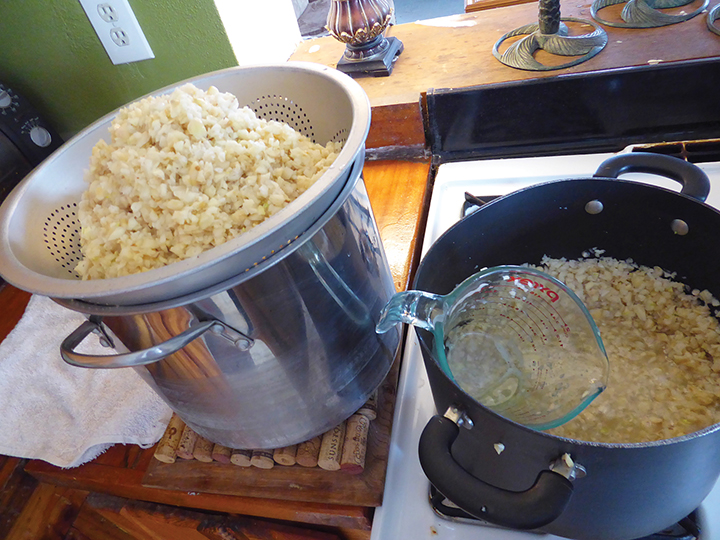
Once the garlic is chopped, it must be parboiled. To do this, boil a large pot of water, turn off the heat, and dump in the chopped garlic for about 10 minutes.
While it heats, get the canning jars ready. As mentioned before, since garlic is low-acid, it must be pressure-canned. Drain the garlic, making sure to save the cook water. Fill the jars with the minced, drained garlic, then fill the jars to within half an inch of the top with hot cook water. Wipe the rims, put on the canning lids and rings, and process in a pressure canner at 10 lbs. pressure for 30 minutes (pints). Don’t forget to adjust the pressure for your elevation.

It’s blue!
When you take your garlic out of the canner, you might find it turned blue, green, pink, or brownish in color. These colors might be shockingly bright, almost fluorescent. Despite its appearance, canned garlic of this color is perfectly safe to eat.
What causes the rainbow hues? The culprit is the allium’s enzymes and amino acids reacting with garlic’s sulfur compounds. The reaction causes various multipyrrole molecules to form. If you’ve seen green leaves, you’ve seen a multipyrrole in action — chlorophyll.
Some of the factors affecting the different coloration of canned garlic include age, acid, temperature, color, and copper.
• Age: Some sources say freshly harvested garlic, which has a high water content, is more prone to turning color. Other sources say the opposite.
• Acid: Adding an acidifier to garlic, such as lemon juice or vinegar, may sometimes (but not always) cause a color change.
• Temperature: Sometimes (but not always), parboiling the garlic in advance may cause a color change.
• Color: Garlic is not always white. Sometimes it has tinges of red or purple, and these colored cloves may be more prone to turning blue-green.
• Copper: Blue garlic may result from the sulfur compounds in the cloves reacting from copper present in the water, the utensils, or copper-rich foods. In this case, the blue stems from the presence of copper sulfate, not the presence of multipyrrole molecules.
This is all just a fancy way of saying, “Don’t panic if your garlic turns blue, green, pink, or brown.” It won’t taste any different.
A full pantry
It’s not unusual for me to can up 18 or 20 pints of chopped garlic for the season, enough to comfortably last through the year until the next harvest. One day, if we get around to building a root cellar, we’ll store some of the garlic, but not all of it. I find I prefer the convenience of chopped garlic.


Canning garlic recipes have been pulled from all reliable sources.
In my experience, a large 20 oz. jar from the grocery store takes years, if ever to go bad. I emptied my jar after a couple years, with nary a sign of going bad. Now adays I would question is it irradiated or have some kind of toxic preservative in it, so I’ve been growing my own garlic and dehydrating in the sun for a couple years making powdered garlic, for the same reason, that it’s easier to use right out of the jar. One-eighth teaspoon powdered equals one clove. Had never thought of canning it myself, but this is a tremendous idea! Thanks, Patrice. BHM has the greatest articles!
How long does an opened jar of garlic last for? I’m thinking that as a single-family household, I might want to can pint jars and plan on using it within 2 weeks of opening it, and refrigerate it once opened.