| Issue #137 • September/October, 2012 |

Queso blanco, sliced and ready for cooking
I have a strong interest in cooking and in local foods and I very much enjoy making my own breads, jams, and canned goods. I work one mile from an amazing local dairy that produces grass-fed Jersey milk and cream, and often wish I could have more locally-produced dairy products. However, I assumed that making dairy products at home was time consuming or difficult. One day a friend served me some delicious homemade crème fraîche and described how easy it is to make. I was astonished! It turns out that making some of our most common household dairy products is incredibly easy and very cost effective.
Homemade dairy products are not exactly like commercially produced dairy products in every instance, I have found that homemade products are superior! The texture tends to be thicker and creamier, and the homemade products are made without artificial thickeners or fillers. You can also control the amount of sodium added (if you choose to add any) and the amount of butterfat you wish to use.
This is also an easy way to add more local and/or organic dairy products into your diet in a very affordable manner. For example, in my area, a gallon of local grass-fed Creamline Jersey whole milk costs $4.25. A quart of whole organic yogurt costs around $6; therefore I save more than 80% by making my own yogurt at home because I can make four quarts of yogurt from one gallon of milk. The product is fresher, more natural, and I can re-use my yogurt containers indefinitely, saving the creation and recycling of hundreds of plastic yogurt containers. Similar savings can be had by making your own buttermilk and sour cream, and certain other easy-to-make dairy delights, such as crème fraîche and queso blanco, are even more expensive or difficult to purchase commercially.
The recipes I use require no special equipment other than basic kitchen pots, a strainer, and some cheesecloth. You will need to obtain some starter cultures to make your own sour cream, buttermilk, yogurt, and crème fraîche; however, these are easy to obtain via mail order and are not expensive. If you have a cheesemaking or winemaking shop in your area, they may carry these cultures as well.
I use pasteurized, un-homogenized Jersey milk and cream in my recipes because it is available to me locally. However, I have also tested these recipes with commercially-produced homogenized milk. I encourage you to experiment with whatever milk and cream is most local, fresh, and natural any of it will work in these recipes. It is a delight to note that milk from pasture-raised animals changes with their changing seasonal diet and the local weather conditions. This adds a sense of mystery to the process will the sour cream be as rich as last time? How yellow will the crème fraîche be this time? You’ll also have the added benefit of being in touch with the seasonality of your local food source. Embrace change, and enjoy the process.

Making Queso blanco — pour the curds into cheesecloth
Sour cream
Sour cream is the easiest and most spectacular homemade dairy product. It is more flavorful and has a better texture than commercial sour cream. It does not contain any extra thickening agents, so it behaves a bit differently in cooking or any recipe where it is melted; however, I have not had any problems substituting it in any recipe.
Gently heat one quart whole cream, half and half, or whole milk to 86° F. (On a warm summer day, I will simply set a quart Mason jar of cream in the sunlight until it is no longer cool to the touch). Add one packet of sour cream starter, and stir or shake well. Let sit at room temperature until the cream or milk has thickened; how long it takes will depend on the time of year, warmth of the room, and type of milk or cream used. It should take 24 hours or less. When the cream or milk has thickened, label, date, refrigerate, and use.
Buttermilk
Buttermilk is made by essentially the same process as sour cream: you simply add starter to room-temperature milk, and let the starter (bacteria) turn the milk into buttermilk. You can either use a purchased packet of buttermilk starter or buttermilk purchased from the store. Please note that the buttermilk must contain live cultures for it to work as a starter.
You can use whole or 2% milk to make buttermilk. If you are using a packet of buttermilk culture, you simply warm your milk to 86 degrees, then add the culture, and let it sit for 12 to 24 hours (again, until the milk thickens). If you are using buttermilk as a culture, use one cup buttermilk and 3 cups milk. Heat to 86° F (or let it sit in a warm sunny spot in your house), and keep at room temperatures for 12 to 24 hours (until the milk thickens). Label, date, and store in the refrigerator. Homemade, whole milk buttermilk has a thick, almost yogurt-like consistency; I usually stir or shake it before drinking. It can also be used in baking, or used as a culture to make other cheese products, such as crème fraîche. It will get more tangy as it ages.

Let the curds hang for an hour or two, until cheese is cool and solidified.
If you save the last cup of buttermilk from each batch you make, you will always have your prepared starter ready to go.
Crème fraîche
Crème fraîche is not common in most American kitchens, but is a versatile and delicious dairy product. It can be used as a substitute for yogurt or sour cream in many recipes. It’s delicious slightly sweetened and served with fruit, delicious drizzled on steamed vegetables, or stirred into mashed potatoes or macaroni and cheese. It’s lightly tangy, creamy, and very rich.
To make crème fraîche, stir 2 Tbsp. buttermilk (homemade or purchased as long as it contains live bacteria cultures it will work) into a quart of whipping cream or half and half. Let sit in a warm place in your home for 12 to 24 hours until the crème fraîche has thickened.
Yogurt
Gently heat a quart of milk to 186° F, stirring often. Let cool to about 115° F, and then add either 2 Tbsp. of plain yogurt (make sure it contains live active cultures) or one packet prepared yogurt starter. Place your milk/starter mix in a covered container, and keep warm for the next 12 to 24 hours. You can wrap the container in towels or blankets and put it in a cooler; place the covered container in a large box-style dehydrator set on low; place the container on a heated vent, register or heating pad set on low; or in a gas oven with a pilot light, or pour the milk/culture directly into a large thermos. Any means of keeping the yogurt gently heated will work. (You can also purchase special yogurt-makers of various sizes, shapes, and prices, and these are fine to use too.) When the yogurt has thickened and cultured, label and date it and store it in the refrigerator. As with the buttermilk starter, if you save the last few tablespoons of yogurt from every batch, you will always have prepared yogurt starter ready to use.

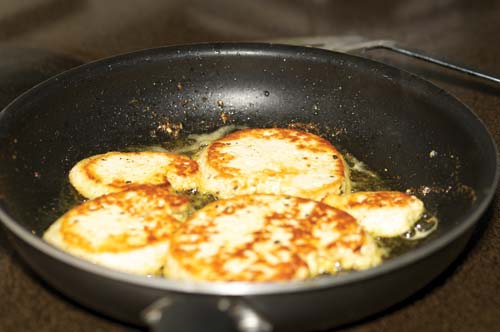
Queso blanco, sliced and pan-fried in butter
Queso blanco
Queso blanco is a fresh, bland cheese that is easy to make and is very versatile. It doesn’t have much flavor on its own, but takes up the flavor of any spices, seasonings, or foods easily. Crumble it into sauces and stews, or use it in place of tofu in stir fries. I love it cubed, fried, and added to Indian dishes, or often we will simply slice it, season it, and fry it. Delicious!
Heat one gallon of milk to about 185 or 190° F, stirring frequently. When temperature is reached, remove from heat. Add ¼ cup apple cider vinegar, a little at a time, until the curds separate from the whey. Pour the curds into cheesecloth, and let hang for an hour or two, until cheese is cool and solidified. Slice, cube, or crumble, and use! This cheese is best used within a few days.


