By Charles Sanders
It is crucial to maintain your chimney so that it will provide that good service safely and for many years.
Chimneys may be made of different materials, but one thing is certain, the need to keep the flue clean and functioning is mandatory.
When it comes to cleaning your chimney, the first question is usually this. How often does the chimney need to be cleaned? The only real way to know is to inspect it. During the peak of the burning season, every other month may not be too often to check your flue. If your chimney gets an accumulation of black, hardened creosote that is a quarter of an inch or thicker, it’s time to clean it. If the deposit is hard and shiny black, even a thinner layer should be removed.
A rule of thumb might be this, that if you are using your stove all winter long, it will need cleaning at least once a year, perhaps twice or more.
Burning good, seasoned wood of hardwood species will go a long way in minimizing the amount of creosote that is deposited on the inside of your chimney. Always gather your firewood a full season ahead if you can to allow for it to become well seasoned. Keep it covered, but allow air to reach it to speed and complete the drying process.

Checking the chimney
As long as we see a plume of smoke coming out of the chimney, it’s easy to forget that it needs an annual inspection and cleaning.
With continued use of your wood stove as a heat source, there will inevitably be some quantity of creosote and soot deposited on the inner walls of the flue. Without a good cleaning, those deposits can build up to where they will eventually ignite and create the wood burner’s nightmare — the flue fire.
If you are, indeed, using your wood burner as your primary heat source, then checking and cleaning the flue every couple of months isn’t too often. Checking your chimney isn’t necessarily difficult, although it is dirty work, and will require some climbing. If you are not comfortable doing your own chimney inspection and cleaning, I suggest contacting a local chimney technician to do the work for you. If you decide that you want to tackle the job, here are some tips to help make the chore go easier.
Tools needed:
• ladder
• any tools needed to remove your particular chimney cap
• chimney brush and either ropes or rods for the brush
• closures for the lower flue opening
• bucket and ash shovel
• flashlight
• goggles
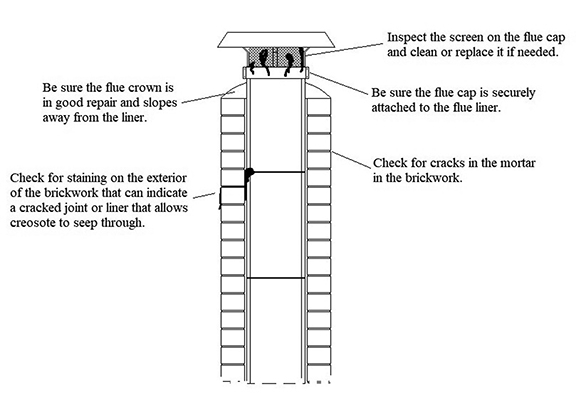
You will need to do a visual inspection of the chimney, top to bottom, inside and out. Check the exterior for black stains that can indicate seepage of creosote through the liners and bricks. That is a heads-up that you may have a cracked liner or mortar joint. If that is the case, you may need to contact a professional to assist with the repairs.
Inspect the flue cap. The flue cap is a removable cover that serves two purposes. First, it keeps most of the water from getting into your flue. Second, it should have a screen that keeps birds and animals out. The screen can also help to keep any stray embers from escaping and causing a fire outside. Check the flue cap and clean, repair, or replace any nuts, bolts, or screen that might need it.
Check the flue crown. It should be sound, not cracked, and slope outward towards the outer edge of the flue. If it is cracked or chunks of it are gone, water can be seeping down into the innards of your chimney. Over time, freezing and thawing of that water will cause cracks and damage to your chimney. That is a primary reason to have a good flue cap and crown in place on your chimney.
Shine your light down the inside of the flue. Look for nests of birds such as chimney swifts or starlings, and those of even raccoons … yes, raccoons! They’ve been known to take up residence in a chimney that is not in use. A nest of raccoons can cause serious restriction in the airflow of a chimney.
After clearing any critters or loose debris out of your chimney, check it for other restrictions or blockages such as soot, ash, creosote, or pieces of brick or flue liner. If you see more than a quarter inch of creosote buildup on the inner surfaces of the flue, it’s time to clean it.
Prepare to use your chimney brush to give the flue a good scrubbing inside. I’ve had the best luck with a square flue brush and sections of fiberglass handles that thread together. Start by attaching a section of rod to the threaded end of the brush Be sure that the section is threaded on tightly — you don’t want it coming apart halfway down the flue! Shove the brush and rod down as far as you can. Thread on another section of rod and repeat. Keep doing that until you reach the flue at a point below where the stovepipe enters.
Then, pull the whole rig out and shove it all the way back down. I repeat this, scrubbing the flue a dozen or more times. Each time the brush travels up and down the inside of the flue, it is scrubbing out loose particles of soot and creosote. That debris will accumulate in the bottom of the flue where it can be scooped out via the ash door at the bottom of the chimney, or by vacuuming it out for disposal.
As you pull the brush out for the last time, detach the sections of rod as they come along. Once it’s all out, allow the fine ash particles to vent out, then use your light and give the inside of the flue another look. Check for any debris that might have been missed, and for any cracked or chipped liners that might have been missed in the initial inspection.
If you choose to use ropes instead of fiberglass rods on your brush, you will need to use two people if you don’t want to climb up and down the ladder a dozen or so times. Attach a rope to the ringed end of the brush. You will also need to purchase a pull ring that threads onto the brush where the fiberglass handle normally attaches. They are available at most hardware stores that sell brushes, rods, and so forth.
You will also need access to a flue opening on the lower end. This is usually done by removing the stove pipe and using that opening to pull the rope through. If you have an ash door at floor level, you can also use that opening and not have to move the stove pipe.
Start by attaching a rope to each end of the brush. Drop one end down so that your helper can pull the brush down. Once it has reached the bottom, it’s your turn. Pull the brush back up through the flue. Repeat this as many times as needed to scrub the flue clean. Inspect the finished product as noted above, clean up your mess, and set the stove back in place.
While you are up on the roof, be sure to check the area where the chimney comes through the roof. Inspect all of the flashing and sealant around the area to be sure that rain and snow are not getting into the inner structure of the home. If you see areas that need repairing, do that before beginning your heating season. I’ve used caulking or black roof-tar type patching to help keep things sealed and dry around the flue.
If your chimney isn’t drawing properly, first check for obstructions in the chimney. If any are present, remove them before resuming use of the stove.
There are some times though, especially in newer homes, that there may simply not be enough air getting to the stove to allow for a good draft. If you suspect that is the case, just crack a window and see if that takes care of the problem.
Once in a while, especially during periods of high winds or storms, you may get a puff of smoke belch out into the living area. That is usually caused by a downdraft and should be very temporary. If it continues or is frequent, you may not have the chimney extended high enough around the adjacent area of the roof.
Preventing flue fires
The buildup of creosote and soot can restrict the airflow in a chimney until it will hardly draw. More importantly, the buildup of these materials creates a tremendous fire hazard in your home.
It’s been said that the sound of a flue fire resembles a train going through the house. I can personally attest to the fact that a flue fire is a roaring, frightening episode that you never want to happen.
If you do experience a flue fire, the first thing to do is to close off the stove as completely as possible. This will help to restrict the airflow to the burning creosote and help to cause the fire to die down.
Keep a fire extinguisher handy in case things really get out of hand. And have a garden hose to water down the roof to prevent the sparks that will be spewing from the flue from igniting the roof or adjacent areas.
I am familiar with a product available that the manufacturer claims will aid in extinguishing a flue fire from the stove end of the blaze. It is called Chimfex (www.chimfex.us). This product is similar to a road flare in that it requires the user to light it and then toss it into the stove. Chimfex reduces the oxygen level available to the fire and helps to drop the temperature in the stove and flue as well.
It’s a good idea to have one or two of these on hand — just in case.
Do not vent more than one stove into one chimney. Doing so can cause ignition of unburned gases from one stove by sparks from the second unit.
Do not use a flue of a size larger than needed. A good idea is to use an 8×8-inch flue liner for a wood stove that uses a six-inch pipe. An 8-inch pipe should be vented with a 10×10-inch flue.
Wood burning essentials
According to the Chimney Safety Institute of America (www.csia.org) there are several important things to remember to operate your wood burning stove safely.
1. Inspect the chimney annually. Have a qualified chimney service technician inspect — and clean, if needed — your chimney. This will reduce the risk of a chimney fire or carbon monoxide poisoning due to creosote, or a damaged or clogged flue.
2. Clear the area. Keep tree limbs or other objects at least 15 feet from the top of the chimney.
3. Install a chimney cap. These screened covers will help keep debris, birds, and animals out of the chimney.
4. Use the right fuel. Good wood makes a good fire. Use well-seasoned wood in your stove to reduce creosote buildup and maximize heat production. Your firewood should be well seasoned by cutting and splitting it at least six months to a year ahead. It should be kept dry and under cover.
5. Don’t stack wood or other material too close to the stove. Keep combustible materials such as wood, paper, or cloth at least 36 inches away from the stove.
6. Install smoke and carbon monoxide detectors. Mount them throughout the house.
7. Consult a professional. The CSIA is the accrediting organization that trains and certifies chimney sweeps. They recommend that you use the services of one of these certified professionals to inspect your chimney. They know what to look for.


