 |
|
| Issue #125 • September/October, 2010 |
At the turn of the 19th century, most country homes had a walk-in pantry, as well as a root cellar for keeping vegetables and fruits. This pantry contained the essentials for daily meals. Today we have walk-in closets to hang all our clothes, but no pantry. How times have changed!
Everyone should have a pantry containing a good supply of the foods they use most frequently. A well-stocked pantry is not only the foundation for a good kitchen, but it is essential to a family’s well-being, should some unforeseen calamity pop up. I have two years’ worth of food stashed away in my basement pantry. All that food sure came in handy the first year we were here on our new homestead. Not only did my small garden freeze out on July 27th, but suddenly Mom and Dad came to live with us in “camping” conditions, doubling our food consumption when we were all broke.
Convenience is another very good reason to keep a well-stocked pantry. I seldom need to run to the store to buy an ingredient for a meal. Everything I need is already handy at home. Just think of all the gas and time I save.
Many foods, including flour, sugar, store-bought and home-canned canned goods, rice, dry beans, pasta, etc., stay good for years, with no special treatment other than keeping them dry, insect and rodent-free, and relatively cool.
|
I can already hear you: “Two years worth of food! Where will I keep it all? I can’t afford to buy that much! I’m new to homesteading, gardening, and canning…it will take me forever to fill my pantry!”
What I do is stock up on things when they’re on sale. For instance, when brown sugar was on sale for 99 cents a bag a couple years ago, I bought two dozen bags. Brown sugar is now more than $2 a bag, but I still have a whole lot, so I haven’t needed to buy any. Just look at the money I saved, plus the convenience of having it in my pantry any time I get an urge to make cookies or other goodies!
I always buy more than one food item. If I need yeast, I buy two one-pound bags, freezing one for long-term storage and keeping one in a jar in the fridge to use now. I can buy a pound of yeast for only slightly more than a few packets of “regular” baking yeast at the store. This way the cost is kept down, and I’m assured of having plenty when I need it.
Where do I put a pantry in a house with none?
|
I have lived on homesteads where I had to get a little creative in order to plan for a pantry. Our little cabin in Montana hardly had room for our wood kitchen range, let alone a pantry. We knew we would be snowed in for at least five months out of the year, so we needed a large pantry. The easiest remedy for our situation was to add on to the cabin. Using log rafters and other materials scavenged from the local dump and bought inexpensively, we added a kitchen and pantry to the existing cabin.
In New Mexico, we moved into a small old house in the middle of the high plains. The whole house didn’t even have a small closet, but there was a back porch we didn’t really need. I blocked up the window to keep it cooler and darker, then built shelves on all three sides. It worked great, and was directly off the kitchen, to boot.
I have several friends in southern states who have no basement or root cellar, but they do have air conditioning or a swamp cooler, so they turned an unused, small room into an effective pantry. Any time you turn an unused room into a pantry, it’s a good idea to at least pull heavy drapes over the window to keep out the sun and heat. (And it’s probably a good idea that every passing Tom, Dick, and Harry doesn’t know how much tasty food you have right inside that window.)
How large does a pantry need to be, anyway? Well, obviously, an apartment dweller can’t have the ultimate pantry of a farm kitchen. But with a little creative thinking and planning, you should be able to add a pantry somewhere. I’d suggest using an existing closet or shelving unit, or building a free-standing cabinet with double doors that you can fit through the door and take with you, if you move. Even a modest pantry is oh-so-handy and sure cuts down on trips to the store.
Think about the wasted space in your home when you are designing a pantry. When we were building our log home, we were getting ready to sheetrock the basement stairwell. I looked at the area at the head of the basement stairs and suddenly the spaces between the studs looked like a perfect place to add little shelves. Now I not only have my big downstairs pantry, but I have my little pantry right off the kitchen where I keep cans, baking soda, baking powder, corn starch, salt, yeast, dried herbs, spices, and so much more. It’s simply amazing how much I am able to house on those narrow shelves.
Another often-overlooked possible pantry location is underneath a stairway. We recently built shelves under our basement stairway to hold bulky dry goods. This freed up loads of space in my kitchen.
Building pantry shelves
One night, long ago, I was awakened by a horrible CRASH from the basement. I rushed downstairs and saw that my metal shelving unit, which previously held lots of my home-canned pickles and tomatoes, had collapsed and dumped all those jars to the cement floor. Needless to say, many jars were broken, the food was wasted, and I had a huge mess to clean up.
|
Be smart and learn from my mistake. Build your pantry shelves out of two-inch-thick lumber. I’ve used one-inch rough sawn lumber, but even that will sag under the weight of full canning jars over the years. Likewise, store-bought bookshelves and metal storage shelves will all sag dangerously after a few months.
To build your shelf supports, nail pieces of 2×4 across two upright 2×4 or 2×6 legs. It should look like an “H” but with a crosswise piece for every shelf. Make two identical supports this way, one on each end of the pantry. I build both ends at the same time, using a level to make sure my measurements are level, before nailing the support pieces in place. My big pantry is 12 feet long, so I’ve got an extra support in the center. Twelve feet is just too long a span, even using two inch thick lumber. The “legs” keep my filled shelves from sagging.
While you can make your pantry shelves any depth, I like mine to be about two feet deep, which is about as far as I can comfortably reach. Don’t make your shelves so deep that you can’t reach the food in the back; you do need to be able to access your food so that you can not only rotate your foods but access it easily, too. My deep shelves give me plenty of storage and let me keep my food in neat rows so I can easily locate it.
To determine the height of each shelf, I always measure a regular quart canning jar, and then add three inches. This lets me put any canning jarquart, pint, or half pinton any shelf, with room to maneuver. You can also store dry goods, such as salt boxes, store-bought canned goods, boxes of macaroni and cheese, cake mixes, etc. on them. When in doubt, just measure what you would commonly store, then add three inches. You might want to make some shelves a little higher, to allow for taller items such as ketchup bottles, olive oil, vinegar, pancake syrup, etc. I left lots of room on my top shelves so I could put twelve-packs of toilet paper and other large, light, bulky things up there. To access those higher shelves, I have a two-step step stool, which is kept right under the bottom pantry shelf so it’s always handy and right there when I need it.
I always leave space along one wall for a whole row of garbage cans. In those new garbage cans, I store my bulk dry foods such as flours, popcorn, sugar, rice, brown rice, noodles, etc. The garbage cans protect the foods from moisture and insect or rodent damage. This is very handy and a garbage can holds a lot of dry food! Much of the dry food stored in these cans is kept in the original bags for added protection.
What should be in my pantry anyway?
|
I would advise you to first fill your pantry with basic foods and ingredients that you frequently use. Equipping a pantry is best done in steps, not going “whole hog” and buying thousands of dollars worth of “emergency” food. If you don’t yet can your own foods, start picking up cans of vegetables and fruits as they come on sale at your local market. If you need one can of corn, buy six. If you can’t afford six, at least buy one more than you need today.
Start socking away basic dry cooking ingredients such as flour, cornmeal, sugar, brown sugar, powdered sugar, instant dry milk, rice, noodles, rolled oats, beans, split peas, macaroni, baking powder, baking soda, salt, commonly used spices, corn starch, yeast, etc. With the basics, you need very little extra to whip up many tasty recipes. I always buy on sale, and having a well-stocked pantry lets you wait until an item is on sale before you re-supply. What a savings!
Don’t forget shortening and cooking oils. Not only do you fry foods with these, but they are often found in common recipes such as pie crusts, bread, biscuits, etc. Baking ingredients such as chocolate chips, cocoa, coconut, vanilla, raisins, walnuts, etc., are always much appreciated on the pantry shelves. Likewise, peanut butter, jams, and jellies are too. Not only can you eat them, but you can make peanut butter cookies, jam filled bars, thumbprint cookies with a dollop of jelly in the middle…
Such things as “cream of” soups, such as celery, mushroom, and chicken are handy, not only as soups, but as casserole ingredients, so they are easy pantry choices.
Stores often will have “truckload” or “stocking up” sales in the late summer, featuring canned fruits and vegetables. Sometimes buying by the case offers additional savings; ask the manager at your local market.
Canned tuna, roast beef hash, salmon, and ham, are also handy meat-based foods that can periodically be bought on sale. You’ll also find plenty of uses for canned spaghetti sauces and tomato sauce. (I use my own home canned spaghetti sauce and tomato sauce for plenty of recipes, including Italian chicken breasts, pizza, Spanish rice, bread sticks with marinara sauce, and Swiss steak.)
Don’t forget cake/brownie mixes. They are often very cheap and provide a quick dessert. They also keep very well on your pantry shelves. One thing you’ll notice is that I recommend very few other mixes or other prepared foods for the pantry. There are two reasons for this. First of all, my recipes always taste better! And second, those pre-packaged mixes are always much more expensive than more-or-less made from scratch recipes. (You’ll remember that not only are we trying to have plenty of food on hand, but are trying to save money, too!)
Don’t forget to add things such as bleach, laundry and dish detergent, toilet paper, and pet food to your pantry. Although not “food,” they will all come in handy.
As you get more involved and enthusiastic about your pantry, it’s time to consider buying a few long-term storage foods such as powdered eggs, cheese, shortening, buttermilk, sour cream, butter, and margarine. These foods come in a #10 can (about the size of a three-pound coffee can), and when unopened, last for years and years. To use them, you either just add the powder to a recipe, slightly increasing the liquid, or add water/vegetable oil.
These foods are available through many emergency preparedness companies such as Ready Reserve Foods (www.readyreservefoods.com) or
Emergency Essentials Inc. (www.BePrepared.com/store). I always keep some of these dehydrated foods in my pantry and find that they come in handy in so many different recipes. I even make up my own mixes, using these dried ingredients. It saves me tons of money and time to have them on the shelf all the time.
|
Keeping your pantry foods safe and tasty
There are four things that can cause food in your pantry to lose wholesomeness and flavor: extreme heat, moisture, rodents, and insect infestation. Where most stored foods will remain good for 10 years or more (much more for canned goods) if stored in temperatures of 60 degrees or less (but above freezing for canned goods), they can rapidly lose long-term storage ability when exposed to temperatures of 80 degrees and higher. So it’s always best to keep your pantry cool, yet above freezing.
As with heat, moisture, either due to condensation, flooding, or a wet basement, can quickly turn your pantry into a sorry mess of molded and inedible food. In my old Minnesota homestead, my pantry was in an old, rocked up basement. It was very damp in the spring and winter. My canning jar lids would even begin to rust. I cured the problem by using a wood stove to heat it during the coldest part of the winter (wood heat is quite drying), and ventilated it with a box fan during the spring and summer. End of trouble.
I also installed a sump pump with an automatic switch, which pumped out the excess water from our basement sump. Before this, it often overflowed, wetting the basement floor, which greatly contributed to damp conditions in the pantry. Coupled with the wood heat and ventilation, I had no more dampness in my pantry.
Given the smallest crack or hole, mice can and will get into your pantry, drawn by tantalizing food smells, especially from foods that are not stored in stout containers. Such foods as powdered sugar, flour, cornmeal, and popcorn are huge temptations for rodents. They will quickly climb up onto your shelves and chew holes in any available plastic or paper bags and gorge themselves on your hard-won foods. I’ve even had them chew holes in my jams and jellies when I used old jelly glasses, topped with melted paraffin, instead of more secure two-piece canning lids, helping themselves to our family’s winter treats.
It’s bad enough to have them eat the food, but they poop in it too, completely ruining the whole works. Talk about impolite critters!
Sometimes determined (or very hungry) rodents will even chew through plastic storage containers to gain access to food. I had mice do this in my pantry, way up in the mountains in Montana one fall and winter. We had a mouse invasion that year and I lost a lot of food that was kept in plastic ice cream buckets or plastic gallon jars. Thinner plastic, such as found in ice cream pails, is easier chewed into than heavy plastic like five-gallon buckets. I can’t remember ever having a plastic 5-gallon bucket chewed into.
One vital addition to my pantry is a set of good old-fashioned mouse traps. In the fall, I “run my trapline,” setting several baited traps along the floor and any open shelves. We have made a very concentrated effort to close up the house against invasion. We close up all small cracks or holes we find with caulking and spray insulation foam. But, slowly, we’ve gotten rid of our mouse problem. A good hunting cat also helps. Mom’s old 17-year-old cat, Monty, is an enthusiastic and effective hunter and he ranges all over the house and yard.
|
What we use to store various foods
I store my jars of home canned foods in rows on my big pantry shelves. Below these shelves, I have several garbage cans with tight fitting lids, in which I have bags of flour, sugar, wheat to grind, popcorn, rice, and other bulky dry foods. I also have five-gallon buckets with gasketed lids, each labeled for such foods as brown rice, chocolate chips, navy beans, black beans, lentils, Jacob’s cattle beans, powdered sugar, brown sugar, kidney beans, etc. When possible, I leave these foods in their original bag for added protection.
Along one wall, under my jars of canned food, I have plastic bins with lids which hold my potatoes and carrots. Mesh bags of onions hang from the rear pantry shelves, handy, but out of the way. In open bins, I store rutabagas and cabbage. As squash and pumpkins like a warmer storage area, I usually store these in a knee-wall storage area in our bedroom, also in bins. In the colder basement, they often get soft and go bad sooner.
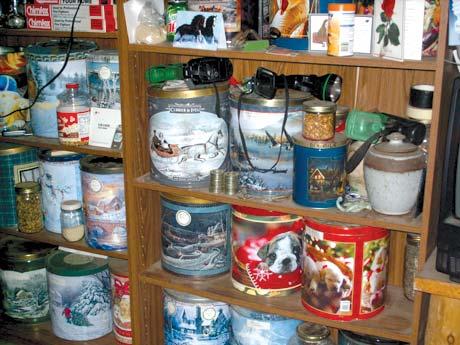
In my kitchen I keep colorful popcorn tins full of the dry foods I use most often: spaghetti noodles, macaroni, large and small egg noodles, sugar, flour, whole wheat flour, rolled oats, brown sugar (which is in a tight glass gallon jar inside the tin), cornmeal, masa harina de maize (corn flour), chocolate chips, and so on. These tins are great as they not only protect these mice-attractants but also look great too. And they hold a lot of food.
Rotating your foods to keep them from growing old
Although most foods in your pantry will keep fine for years, it’s a good idea to rotate the food you are using so you use up your older foods first so they don’t get so old that they lose flavor and nutrition. I just periodically go through my pantry, moving the back jars/containers to the front, like they do in the grocery stores. It’s really best if you jot down the year on the container, but it seems I’m always so busy that doesn’t get done. However, if you write the year on the container or lid with a permanent marker, you’ll know exactly how old the food is and know which containers to use up first. I bring the older containers of food upstairs to my little pantry, where it is real handy at mealtime. I find it gets used much faster than if I have to go all the way downstairs to the big pantry to use it. And seeing it often reminds me to cook with it soon.
I hope that you, like me, discover how much money you’ll save, how handy a pantry full of food is, and how good it feels, knowing you and your family can always eat well, by simply reaching onto your well-stocked pantry shelves. Stocking your pantry is always money and time very well spent.











cc: I agree. Also, put your shelves a bit off the floor. The lowest shelf should not be directly on the floor if in a cellar. Allow for ventilation underneath. Heaven forbid you should have water on the floor, too! You may want them barely high enough to sweep under with a wide broom.
Oh, oh, oh, it’s so fun reading all these articles! I’m new to Backwoods, and find all this experience so fun to learn from. I like to can, and am drying quite a bit of vegetables this hot summer, here in northern California. God bless ya’ll!
I’m a little late to the party (ok, a lot late). We have just built a tiny cabin to use as a weekend place, then live there full time when we retire, so I looked at this to help know how to stock it for weekends. Helpful information. I especially love the popcorn tins! I use those for all kinds of things. I showed my husband the picture and said you were my spirit animal!
I is also a good idea to put an small rim in front of your shelves. It lessens lost due to earthquakes or other major storms.
This was so helpful! Thank you!!!