By Linda Gabris
Attempting to can meat (or any other low acid food, for that matter) without the use of a pressure canner is every bit as foolhardy as arming up with the wrong gun for your chosen quarry … sort of like going after grizzly with a .22 rifle!
Most old-timers like my grandma never heard of pressure canners so they used the boiling water bath method to can jars. I’m thankful that we never got sick eating Grandma’s canned goods. The highest temperature a boiling water bath canner can reach is 180° F, which is considered safe for canning high acid foods like fruits, jams, and jellies. For processing low-acid foods, only a pressure canner can reach the internal temperature of at least 240° F, which is required to kill botulinum toxins.
If you’re not familiar with pressure canners, don’t confuse them with pressure cookers. Pressure cookers are strictly meant to be used for making fast suppers. Pressure cookers are not designed to reach high enough temperatures or maintain the adequate pressure needed for safe canning.
Pressure canners, on the other hand, are made especially for the purpose of canning low-acid foods and come in various sizes from around 10 to more than 40 quarts. The size refers to the capacity of the pot — not how many jars it will hold. For instance, a 10.5 quart canner will process up to four quart jars or seven pint jars in one session.
There are two main types of pressure canners: dial-gauge and weighted-gauge. You can read the pressure on a dial-gauge model and thus control it by either turning the temperature up or down to raise or lower the heat as needed. A weighted-gauge regulates pressure inside the canner and automatically releases any pressure above the desired amount.
The plus side of a weighted-gauge model is that they do not need to be periodically tested for accuracy as does the dial-gauge model. The disadvantage of a weighted-gauge model is that people who live at altitudes above sea level have to process their foods at a higher pressure.
Pressure canners can be expensive but are well worth the investment for the peace of mind they afford knowing you’re doing it right! They have a very long life when properly cared for and maintained. I have a dial-gauge, 15½-quart canner with the old-fashioned “petcock” on it that is more than 20 years old and it is still in top working condition — perfect for canning smaller batches of food. I also have a 30-quart newer model with the weighted pressure regulator that allows me to can a larger batch in one session.
After a few canning seasons, you may notice your canner has some water discoloration marks on the inside of the pot. These are not harmful in any way but they can be removed by putting ½ cup vinegar per quart of water — ensuring you have enough to reach the discoloration marks, into the canner and boiling uncovered for about 15 minutes. Always wash and dry well before storing. I store mine with a folded tea towel inside the canner which absorbs any moisture that may be present.
If your canner is a dial-gauge model you should have the pressure gauge checked out periodically (your manual will suggest how often) to ensure it is in good working condition. Some manufacturers do this test for free. You can also buy a special pressure-reading kit or contact your area’s county extension office to see if the test can be done locally.
If you have a ceramic or glass top stove, you may want to think twice about pressure canning on top of it. Some manufacturers of these types of stoves do not recommend using a pressure canner on them. Even though some folks claim they have canned on their ceramic stovetops with no ill effects, if you fear damaging your stove, you can buy an electric hotplate or burner and use it for canning. These are relatively inexpensive and free up the stovetop for other purposes.
All models of modern-day canners have built-in safety features that release steam if the pressure builds up too high inside the pot — ridding the anxieties that revolved around older models that were feared to explode under too much pressure; one of the reasons why, no doubt, some folks still shun the idea of pressure canning.
You must use approved canning jars. Home canners today are lucky because canning jars are easy to come by and quite affordable, especially if you hunt them down at yard sales and thrift stores. Before using, make sure your jars are free of nicks. With each use, they must be fitted with new two-piece, self-sealing lids, which can be bought at hardware and grocery stores. Outer bands can be reused if they are not bent or rusty but never attempt to reuse the inner lids. Those old jars of Grandma’s with the glass lids, rubber seals, and wire bales cannot be used — but they’re still great for storing tea leaves and other dried goods.
Round up your jars on canning morning, taking into consideration whether you wish to fill pints or quarts. Wide-mouth jars are better-suited for large or chunky foods, because it’s easier to pack the food in and to empty the contents out upon using.
Wash jars in soapy water, rinse, and scald with boiling water. Set aside until ready to load. There is no need to sterilize them first because they will be sterilized along with the food during the canning process. Make sure you have purchased new inner lids for the jars and read the manufacturer’s instructions as some call for soaking the lids in hot water before using, while others do not.
I still live by Grandma’s old motto, “Meat can only come out of the jar in as good shape as it goes in,” meaning you should only process top-quality meat. Don’t expect to salvage dirty or tainted meat by canning, as the process cannot rescue it.
However, pressure canning can be a wonderful cure for tougher meat from a mature animal such as a trophy bull moose or a big old bruin, helping to break down fiber which renders the meat more tender.
Meat must be trimmed of all shot damage, gristle, and excess fat (which tends to get rancid in the jar rather quickly). If processing frozen game, thaw first in the refrigerator.
Canning is a delicious way of using up those lingering packages of last year’s game (and other meats) before they expire their prime shelf life of one year in the freezer while at the same time making room for the new bounty you hope to bag.
Two methods for packing food into jars
There are two basic methods of packing food into jars for pressure canning. One method is called raw-pack which means the food is packed into the jars raw. The other method is known as hot-pack, meaning the food is cooked or partially cooked before it’s loaded into the jars. The recipe you use should specify which method works best for that recipe.
Headspace
No matter what the recipe is, you will always be advised to leave at least ½-inch (some recipes may state 1-inch) headspace, which means that you should not pack the food all the way to the brim of the jar. Leaving headspace ensures there will be ample room for the food to expand upon processing.
Raw-pack canned venison
As a general rule of thumb, allow about 2½ pounds of boneless meat to fill a quart jar. Again, this amount can vary depending on the size of the cubes or strips you cut and how tightly you wish to pack them. I like to pack mine fairly tight or else I find there will be empty space in the top of the jar upon settling.
Cut fresh or thawed meat into uniform-sized pieces — cubes, chunks, or strips. Pack the meat into jars, leaving headspace. Sprinkle one teaspoon (more or less to suit taste) curing or pickling salt into each quart sealer or ½ teaspoon per pint. Regular iodized table salt can be used but a chemical reaction may cause a “clouding” effect in the jar. Salt is added strictly for flavoring (not for preservative purposes) so you can omit it, if desired. A pinch of coarse black pepper is also nice.
You can get a little creative if you wish by spiking each jar with a clove or few slivers of garlic, a bit of chopped or dehydrated onion, a pinch of chili pepper flakes, or whatever tickles your fancy but do keep in mind, spices and herbs tend to get strong in the jar, thus use sparingly so they don’t overpower your food.
For this recipe, you do not need to add any liquid to the jar. The meat will form its own juices upon processing. Follow the directions at the end of this article for preparing the filled jars and processing.
Serving suggestions
Add leftover cooked or canned vegetables to the meat, thicken, and you’ve got a hearty stew. Empty it into a casserole dish, top with a pastry lid or mashed potatoes and bake for a super quick supper pie. Or, simply heat up a jar, thicken the gravy, and ladle it over crispy garlic toast for a delectable hot venison sandwich that’ll do any hunter proud.
Raw-pack venison stew (with vegetables)
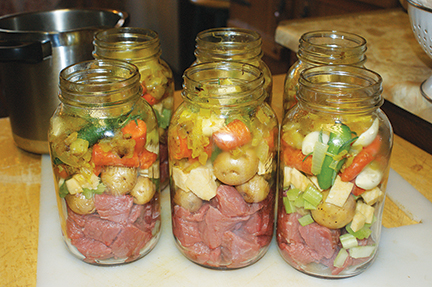
This recipe is very versatile — there are no exact measurements. You will need enough stew-cut meat to loosely fill each jar half full. As you layer the vegetables into the jar on top of the meat, it will settle down under its own weight, making room for everything else you wish to add. Of course, if you desire more meat and less veggies, or vice versa, that is fine, too.
So start by putting the meat into the bottom of the jars. Next, layer the jars with whole scrubbed baby potatoes or cubed potatoes, chunky cut carrots and turnip, diced parsnips, a bit of minced celery, and garlic cloves to suit your taste. You can add firm green peas, too.
Top each jar with a couple tablespoons of minced onions (I sauté them first and cool) or you could use a shake of instant onion flakes. Lastly, pour in stock, tomato juice, or water into jar, leaving headspace. Follow the directions at the end of this article for preparing the filled jars and processing.
Hot-pack ground browned venison
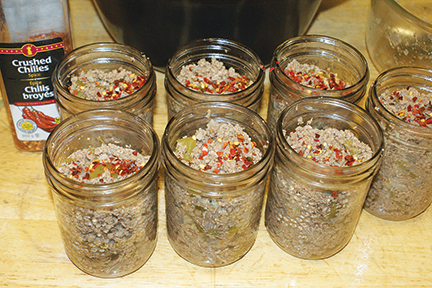
In my opinion, ground meat (game or domestic) is always best when browned first before canning as the browning instills a richer flavor. Keep in mind, this meat is very compact so you may wish to use pint jars which hold about 1-1½ pounds of meat. A quart jar holds about 2-3 pounds which I find is usually more than I need for a family meal.
First, lightly brown the ground meat. Put just enough vegetable oil in the bottom of a large skillet or Dutch oven to start the meat in. Sauté, stirring constantly, until it is no longer pink, working in batches if you must. I like to sauté some chopped onion, minced garlic, and diced sweet peppers along with the ground meat, but this is optional.
When all the meat is browned, put it into a saucepan and add just enough water to barely cover it. You want to simmer the meat down in order to render a rich broth, so don’t add too much water. Put a lid on the pot, reduce heat, and simmer 30 minutes. Season with salt and pepper to taste.
Strain meat through a sieve, catching the broth in a saucepan. Skim and discard excess fat (especially important if your venison was ground with pork or other domestic fat which will require more skimming). Fill the prepared jars ¾ full of the meat, then cover with the broth, leaving headspace. I like to sprinkle a few dried chili flakes on top of each jar. Follow the directions at the end of this article for processing.
Serving suggestions
I like to sauté some onions, garlic, sweet peppers, a jalapeño, and sliced mushrooms in olive oil until soft and then add a jar of this canned venison, a quart of tomato sauce, and a hefty shake of Parmesan cheese to make a delicious meaty spaghetti sauce. Or, heat up a jar of ground venison with a mess of cooked kidney beans and spice it up with some chili con carne seasoning mix. This can be served in bowls or as filling for hard taco shells. For appetizers, I like to fill mini tart shells with the drained meat (save broth for other use), top with grated cheese, and bake until bubbly — delicious appetizers that rack up big raves for my woodland bounty.
Hot-pack canned grouse or rabbit
Grouse and rabbit are delightfully tender upon canning and I find any recipe that is suitable for canned chicken is also suitable for grouse and rabbits. About a dozen of either makes about 6 or 7 pints, depending on their size and how tightly you wish to pack them.
I field-dress my grouse in whole bird fashion which means they have the legs, backs, and necks intact upon thawing. I cut these off and use them for making a rich stock to use in the recipe. However, if you practice the “breasting” method of field-dressing your birds (just saving the breasts) then you can use chicken stock.
I put the soup parts from the birds in a saucepan, add some diced celery, onion, carrot, a sprig of rosemary, garlic, and salt and pepper to taste, then simmer into a rich broth. Next, I strain the broth and pull out the parts that are too bony to put into the jars. (I sprinkle them with salt and pepper for a snack.)
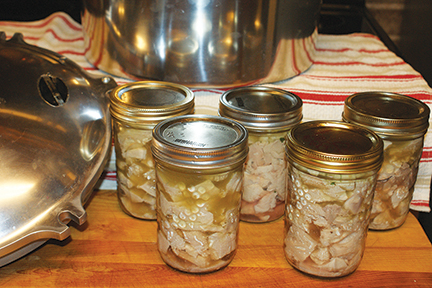
Put the whole grouse breasts (or if doing rabbit put the butchered pieces into the pan) and cover with lightly-salted water. Simmer until the meat is white on the outside and slightly pink towards the bone, about 12 to 15 minutes does the trick. It only needs to be partially cooked, not thoroughly done.
Strain the meat, discarding the cooking water. Set aside until cool enough to handle.
Using a sharp knife, cut the meat away from the bones. On grouse, run your knife down the breast bone on each side. De-bone rabbit similar to chicken. Cube the meat into uniform-sized pieces and pack it into jars. Cover with hot stock, leaving headspace. Follow the directions at the end of this article for processing.
Serving suggestions
I use canned grouse and rabbit for delicious toppings for salads and pizzas; a hearty base for casseroles and pot pies; fillings for chunky sandwiches, pitas, and enchiladas; and stuffing for manicotti and tortellini.
Processing
Prepare the filled jars
After the jars are filled with food — either raw or hot pack such as in the recipes above, always follow this procedure:
- Force out air bubbles by running a rubber spatula between the food and the sides of the jar.
- Dip a cloth in white vinegar and wipe the rims of the filled jars to remove any traces of grease or other foods that may be present and cause an improper seal. Hot water can be used but vinegar is a more reliable grease cutter.
- Center lids on jars and lightly screw on the outer bands. Do not overtighten them.
The jars are now ready to be placed in the canner and processed according to your canning manufacturer’s manual or using the guidelines below.
Load the canner
Pour 2 to 3 inches of water into canner (or amount advised in your own manual). Put canning rack in bottom of canner. Place loaded jars into canner. If doing two layers of jars, stagger those on the top rack so heat can circulate more freely. Lock down the lid.
Vent the canner
You must vent the canner. On new models you will leave the vent port uncovered. On older models you will manually open the petcock — stand it upright. Turn heat to high. As the water boils and generates steam it will escape through the vent port or through the petcock. When steam first starts to escape, set your kitchen timer for 10 minutes. Allow the venting to continue until the time is up, then place the weighted gauge (counterweight) over the vent port, or close down the petcock.
Processing and timing
Do not start timing until the pressure reading on the dial gauge indicates that the recommended pressure has been reached, or until the weighted gauge begins to jiggle or rock.
Dial-gauge canner: Process at 11 pounds of pressure, pints for 75 minutes and quarts for 90 minutes.
Weighted-gauge canner: Process at 10 pounds of pressure, pints for 75 minutes, quarts for 90 minutes.
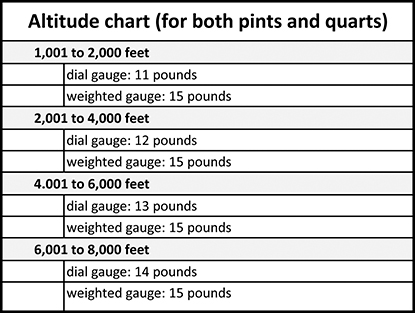
For pressure canning in regions above 2,000 feet altitude, make altitude adjustments according to your pressure canning manual or the chart below. If you are not sure what altitude you live in, contact your local weather station. Processing times, however, remain the same at all altitudes.
Clock exactly, never alternating the recommended time. When the time is up, turn off the stove and allow the canner to completely depressurize before unlocking and removing the lid.
Check canned jars for proper seal
Set jars on counter and let stand undisturbed for 24 hours. Some folks unscrew the outer metal bands and remove them from the jars and store them away for future use. Others leave the outer bands lightly screwed on the jars for storage. Do as you think is best.
The lid on a jar of properly-sealed food is concave, meaning it will be sucked down and curved slightly inward. These jars are now ready to safely store on the pantry shelf.
Any lids that spring back when pressed lightly with the finger, or those that bulge upwards indicate an improper seal and these jars of food must be refrigerated and used as soon as possible, frozen for safekeeping or, if you have several improperly sealed jars, they can be reprocessed for the full amount of time.
Properly-sealed jars of food can be stored on the pantry shelf for up to one year, but I’ve never had a jar outlive its due date yet. If you have a well-stocked pantry of home-canned goods, then be sure to label and date them so you can use up the older jars first.
Tips for safe eating
Here’s a few rules to follow to ensure safe eating of your home-canned goods.
- Before opening a jar, inspect it carefully. Check first for a proper seal (concave lid). Discard any jar that does not have a secure seal.
- Look for traces of leakage on the outside of the jar. If present, discard.
- If the jar has mold growing on top of the food, discard.
- Open carefully, watching for signs of bubbling over or spurting liquid. Discard if foamy or “working.”
- If you detect any off or unnatural odor, discard.
- Never taste anything that looks suspicious. When in doubt, throw it out.
- Take precautions to safeguard your pets from eating the discarded contaminated food. Never feed them food that is suspected of being spoiled. Dispose of it out of their reach.


