
By Michele Cooper

Making soap can seem scary to some people, but the truth is, it only takes a few steps.
Tools & equipment
The equipment you use to make soap needs to be only used for making soap, so look for equipment at a local thrift store to save money. You will need:
a few metal spoons
stainless steel pot (not aluminum)
2 microwave- and stovetop-safe glass or ceramic bowls
metal thermometer
stick mixer
digital kitchen scale
rubber gloves
safety glasses
paper towels
silicone soap mold
You will use the stainless steel pot to mix your lye and milk and the glass/ceramic bowl to mix your oils. Never use a glass bowl for mixing the lye with the milk — it is likely to break due to the extreme temperatures generated.
Although some of these things can be found at thrift stores, you’ll probably need to purchase a few items new. I had been using the instant-read metal thermometers, but just recently purchased a non-contact digital laser thermometer for under $25. Boy, is that easier and faster. I bought my stick mixer locally at Bi-Mart for about $10 on sale (label it clearly “only for soap”). I bought the digital scale on Amazon for around $15.
I get rubber gloves and safety glasses cheaply from the dollar store. They are essential; lye is very caustic and hurts like you-know-what if you get it on your skin and getting it into your eyes could cause blindness.
A couple of paper towels folded double are nice to have available to lay your spoons and thermometer on to protect your countertops.
You can find silicone soap molds online. My husband liked the one we found on eBay that had a little goat on it sniffing a butterfly.
Since you have to have quite a bit of soap-making equipment, this is probably not something you would want to just do one time. This is an investment that will make many batches of soap over many years.
Before you start
For years now, I have been making goat milk soap with the cold process method, so that the fats in the milk do not turn dark as they do in the hot process method. All of the goat milk soap I find for sale at the co-op and farmer’s market are made that way and all are dark tan or darker, but I just like my soap creamy white.
Cold process takes longer than hot process — you will spend about an hour and a half to make your soap — but a lot of that time is just spent waiting and watching. It is crucial that you ensure all ingredients stay below 100° F.
Again, lye is extremely caustic. Use safety precautions, and wear gloves and eye protection. Should you get it on your skin, make sure you have another sink you can stick the affected member into and run lots of water over it for several minutes. Do not wait to clear an area — have it ready to go, just in case. You do not need to have vinegar on hand to neutralize the lye on your skin; lots of running water will do just fine, and is not as painful as putting vinegar on a lye burn.
Ingredients
The recipe I am giving you is for 3 pounds of soap. It fits in my mold that is 15.5 inches long x 7.5 inches wide x 1.5 inches deep. If your mold is another size or you are making another amount of soap, you will need to adjust your recipe. To do that, you will need to find a recipe that has already been tested for the amount you need. You can also download a soap calculator onto your computer. I absolutely love the one at www.soapcalculator.com, which you can use for free for 30 days, then purchase for $20.
6.76 oz. (191.679 grams) lye (pure sodium hydroxide — not drain cleaner with aluminum in it)
several cups of ice cubes to keep the water in the sink cold
2 oz. (56.7 gm) palm oil
16 oz. (453.6 gm) coconut oil
6 oz. (170.1 gm) caster oil
24 oz. (680.4 gm) regular olive oil (not extra virgin)
1.5 to 2 oz. lavender essential oil, optional
18 oz. goat milk, frozen
a handful of lavender flowers, optional
Directions
While wearing long sleeves, gloves, and eye protection, measure out your lye into a dry glass bowl.
Into your oils bowl, place measured palm oil and coconut oil, and warm in the microwave or on the stove top just until melted or nearly melted. You do not want to get these too hot. Then add castor oil and olive oil and test the temperature. It will likely be above 80° F, so allow it to cool on your counter. If you are adding a fragrance oil or essential oil, you can add these to your oils as well at this time.
While the oils cool, put the frozen goat milk into your stainless steel pot and allow it to melt slightly, so that there is a tiny bit of melted milk with the frozen lump. Place the pot in a sink which contains an inch or two of water and several cups of ice. You do not want so much water that your pot will float and possibly dump over.
To the frozen slushy milk, sprinkle in about a quarter of the lye, and mix gently with a metal spoon. When done stirring, place the spoon onto a folded paper towel (to save your counter).
Check the temperature every 15 minutes, and as long as the temperature is below about 70° F, you can add another quarter of the lye and stir it in gently. If the temperature is higher than 70° F, keep stirring and give it a few more minutes to cool down.
After all the lye is added to the milk, wait a few minutes and check the temperature of both the lye/milk mixture and the oil mixture. If they are within 10° F of each other, it is time to turn them into soap. If they are not within 10 degrees of each other, you can either pull the milk/lye mixture pot out of the sink to allow it to warm slightly on the counter, or place your oils bowl in the ice water to cool.
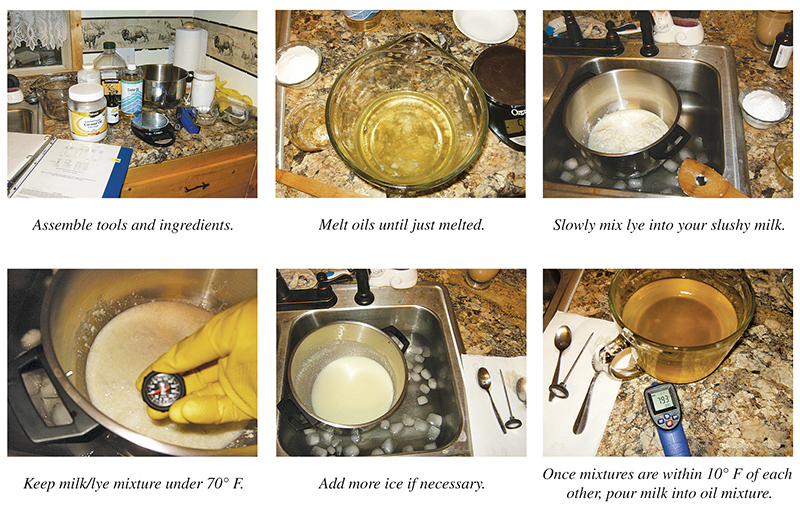
Once your milk/lye mixture and oils are within 10° F of each other (and both preferably under 90° F), you can pour the milk/lye mixture slowly into the oils, mixing gently with a spoon. Scrape the sides of the pot to make sure everything is mixed in, then use your stick mixer. Pulse for a few seconds, stir, wait a few seconds, and pulse again. Running the stick mixer non-stop could overheat your mixer and ruin it. You can mix your soap by hand, but it is a very long process.
Continue to pulse the soap until the oil is mixed completely with the lye/milk mixture. It should be uniform in color and look like a thin cake batter. You’ll know it is mixed enough when it comes to a light trace — when you drizzle some of your soap off a spoon back into your bowl, it will sit on top of the surface of the soap for a second and then sink back into the mixture.
If you wish to add lavender flowers, stir them in now, then pour the soap into the mold and shake it down lightly to level it. Once it is in the mold and somewhat level, place the mold in the refrigerator overnight.
The next day, allow it to sit on your counter for a few hours, then remove the now-solid soap from the mold. Once removed, you can cut it into individual bars.
After it is cut into individual bars, place it somewhere out of the way. I put it in the spare room closet on a cake cooling rack. It now needs to “cure” for three to four weeks before using.

Making soap for the first time was a little nerve-wracking for me. I didn’t have anyone to show me how, and I was a little confused about the process. Fortunately, I found some YouTube videos online. One in particular was called “How to Make Goat Milk Soap (and have it stay creamy white)” — and it was a three-part video series (www.youtube.com/watch?v=bdp4zy7b9Ag). After watching it a few times, I was mostly confident enough to give it a try myself, and it worked. After my first success, I was hooked, and have now taught a few other people how to do it as well.
To me, that is an important part of my homesteading experience — learning how to do things myself and then sharing that knowledge with others.


I just made this omgbits heavenly I love it
This looks awesome. can’t wait to try it!
I read the article and it done in such away that it is very understandable, to a beginner soap maker, or in fact anyone who is researching their milk soap process. Thank you
I really enjoyed how you presented making goat milk soap…very easy to understand …thank you!!☺️