| By Lee Greiman | |
| Issue #109 • January/February, 2008 |
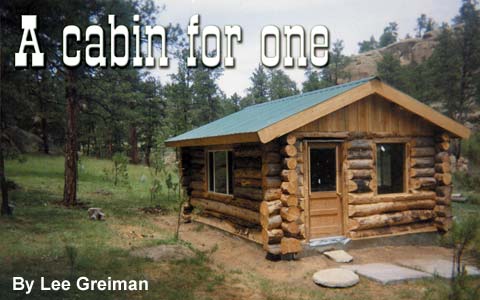
Between 1989 and 1990 I built a 20 by 20-foot log house on the Musselshell River in Montana. The next year I built an addition on it that was the same size as the original because I was thinking, someday, I might have a family and a bigger house would be better.
Well, as it turned out, I stayed single, and we bachelors are not famous for our housekeeping. After a while, I looked around and it became evident to me what I had to do: Sell my “big” house and build myself a smaller one?again.
So I bought 20 acres north of Delphia, Montana, and on November 2, 2002 I poured cement for the foundation. After a two-week curing time, the cement was strong enough to lay the sill logs which I had flattened on one side with an Alaska chainsaw mill. The east and west sides of the foundation were built half the diameter of a log higher than the north and south sides to allow for the saddle notch. I cut the logs 16-feet- and 20-feet-long so there would be one foot on each end overhanging the foundation’s edges.
There were enough dead pine trees on the property to make the walls. I built the door and window frames with a vertical groove ½ inch deep and 1½ inches wide the full height of the frames, then nailed a 1½- x 2-inch strip to keep the logs stable. I cut
1½-inch notches in the end of the logs that butted against window and door frames, cutting the notches into the log to allow the log to slide up and down, as the logs will expand and contract with changing weather.
I built a scribing tool to mark the logs. By putting a log on top of the previous course, the log was placed half the diameter of log higher; log dogs (giant steel staples) anchored it while it was being scribed, or marked. Then I took the log down and cut out between scribing marks, then put it on and went on to the next one.
For added strength I drilled 9/16-inch holes through two logs and drove in ½-inch rebar. It was a snug fit as the rebar has ribs designed to grip cement. I started doing this on the second course of logs to go on.
When the walls were above the window and door frames, I built three scissor trusses?one for each end and one in the middle.
I had an old friend who wanted me to use the Alaska mill to saw boards on his timbered place. For this service he let me get five spruce 20 feet long for the purlins and ridgepole plus pine to make boards for the roof.
After bolting purlins to the trusses, I nailed the boards on the purlins and ridgepole. I laid rosin paper on top of the roof boards, then put 1½- x 5-inch rafters on, anchored with metal brackets. The rafters were centered at 24 inches. I used 3½-inch fiberglass insulation between rafters. Then I put on 7/16 particle board which comes in 4′ x 8′ sheets, staggering the joints. At the peak a 4-inch gap was left between the two sides of chipboard. I then put on tar paper, again leaving a 4-inch gap. Thus on the ridgeline you could see a 4-inch-wide zone of the pink insulation. This is done to allow moisture to escape. Then I screwed on metal roofing. Over the 4-inch ridgeline a mat was laid that is designed to allow moisture to vent. After laying the mat I screwed on the metal ridge cap. On the bottom side of the rafters on the lower end I boxed the rafters closed and put 2
3-inch vents between rafters on each side. With this setup there is a 2-inch air gap above the insulation in between the rafters, and vents at the bottom and top of rafters.
After the roof was finished I put 2 x 6-inch floor joists in. When I poured cement I had a cement girder in the middle to support the floor joists. The joists were on 2-foot centers and I used high density styrofoam insulation. I put vents under the floor styrofoam insulation. For the floor I put a subfloor of 7/16 particle board, then felt paper, then ¾-inch tongue and groove plywood.
All winter long I packed the chainsaw, a big lunch, water, a cordless drill, and a saw even though it was steep going to the cabin site. Later I had a road built.
The cabin was enclosed by June, but I waited until August to chink between the logs.
Building the little cabin was easier and more successful than cleaning the big house.


What you did is what a lot are calling homesteading: land and cabin. Shawn James (you tube) has worked 4 years on his property and built a little bit bigger cabin for two, a sauna building, a toilet/tool shed, an outdoor kitchen, and now a woodshop; all by himself. Seems like you’re pretty self-reliant. Don’t know why a woman wouldn’t want that in a man! Good article!
Really awesome job , rely inspires who might be interested in doing such a project. Thanks again looks really great.
I’m so impressed when I see the fortitude a person can have. It is beautiful and I know you have to be proud of it. Thanks for sharing the wonderful story.