| Issue #57 • May/June, 1999 |
My family has always been big on birthdays and holidaysincluding Thanksgiving, Christmas, Memorial Day, Fourth of July, New Years, and so on. Every holiday is a major event at our house and always includes plenty of good eating. Whether you’re talking about birthday cakes, Thanksgiving turkey, a Christmas goose, or pies and cakes for July Fourth, there’s more than the normal amount of baking going on around here.
For the winter time holidays that extra baking is a welcome aid for keeping the chill out of the house. But when the warm weather holidays show up, all that extra heat from the oven doesn’t seem nearly as pleasant anymore.
A few years back I walked into our kitchen to see how my wife and daughters were coming along with their preparations for the Fourth of July holiday. Though the outdoor temperature was up over 90°, stepping inside the kitchen was like walking into a solid wall of heat. I didn’t think it could have been much hotter inside of the oven itself. I decided right then to do something about that.
Years earlier, I’d built a large outdoor fieldstone barbecue, so there already wasn’t too much stovetop type cooking during the summer months. A space beside this barbeque seemed like the most logical location for an outdoor oven, and that’s where I decided to build it.
Remembering the large outdoor adobe ovens I’d seen in use in northern Mexico and our southwestern states, I decided to build something similar for our use. But even though I know quite a bit about making adobe mud bricks, I really hadn’t too much of an idea of how to go about building one of those clay ovens. Today, I’m still not sure I did everything (or even anything) correctly. But the adobe type oven I built does work, and it works very well.
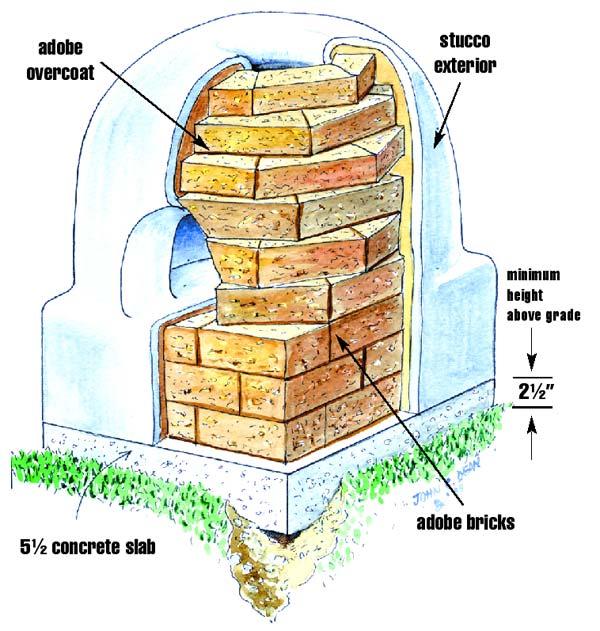
I know that even in wet climates adobe buildings can last for centuries, if their base is kept dry, the roof is kept in repair, and they’re kept painted to repel moisture. So the first thing I did was to shovel away the sod from the three-foot by three-foot area where I intended to build. Then I formed up the edges with 2x6s and mixed up my own concrete to pour sort of a floating slab base.
Next, I used some 1×4 lumber to fashion molds, as shown, for shaping the adobe bricks. Though I sized the molds to fashion bricks measuring 6-inches wide, 12-inches long, and 4-inches thick, any size you deem appropriate for your own uses would work equally well.
Beneath the layer of topsoil, the underlying subsoil in our area is made up of heavy limestone clay which is ideal for fashioning adobe. In areas with other soil types, I’d recommend incorporating about 15 or 20% Portland cement into the mixture. I ran two bales of old straw through the shredder I’d fashioned from a power lawn mower (covered in Issue No. 44, Mar/Apr 1997) to mix in with the clay for making adobe.
In front of our house, my wife had already picked a spot where she intended to add a new flower bed. An awful lot of compost and such would need to be added here if she really wanted to grow much of anything, and the soil I removed I could use to make the adobe. So I shoveled away the sod and the thin (maybe 3 inches) layer of top soil from the 3-foot by 12-foot section she’d indicated, after which I ran our rototiller back and forth over the spot several times until the underlying clay was very finely broken up. I then spread chopped straw over the area and used the tiller again to mix it in well.
Now I used the garden hose to add water, while continuing to mix things together with the tiller, until the mixture reached a consistency that resembled “Play Dough.” This damp adobe mixture was then shoveled into the molds, and the tops struck off evenly with a scrap of board. Afterwards the still soft bricks were very carefully removed from the molds and set in a sunny spot to dry out.
A week later, I covered the concrete pad with a triple layer of these dried adobe bricks. As shown in the illustration, a circle with an 18-inch radius was then scratched out on the top layer, with a 12-inch wide door opening also marked out. Following the scribed line, the first layer of adobe brick was laid in place. In the illustrations you can see how these bricks were trimmed to fit together (I used a worn out keyhole saw for this), Two more layers of adobe brick were set in place (as shown) in the same manner. I then used my hands to smear a layer of wet adobe over the entire inside of this lower portion to smooth the oven’s interior nicely.
Now three more layers of adobe brick were added, one layer at a time with the inside portion of each brick carefully trimmed to shape, and with each layer tapering in towards the middle as shown. A smooth finish layer of wet adobe was smeared over the interior side of these layers as well. I then smeared a 1-inch thick layer of wet adobe as smoothly as I could over the outside of the oven as well.
For weatherproofing purposes, I then mixed up a sort of stucco at a ratio of one shovelful each of Portland cement and masonry cement to nine shovelsful of sand. Using a regular concrete finishing trowel, I spread about a 3/8-inch thick coating of this cement mixture over the exterior of the whole thing, including the base. The next afternoon I brushed on a couple of coats of white house paint.
A couple of months later, I erected sort of a small roofed open air pavilion like structure over the entire oven-barbecue area. This was only partially for further weather protection. Mostly it was at my wife’s insistence. She wanted to be certain that she could use her oven comfortably, even during inclement weather. I guess I must have done something right.
Though slightly different from using the gas or electric indoor ovens most of us have grown used to, baking in one of these adobe hornos couldn’t get much simpler. Usually my wife and daughters will prepare everything they want to bake first thing in the morning then they fill the entire oven with dried corn cobs or chunks of wood, and light them.
Once the fire has burned itself all the way out, the ashes are carefully (it’s hot inside the oven) swept out. A pair of adobe bricks are then used to cover the top opening, the food is placed inside, and the door is then blocked shut with a couple more adobe bricks.
It’s mostly only the timing that takes a little getting used to. Each one of these clay ovens really is an individual creation and takes familiarity to use. This style of oven does hold in the heat for a long time, but each time you open it up to check on things, it cools a trifle quicker; and the quicker it cools the longer the baking time. Once you’ve grown accustomed to your individual horno, however, you’ll find that it actually doesn’t seem much—if any—different from using a standard mass-produced appliance.
You know, aside from just your normal BHM reader’s bent towards self sufficiency, constructing such a simple, yet enduring and reliable baking oven doesn’t sound like such a bad idea for any of the folks worrying over this Y2K thing and other concerns either. Similar adobe ovens were used for at least a couple thousand years before gas or electric ovens were ever dreamed of, so you couldn’t care less if the supplies of fuel or power are interrupted.
Be that as it may, should you decide on fashioning your own outdoor adobe horno, you might want to try the recipes I’ve included to help you become familiar with it. Both are pretty forgiving about temperature and timing variations, so are especially easy for beginners.
The first recipe is one variety of the type of bread traditionally baked in the adobe ovens of our southwest. It’s also one of our family’s favorite wintertime breads and goes really well with stews, chowders, chilies, and similar one dish winter meals.
The second apparently originated in Portugal and was something that my mother learned to bake while my father was stationed in the Azores Islands for a short time during the Korean War. In the Azores this sweet bread is traditionally served during the Easter holidays, though in our family it’s become something of a staple at every holiday gathering.
| Azore Island Easter Bread | |
| 2 pkgs. active dry yeast 1¼ cups white sugar 1 cup melted butter ¼ cup warm water |
6¾ cups sifted white flour 9 large eggs 1/3 cup warm milk ½ tsp. salt |
| Mix together yeast, water, milk, sugar, and 1 cup flour and set aside in a warm place for 20 minutes or so. Add the salt, 3 more cups of the flour, butter, and eggs, and mix well. Keeping your hands well covered with flour, knead the remaining flour into the mix. This is a very sticky dough, so knead carefully. Place the dough inside of a well greased bowl, cover with a clean cloth and set aside in a warm place. Allow the dough to rise until doubled in size (about 1½ hours).
Punch the dough down and divide in half. Place each half in a greased 1½ quart baking dish or loaf pan, and cover with a clean cloth. Allow to rise until doubled in size again (usually less than an hour). Place the loaves inside of the oven and cover the door. These loaves are also done when nicely browned and hollow sounding when tapped with your fingers. Check them after 1 hour, and if not finished check every 15 minutes until done. My wife and I like this one with a little butter melted on top, while our daughters prefer it topped with honey, and our grandkids actually like it best once it’s become just a little dried out and they break it up into little pieces in a bowl, add milk, and eat it like breakfast cereal. |
|
| Traditional Adobe Oven Style Bread | |
| 2 pkgs. active dry yeast 1 tsp. salt 5¾ cups sifted white flour |
1¾ cups warm water 3 Tbsp. white sugar 4 Tbsp. melted butter or fat |
| Mix together the yeast, warm water, salt, sugar, and 1 cup of the flour; set aside in a warm place for 15-20 minutes. Stir in 2 more cups of flour and the melted shortening. Now stir in as much of the remaining flour as possible and then knead in the remainder. Continue kneading for an additional 5 minutes. Place the dough inside of a large well greased bowl and set aside in a warm place to rise, until doubled in size (about 1½ hours). Punch the dough down, divide in half, and place each half in a lightly greased bowl, cover with a clean cloth, and again set aside to rise until doubled in size (about ¾ hour). Carefully turn each loaf out onto a well greased baking sheet and brush the tops lightly with warm water. Close up the loaves inside the oven and check after 45 minutes. Loaves are well browned and sound hollow when tapped with your fingers when done. If baking isn’t finished, recheck every 15 minutes until the loaves are done. | |


I wonder if a long metal thermometer like those used in large deep fryers embedded through the side would work to help with cooking times,