 |
|
| Issue #153 • May/June, 2015 |
Carrots are an old-time homesteader favorite. They can be frozen, canned, dehydrated, or simply stored in a cool location.
They are nutritious, too, being a great source of beta carotene (vitamin A), folate, and vitamin K. Carrots rank well for their mineral content: calcium, phosphorus, potassium, and magnesium. Carrots’ trace minerals are fluoride, manganese, zinc, selenium, and copper. They also contain Omega-3 and Omega-6 fatty acids.
We always include at least four rows of carrots in our garden and I usually wish I planted more. Admittedly, they can be a little tricky to get going but I’ll tell you a few of my secrets so you, too, can grow great carrots every single year.
Carrot history
Today’s carrots are a far cry from the wild carrot (Daucus carota) from which it was bred and domesticated, although domestic carrots (Daucus carota sativa) can and will cross with wild ones (Queen Anne’s lace). Thousands of years ago, farmers worked to refine and improve the wiry, thin, hairy, forked, and often bitter wild carrot root into a large, smooth, sweet “new” root vegetable.
Domestic carrots were first grown in Afghanistan way back in the 10th century. These carrots were usually purple and yellow like the “new” specialty carrots sold in catalogs today. They were soon traded and moved into other countries. But it was the Dutch who dominated the carrot-breeding world, giving us a bounty of carrot varieties, most of a bright orange color.
Colonists brought carrots with them to the New World. Our third President, Thomas Jefferson, an avid gardener, grew several varieties of carrots at Monticello.
Today we have hundreds of choices when it comes to choosing carrot varieties for our gardens.

Here’s one of our Scarlet Nantes carrots right out of the ground. Nothing beats homegrown carrots for flavor.
Types of carrots
There are many types of carrots with many color variations. Here are four of my favorites.
Chantenay carrots originated in France more than a hundred years ago. This carrot has wide shoulders tapering to a long, pointed root. It grows well in most soils, especially heavier clay soils where thinner carrots fail to grow. The Chantenay carrot has good sweet flavor and is a dependable producer, storing well. Among my favorites of this type is the Japanese Kuroda, which can mature to a very large, sturdy-sized carrot. I use big chunks of these, canned up, for use with pot roasts and in hearty stews. Other Chantenay carrots include: Shin Kuroda (OP) and Red-cored Chantenay (OP).
Nantes carrots are cylindrical, with no pointed root. They mature at about 7 inches long and are usually very easy to harvest. These have great flavor with small cores and are among my favorites to can as the carrots are about all the same size and slice up very nicely. Some Nantes carrots include: Yaya (hybrid), Scarlet Nantes (OP), Nelson (hybrid), Bolero (hybrid), and Napa (hybrid).
Imperator carrots are your regular supermarket carrot; long and thin, often growing to 10 to 12 inches in length, tapering to a gradual point. They are very sweet and produce a good crop but are difficult to grow in very rocky or heavy clay ground. Commercially, they are grown in deep, black soil where they can be pulled without breaking off the lower part of the root. Some Imperator carrots are: Cosmic purple (OP), Tendersweet (hybrid) and Sugarsnax (hybrid).
Danvers Half Long carrots are heirloom, originating in Danvers, Massachusetts, back in 1871. They are a short, tapered carrot, growing about 8 inches long and having relatively thick bodies tapering to a pointed, yet not slim, tip. These carrots look like a cross between Chantenay and Nantes varieties, broad in the shoulders and short in stature. These carrots are sweet and they store very well.
Selecting varieties to grow
What kind of soil do you have? If it is heavy clay soil or hasn’t been worked up well, stay away from Imperator-type carrots with long, slender roots. These either won’t develop properly or will break when you try to harvest them. Often you’ll end up with crooked, hairy roots. Instead, choose a variety suited for your heavy soil, such as Danvers Half Long or Chantenay. I grew Danvers Half Longs in my first-year garden back in Sturgeon Lake, Minnesota. We had solid red clay (down eight feet or more) and I don’t think any organic material had ever been worked into the garden. I planted my carrots and managed to grow a crop. But when I tried to harvest the carrots, I couldn’t pull, dig, or even shovel them out. I had to bring the tractor and single bottom plow into the garden to plow my carrots out of the ground!
Luckily, carrots are not bothered by freezing, so you don’t have to worry about the length of time they take to mature unless you want to store carrots over winter. Then choose a variety that is a long-maturing type so you’ll just be digging mature carrots before a freeze.
Carrot seeds are hard to plant because they are very small. So if you can’t take the time to plant those tiny seeds evenly, consider buying pelleted seeds, offered in some catalogs such as Johnny’s Selected Seeds. This means that the tiny carrot seed is encased in a white clay pellet that is quite a bit larger and much easier to see and handle. You can plant them evenly a lot easier, reducing stress and later thinning. Although pelleted seeds do cost a lot more, they are still an excellent investment for folks with poor eyesight or impatient natures. (Don’t just sprinkle seeds down a row, right out of the package; it wastes seeds and makes later thinning extremely difficult.)

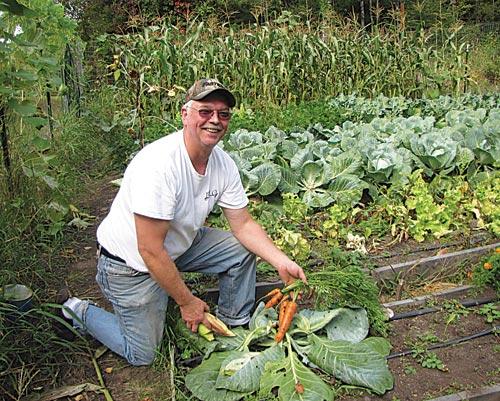
Our friend, Jeff, shows just a few of his great crop of carrots from his extensive raised bed garden.
Preparing the soil
Because carrots can take frost and freezing, a lot of people (often those one-day-planters) go ahead and plant their carrot seeds very early. Often the soil has not been worked up enough and well. As carrot seeds are so tiny, the soil needs to be worked up so there are no clods or clumps; the soil should be smooth and fine. Mix in a bit of well-rotted compost.
We don’t plant our carrots ultra early. We wait and till the area several times, not only breaking up any clods or soil clumps but killing tiny, germinating weeds in the process. This pays huge dividends later on. First of all, carrots germinate best in soil temperatures of around 55-80 degrees. At those temperatures, carrots will start popping up in as little as a week. But at cooler temperatures, it may take three weeks. It’s best to be a little patient and sow your carrot seeds as the ground warms up.
Planting your carrot seeds
After the soil temperature has warmed up, mark your rows with sticks pounded into the ground on either end with a sturdy string stretched between. With a hoe, make a shallow trench down your row, under the string, about ½ inch deep.
Shake out some carrot seeds into your palm and pick up several seeds. Gently sprinkle them out in your row so the seeds end up about ¼ inch apart. Slowly work your way down the row until all of the seeds are in the trench. Then go back and cover them with about ½ inch of soil. With the back of the hoe, gently pat the soil over the seeds down firmly. Don’t mash it down; you don’t want to compact the soil or it will make it hard for the germinating seeds to pierce the surface.
Once planted, leave your row marker in place until germination occurs so you don’t lose your row. Then water your row. Keep the soil of your carrot rows evenly moist until the carrots are up and growing nicely.
I think this is the one most important thing folks fail at and thus, don’t get a nicely germinated row of carrots. Those seeds are very small, remember, and as they germinate, if they dry out even for a few hours, they die. Be sure the carrot rows stay moist, but you don’t want the ground soggy or wet to the point where water is standing around.
You can help your carrot seedlings by putting a floating row cover over your rows. Not only does this help hold in moisture, but it also warms up the soil.
If you have an older garden or a well-cared-for raised bed, you can plant your carrots in multiple row-wide beds. This makes great use of garden space. To plant multiple rows, simply mark your carrot rows, leaving only about four inches between rows. I find that three rows, closely spaced like this, works best as you can reach the center of your planting from both sides, making thinning and weeding much easier.
Care of your carrots
Once your carrots have germinated, you’ll soon see some tiny, two-leafed plants emerging in a row. The leaves are long and flat, pointed in different directions. These are your long-awaited carrots! Don’t stop watering now. This is the second reason folks’ carrots fail; they quit watering right after they see new growth. Keep those rows evenly watered so the soil stays moist.
The third most common reason for carrot failures is weeds. Carrot seedlings are so tiny and tender, they cannot compete with weeds one bit at this age. Keep the row between your carrot plantings tilled or hoed clean of weeds. Then go down your carrot rows, picking up each tiny seedling weed and popping it into a bucket so it won’t root elsewhere in your garden. Yes, it does take some time weeding newly-germinated carrot seedlings. But it’s worth it, come harvest time.
When your baby carrots get two sets of ferny leaves, it’s time to start thinning them. Now I absolutely hate thinning carrots. I feel like I’m throwing away food. Early in my homestead life, I tried not thinning, feeling sorry for the little carrots. But I never got a nice row of big carrots like Mom grew. So I started the nasty job of thinning and soon I was growing nice big carrots, too.
No, carrots do not transplant; I tried that one too. Just pull them out and toss them between the rows. You want your carrots to end up about an inch apart to start with so toss the rest.
After the carrots are sturdy and about six or eight inches tall, I mulch the rows with straw or seed-free grass hay. Make sure it is seed/weed free or you’ll grow a fine crop of weeds or grass right in your garden.
Later in the summer, you can go back and harvest a few carrots for baby carrots and snacks, taking out every other carrot down the row. This lets you harvest while leaving room for the remaining carrots to grow.
Be sure to keep your carrots well watered all summer, especially during hot, dry spells.
Harvesting your carrots
You can either start pulling some carrots to put up as soon as they reach mature size or wait until a few frosts have come and gone and dig the whole bunch. Personally, I start harvesting earlier and begin canning so I don’t become overwhelmed at frost time when I’m madly putting up crops that don’t hold well, such as sweet corn.
If cold storage is your storage method of choice (and you have good storage facilities) wait until frosts and freezing threaten before harvesting your carrots.
In milder climates, you can even mulch part of your carrot row and dig carrots right through the winter. Here in northern Minnesota, this is not an option as the ground freezes hard, mulch or no mulch.
If your soil is loose, you can usually harvest your carrots by just pulling from the tops; the carrots will pop right out of the ground. But if you’re breaking the tops off or finding part of the carrot has broken off below ground, it’s best to use a spading fork next to the row to loosen the soil before pulling. Then you’ll harvest whole carrots with ease.

Not only do I can up sliced, whole, and chunked carrots but I also include carrots in many of my mixed recipes to can. Here is a mix of diced carrots, peas, and sweet corn.
Freezing carrots
Freeze only nicely mature, fresh, crisp carrots right out of your garden. Limp, old, partly-dried carrots never freeze well.
First wash the carrots, scrubbing away any clinging soil. Cut the tops off about an inch into the carrot, removing any green part. This green results from the carrot heaving out of the ground as it grows and becoming exposed to sunshine. Wipe off any rootlets. Scrub with a green nylon pot scrubber or peel. (Unpeeled carrots have greater flavor and more nutrition than peeled carrots.)
Cut the carrots into slices and hold in cold water to keep them fresh. Get a pot of water boiling on the stove and have a large bowl of ice water ready. Drain carrots, then boil them for about five minutes to blanch, then drain and plunge into the ice water to quickly cool them down. Carrots should be blanched to halt enzyme activity and kill any bacteria that may destroy flavor.
Pack cooled carrot slices into a freezer container such as a freezer ziplock bag. Remove as much air as possible. If you don’t get out most of the air, the carrots won’t stay fresh in the freezer. For this reason, using a FoodSaver vacuum packer is a wonderful idea; carrots will remain fresh-tasting months longer in the freezer. Frozen carrots will remain good in your freezer for 9-14 months.
Canning carrots
Carrots are extremely easy to can. You can put up many pints of carrots in an afternoon’s easy work. And once properly canned, carrots will remain good in your pantry for decades.
I can my carrots in whole/halves, large chunks, and slices. I nearly always can my carrots using the raw pack method as it goes fast and I get done sooner.
Raw pack:
Cut off the tops and root end of the carrots, then scrub and rinse. Scrape or peel the carrots, then rinse and drain. Slice, dice, cut into chunks, or leave small carrots whole. Pack tightly into hot jars, leaving 1 inch of headspace. Add ½ tsp. salt to each pint and 1 tsp. to each quart, if desired. Pour boiling water over carrots, leaving 1 inch of headspace. Remove air bubbles. Wipe rim of jar clean. Place hot, previously-simmered lid on jars and screw down ring firmly tight. Process at 10 pounds pressure in a pressure canner: pints for 25 minutes and quarts for 30 minutes. (If you live at an altitude of 1,000 feet or more, consult your canning book for directions on increasing your pressure to suit your altitude.)
After pressure returns to zero, carefully remove weight/open petcock, then remove the lid. Let hot jars cool on a folded towel in a draft-free location. When thoroughly cool, check seals. If the lid is indented and has no give, the jar is sealed. Remove ring and wash jars with hot, soapy water. Dry jars. Store on your pantry shelves.
Hot pack:
Prepare carrots as for raw pack. Place carrots in large pot. Cover with water and bring to a boil. Simmer 5 minutes. Pack hot carrots into hot jars, leaving 1 inch of headspace. Add ½ tsp. salt to each pint and 1 tsp. to each quart, if desired. Pour boiling cooking liquid on carrots, leaving 1 inch of headspace. Continue as per raw pack, processing at 10 pounds pressure, pints for 25 minutes and quarts for 30 minutes.
I also can carrots in mixed vegetable combinations. The mixes give you great variety in your soups, stews, casseroles, and side dishes. Carrots taste great pickled, too. Here are a few recipes for you to try:
Sweet pickled carrots
10 lbs. small, tender young carrots
1 qt. vinegar
5 cups sugar
Spice bag:
1 Tbsp. stick cinnamon
1 Tbsp. whole cloves
1 Tbsp whole allspice
1 Tbsp. mace
Scrape young carrots. Slice or leave whole. Make a spiced syrup of remaining ingredients, simmering for 15 minutes in a large kettle. Pour boiling hot over carrots in another large pot. Cover and let stand overnight. In the morning, bring to a boil and boil 5 minutes. Remove spice bag. Pack hot in hot jars, leaving ½ inch of headspace. Ladle boiling syrup over carrots, leaving ½ inch of headspace. Remove air bubbles. Wipe rim of jar clean; place hot, previously-simmered lid on jar and screw down ring firmly tight. Process for 15 minutes in a boiling water bath canner.
Carrot relish
12 medium carrots
5 sweet green peppers
1 sweet red pepper
6 medium onions
2 Tbsp. celery seed
¼ cup pickling salt
6 cups sugar
6 cups white vinegar
½ tsp. cayenne pepper
Peel carrots, remove ribs and seeds from peppers, peel onions. Put all vegetables through a meat grinder using a coarse blade.
In a large pot, heat spices, sugar, and vinegar to boiling. Add ground vegetables and simmer for 20 minutes. Pack hot relish into hot, sterilized jars, leaving ¼ inch of headspace. Wipe rim of jar clean; place hot, previously-simmered lid on jar and screw down ring firmly tight. Process for 15 minutes in a boiling water bath canner.
Dehydrating carrots
Dehydrating your carrots at home is simple and fast. All you do is wash and peel (if desired) your carrots, removing top and root end. Slice or dice your carrots and place in a holding bowl full of cold water. Bring a large pot of water to boil, then boil carrots for 3 minutes to blanch. Drain, then place in a large bowl of ice water. Once cool, drain your carrots well.
Lay them out in a single layer on your dehydrator tray so they don’t touch. Dehydrate at 125-135° F until leathery. Switch your trays to keep dehydrating evenly. You may also dehydrate grated carrots using your fruit leather or screen tray inserts. Try to sprinkle the grated carrots out so they form a loose, single layer that isn’t piled up. I don’t blanch these as they dry very quickly.
When finished dehydrating, store your carrots in an airtight container. Be sure to check for the first few days to make sure there is no condensation inside the container indicating insufficient dehydrating. If there is, pour out onto your trays and dehydrate a few hours longer.
Dehydrated carrots will remain good nearly forever.
Storing fresh carrots
Sources for carrot seed
If you wish to grow some of the more common varieties of carrots, you can find seeds at your local store. But if you want to try some of the old heirloom varieties or one of the different-colored carrots, here are a few sources for seed:
Baker Creek Heirloom Seeds
2278 Baker Creek Road
Mansfield, MO 65704
417-924-8917
www.rareseeds.com
Fedco Seeds
P.O. Box 520
Waterville, ME 04903-0520
207-426-9900
www.fedcoseeds.com
Sand Hill Preservation Center
1878 230th Street
Calamus, Iowa 52729
www.sandhillpreservation.com
Seed Savers Exchange
3094 North Winn Rd
Decorah, Iowa 52101
563-382-5990
www.seedsavers.org
If you’re on grid, a good way to store carrots is to put a second refrigerator in your heated garage, basement, or porch. Then pack your carrots in ventilated plastic bags and place in a single layer in the fridge. You can also store limited amounts of fresh carrots the same way in your kitchen refrigerator. Carrots like 34-40° F with high humidity for long-term storage.
I have a small propane refrigerator with no room to store carrots, so we store ours in our unheated basement pantry/root cellar. After I pull our carrots, I cut off the tops and feed them to the goats. Then I let the carrots sit in the garden for a few hours on a dry day. This way I can brush off most of the dirt and the little hair roots dry up. I carry them down to the basement, to a large insulated cooler that has been disinfected with bleach water and dried. I lay the carrots in the cooler, in rows and layers. No damaged carrots are put into cold storage those are either dehydrated or used immediately. Our basement is unheated and stays around 40° F all winter. I check the carrots every time I use a few. If the condensation is getting heavy (drips) on the bottom of the lid, I prop the lid open an inch or so for a few days. If it gets too moist in there, the carrots will rot; too dry and they’ll shrivel up.
Another way to store carrots is to layer them in a box with sand sprinkled with water to just barely dampen it. A layer of sand is placed, then carrots, then sand until the box is full, ending with sand and a cover to prevent evaporation. This works, but it requires a lot of sand and lifting so I don’t do it any more. Our “plain” carrots store just fine without all the fuss.
Seed saving
Carrots produce an edible root the first year from seed but don’t produce seed until the following year. For this reason, many folks don’t even consider saving carrot seeds. But, in fact, it’s quite easy. Choose an open-pollinated variety instead of a hybrid. Although hybrids will produce seed, many times the carrots produced from these seeds do not resemble the parents.
In milder climates, you can just leave a few carrots right in the ground to save over winter for seed stock. In cooler climates, you may have to mulch the carrots to protect them from severe freezing. But in cold climates, like we have here, the most dependable way to save seed stock carrots is to harvest them, store over winter, then re-plant, come spring.
One problem with saving carrot seed is that if you have an abundant wild carrot (Queen Anne’s Lace) population near your garden, the wild carrots will cross with your domestic carrots, leaving your seeds to produce wiry, bitter, gnarly white carrots. To prevent this, you can take a pair of scissors and clip all of the flowers from the Queen Anne’s Lace when your carrots are about to bloom.
Parsnips
Often confused with white carrots, parsnips are not carrots but another good-to-eat root crop. Unfortunately, parsnips have gotten a name for being finicky to grow, so although they have a wonderful flavor and are hardy in the garden, not many people grow them.
Parsnips are shaped like a carrot. The leaves look sort of like large-leafed parsley and the seeds are flat and large. They are sweet, earthy, and tender. Plus, they store just as well as carrots.
To have success with parsnips, simply follow the planting tips I’ve given for carrots: work up the soil well, don’t plant too early, keep the row moist until germination, and keep the row weed-free. With this care, parsnips will thrive in nearly all gardens.
Parsnips do take longer to germinate than carrots, but if you wait until the soil is warmer and keep those rows moist, they should pop up in about two weeks’ time. In cooler weather, they sometimes take up to three weeks to germinate so don’t give up. Parsnips are definitely worth the wait! And they are frost-tolerant, so they grow well even in short-season climates.
Parsnips are sweetest if harvested after a few freezes. In fact, folks in milder climates often leave their parsnips in the ground all winter, pulling them when needed for a meal.
Sautéed parsnips
8 parsnips, scrubbed well and cut into thick strips
2 Tbsp butter or margarine
½ tsp. salt
water to parboil
In a medium frying pan, add about one inch of water, salt, and parsnips. Turn heat to medium, and cover and parboil till tender. Drain. Add butter and keep heat at medium, frying until nicely browned on all sides. Do not let pan get too hot and scorch the butter.
Recipes
Here are a few recipes using canned or fresh carrots.
Flemish carrots
6 medium carrots, scraped or peeled, cut into thin, 2-inch strips
2 Tbsp. butter or margarine
½ tsp. salt
1 tsp. sugar
½ cup water
½ cup cream
1 tsp. lemon juice
In a saucepan, sauté carrots in melted butter or margarine about 5 minutes. Stir in salt, sugar, and water. Simmer, covered, until carrots are tender. Add cream and lemon juice, stirring until a coating forms. Serve.
Candied carrots
8 medium carrots, scraped or peeled or 1 quart canned carrot slices, drained
water to boil if using fresh carrots
2 Tbsp. butter or margarine
¼ cup brown sugar
Slice fresh carrots and simmer in boiling water until tender. Drain off most of the water, saving about ½ cup. (If using canned carrots, drain, reserving ½ cup liquid). Add butter and brown sugar to carrots and simmer, covered, for about 10 minutes. Remove cover and continue cooking. The liquid will cook down, leaving the carrots coated with a glaze. Be sure to stir them so they don’t scorch. Serve.
Carrot cake
2 cups sugar
1 cup oil
4 eggs
1 tsp. vanilla
2 cups flour
1½ tsp. baking soda
2 tsp. baking powder
2 tsp. cinnamon
3 cups shredded carrots
½ cup chopped nuts (optional)
Mix sugar, oil, eggs, and vanilla; beat until smooth. In a separate bowl, mix dry ingredients. Slowly mix dry ingredients into the sugar/oil mixture. Fold in shredded carrots and nuts, then pour batter into two lightly-greased 8x8x2-inch cake pans. Bake at 350° F for 30 to 35 minutes or until a toothpick inserted in the center comes out clean. Let cool for 5 minutes, then turn out on cake racks to cool thoroughly.
Frosting:
8 oz. cream cheese
¼ cup butter or margarine
1 cup powdered sugar
1 tsp. vanilla
1 tsp. lemon juice
Mix cream cheese and butter (both at room temperature works best), then cream with powdered sugar until fluffy and smooth. Add vanilla and lemon juice. Mix again very well.






Cara Smith, I have had great success growing carrots in pots. For many years I used large black pots that my trees came in. I did not over crowd the seeds but dropped one seed for every other square on a wire grid leaving some space to loosen around the edges to wiggle them loose for harvest time. Start harvesting from the outside working in. Worked great! The last couple years my sone built me a 8’x4’x2’ planter Box. I start with a tomato on the far left side, a 4’x3’ patch of carrots, then fill the rest with onions, parsley, cilantro and lettuces. This year I’ve already had issues with rabbits and squirrels so I just sprinkled cayenne pepper on them. Hope that’s gonna work. I need to add marigolds to keep them out too.
I hope this answer helps you. Good luck!
I’ve bought from Baker Creek many times; never with a problem at all. Plus purchased from many other companies, never with a problem. I think Seed Treasures is amazing and am looking forward to purchasing from. Jackie, you always do your best with advice from your vast experience. It’s kinda early even for zone 9, but I just got carrots, cabbage, iceberg, onion and peas in the ground, this fine February 16, 2022!
Baker Creek Heirloom Seeds are a ripoff company. They advertise a lot but don’t deliver on your order and rip you off on if you have any money left from your order instead of returning it to you. They blame all of their shortcomings on the pandemic and the customer service person in charge doesn’t know who picks up the orders or sends out the product or anything as to the line of accountability of your order. Again it’s the pandemic’s fault, and once they have your money, if you call with a complaint they just give you lip service and hope you’ll just go away and forget about and cut you losses and drop it. Too bad, if they had been an honorable company they could have maybe been the best in the nation. My advice is to stay away from them.
Is it possible to grow carrots in a large container or flower pot, I am not looking for a hughe crop, just a small batch.. the soil here is extremely hard and rocky.. plus I have back issues and bending over is problematic.
Thank you!
Why are some carrots bitter? Is it only when they are raw?