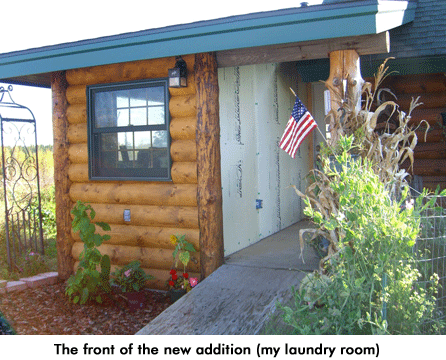
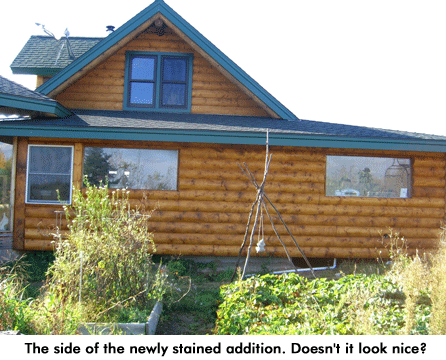
Slowly, slowly, Will and I are feeling better and doing more every day. Besides the “getting ready for winter” stuff, (canning, and building projects), I took time to get the log siding on the new addition stained. It took awhile before I could stand on a step ladder to do the soffit and higher logs! But it’s done, a little at a time as I could, and I think it looks great. I’ve still got to go back and add caulking here and there around windows and between horizontal and vertical logs, but that’ll be child’s play after the rest. We didn’t have enough cash to do the whole addition or the south side of the greenhouse, but oh well, that’ll have to wait till next spring. It feels so good to be DOING again!
Saturday and Sunday, Will and David put the rest of the sheet metal roofing on the storage building. I wanted to help, but was forcibly evicted from the scaffold. So much for women’s lib… (Well, I wasn’t exactly “forcibly evicted,” but it felt like it!) It’s done now, and the woodshed and workshop parts will no longer rain inside! Today, Will’s putting on the finishing trim.
Readers’ Questions:
Caramel apples
As Halloween nears I’m hoping to bring caramel apples to our local farmers market fall celebration do you have a recipe for caramel and the method used to make these treats?
Arnold Barrie
Chicago, Illinois
Here’s a recipe for you. You can also just melt store bought caramels, although it’s nicer to make them from scratch.
CARAMEL APPLES
Use the caramel in any recipe that needs melted caramels, also for ice cream topping.
6 apples, remove stems
1 c. sugar
1/8 tsp. salt
1/4 c. butter
3/4 c. white corn syrup
1 can sweetened condensed milk
1 tsp. vanilla
Wash and dry thoroughly each apple. Insert stick into stem end of apples. Combine sugar, syrup, sweetened condensed milk, and salt in a heavy saucepan. Mix well. Cook over medium heat, stirring constantly to 230 degrees F on your candy thermometer, or until small amount dropped in cold water forms a soft ball (cook about 30 minutes). Remove from stove; cool slightly. Stir in butter and vanilla. Quickly dip apples in caramel. Coat well. Place apples with skewers up on a buttered piece of wax paper until caramel hardens.
Variation: You can roll caramel coated apples in crushed nuts, such as walnuts, pecans, or even peanuts, if you wish. Tip: if you refrigerate your apples, the dip will cling better to them without sliding off. — Jackie
Canning green tomatoes
My husband found a recipe online to can green tomato slices. You cut slices about 1/4″ thick, place in wide mouth jars and cover with boiling water. Process for 10 minutes in water bath. Use as you usually would for cooking. What do you think? We don’t really like piccalily or chow chow and need to use up our over abundance of green tomatoes.
Julia Crow
Gardnerville, Nevada
Sorry, but I can’t see where canning slices green and only processing them for 10 minutes, where red, ripe tomatoes need to be processed for 45 minutes, would be safe. How about making some green tomato mincemeat? Or make apple pies from your little hard green tomatoes. It’s REAL good and nobody can tell it from “real” apple pie! You just treat the tomatoes like apples and make your apple pie as usual. Or dilled green tomatoes (taste like dill pickles, but are round). You can just pick your larger green tomatoes and bring them into the house in ice cream pails or baskets, and they’ll go ahead and ripen right up in a few days. We did that several times this fall, and I’m still canning tomato products like mad: barbecue sauces, spaghetti sauces, pizza sauce, tomato sauce, hot and mild salsa, chili, and chunky tomato sauce…not to mention plain canned tomatoes! — Jackie
Copper penny salad
Do you have a recipe for copper penny salad? And also can you stack your jars on top of each other in the pantry?
Robin Putman
Coolville, Ohio
Here’s a recipe for you:
COPPER PENNY SALAD
2 lbs. carrots, thinly sliced
1 tsp. salt
1 lg. onion
1 lg. green pepper, sliced
1 can tomato soup
1/2 c. vegetable oil
1/2 c. vinegar
1/2 c. sugar
Boil carrots in salted water 4 minutes until not quite done. Drain carrots. Add onions and green peppers. Heat soup, oil, vinegar, and sugar until it boils. Pour over vegetables and stir lightly. Makes about 4 cups. It will keep refrigerated for 4 weeks and is nice to have ready to serve anytime.
While you aren’t supposed to stack jars on top of each other in the pantry, I’ve done it for years, for lack of space, and have never had a problem with the bottom jars coming unsealed. I only stack them 2 high, and usually lay a piece of cardboard over the bottom jars to more evenly distribute the weight of the top jars on the jar rims. And I try to only put pint or half pint jars on the top layer. You may have an occasional jar’s seal fail, but, again, I never have had that problem. — Jackie
Crossing a Nubian buck
You mentioned crossing a Nubian buck with your 15/16 Boer does. If you do this, then what will the percentage of the offspring be? Would they be greater than half Nubian? I figure they would be 17/32 Nubian but don’t know if I am figuring correctly. What is your end goal? How many generations does it take to get the mix of genetics you want in your livestock? Maybe someone will be kind enough to bring the Nubian buck to you for the chance of meeting Jackie Clay. I know I would. Good luck.
Deb Motylinski
Brecksville, Ohio
Yes, they would be 17/32 Nubian. Our end goal is to have a terrific LARGE, yet heavy bodied and boned dual purpose homestead goat. We want to keep our gallon milkers, yet have wethers that weigh between 70-90 pounds at three months of age. This year, our 90 day kids, both doelings and bucklings, weighed in at from 60-70 pounds. Not bad. Heavier boned, thicker bodied milking does stay in the milking line longer than do dainty, fine boned, smaller bodied does, too.
We did have luck in finding a nice lady, Carol Miller, down in Staples, MN, who has a buckling. So on Wednesday, we plan on driving down 169 miles to pick him up. It was a real wrestle, finding a good spotted, large-bodied Nubian buck from good milking bloodlines, (I sell spotted kids much faster than “plain” colors!) — Jackie
Magic Button canning lids
Just found a bunch of Magic Button canning lids and heavy duty plastic rings at a thrift store. They are brand new in the box with plastic wrap over them. I have been canning for about 8 years now and have never heard of these. Are they okay to use? Don’t want to pass up a bargain!
Jared Hamilton
Buffalo, Illinois
Magic Button lids were made by Kerr, and were among the first to have the dimple in the center to indicate a good seal. My only concern is that the “rubber” compound on the lids may be hard and not seal well. But I’ve used many old lids, only simmering them for a few minutes to make sure the compound softened before use. I would probably give them a try, a few at a time, so if they don’t seal you won’t be too disappointed. My guess is that they’ll do fine, regardless of what new “common” expert knowledge advises today. — Jackie
Canning wild rice
We live here in Cook County and at our Co-op can get real wild rice–not the paddy grown stuff. I’m wondering if you’ve ever canned wild rice or any kind of rice. Would you cook it first or put it in raw and let it cook as it processed? I was in a pinch and didn’t have time to cook wild rice for a recipe so I bought a can of already cooked stuff. OUCH! It was over $3 for the can.
Laurie Hill
Grand Marais, Minnesota
I have canned rice and wild rice, mixed with broth or tomato sauce. I don’t think it would be wise to can rice alone, as it makes a very dense product where the necessary heat might not penetrate the center of the jar, making it unsafe processing. I often can wild rice in chicken or beef broth, and it results in a very nice product. To do this, just heat your seasoned broth to boiling and ladle into a quart jar, leaving about 4″ of top space. Put in about 1/4 cup processed, but uncooked wild rice, then fill the jar to within 1 inch of the top, as the rice does expand a lot. Process at 10# pressure for 90 minutes. If you live at an altitude above 1,000 feet, consult your canning book for directions in raising your pressure to suit your altitude, if necessary. Enjoy your wild rice. We sure do! — Jackie


Re: canning wild rice: Sorry, Jackie, I’m confused. What is “processed but uncooked wild rice”? When you fill the jar to within 4″, do you then add more broth to get it to within 1″?
Your place is beautiful!!!!
Jackie, your house…your view, it all looks so beautiful! So glad you are getting stronger everyday. I wanted to add a comment to Laurie about the rice. Perhaps you are only interested in canning your food, but I always cook a large batch of wild rice at a time since it doesn’t take any longer to cook a big pot than just enough for a meal. I then freeze what I don’t want to use right away. Just pop it into quart freezer bags and stick it in the freezer, works beautifully. It thaws out exactly the same as fresh and so easy to just break off a little bit to throw in soup or use for any stirfry, etc. Just a thought. I am going to try canning some too though, freezer is getting packed.
Comments are closed.