 |
|
| Issue #60 • November/December, 1999 |
There may be a time, as close as tomorrow, when your loved ones need medication or medical treatment and there is no drug store open or doctor available. This may be as simple a situation as a head cold coming on during a weekend night, or more drastic, such as nothing available after a civil or natural disaster.
Family medical kits
Here at home, we’ve always had a medical kit. Several, in fact. One is quite large, made up of a poly box, originally designed as a field box for trap and skeet shooters. This “drug store on wheels” is a well-packed medical utility box that will handle nearly everything from a cold to severe lacerations. This one we carry when traveling in remote locations.
But while it is loaded with most medical needs, far surpassing a first-aid “kit,” it is heavy, weighing over 30 pounds, and it is not something we carry for short trips, pack in our canoe, or carry on horseback.

An intermediate kit is lighter and fits into a flat, moderate-sized fishing tackle box. While this does not contain such a wide variety of medical supplies and medications, it is a very well thought out first-aid-and then some-medical kit. This is light enough to pack in the canoe (if we don’t foresee many lengthy portages, when every ounce counts), with camp supplies on a horse packing trip, or small enough to take up little room in the truck.
Besides this kit, we also carry a small first aid kit under the seat of the truck and Suburban, containing bandages, antibiotic ointment, burn medication, sterile gauze, tweezers, aspirin, sterile eye wash, and cold tablets for ourselves and our eight- year-old son, David. In the glove box is a smaller snap-open plastic box with Bob’s oral diabetes medication, my blood pressure pills, and a few aspirin. This has come in handy many times when someone forgot to take prescribed daily medication or a headache suddenly popped up. As the glove box does get hot during the summer, this small stash of meds is rotated routinely to make sure the strength does not fade.
Learning to use your kit
No matter how comprehensive your medical kit is it can be useless or even harmful if you do not know how to use it safely. You don’t have to have extensive medical treatment to handle most emergencies that occur in real life. Most of ours consist of splinters, minor cuts and scrapes, sprains, and an occasional head cold or the flu. While these are scarcely life-threatening, they are uncomfortable and the afflicted party sure appreciates quick, competent aid.
Our family is lucky; I have spent a lifetime as a veterinary field technician riding on calls and acting as an assistant on everything from broken legs to pneumonia. Bob is a Certified Nurses Assistant (CNA) with additional military medical training in Vietnam. But you’d be surprised at how much free medical training is out there for you to pick up. Many communities provide first-aid classes, including invaluable cardiopulmonary resuscitation (CPR) training.
During these classes, ask questions to boot up the amount of knowledge you receive. Attend volunteer firemen’s training sessions, as available (again, ask around). Ask your veterinarian if you could accompany him/her on calls one or more days a week free in exchange for the knowledge you gain. Yep, I know, they’re animals, not people, but basically, a mammal is a mammal, especially when it comes to shock, wounds, and common illnesses such as pneumonia.
Pick up a good first-aid manual (which should be in your large medical kit at all times) and a book or two from a preparedness company which details medical treatment when no doctor or dentist is available. Then read these manuals carefully. I know they’re not great reading, but they can save someone’s life. Share the reading with your spouse or older children, and even practice at home. It can be interesting, learning to suture gaping wounds on a piece of that chicken you’re having for dinner. After it’s butchered and ready to cook, of course. I’m not that morbid.
Real life medical treatment basics
While some survival first aid manuals assume your family’s injuries will need treatment for nuclear blast and gaping wounds, in reality most will be of a much more mundane level no matter where you are, from arctic tundra to urban sprawl. They will consist of minor cuts, scrapes, slivers, blisters, the flu, colds, a fish hook in the skin, etc. We have lived for years in very remote locations and, although the worst injury any of us sustained was Bob’s green stick fracture of his leg in a snowmobile accident, the most painful was my severely sprained ankle, suffered when I missed a step going downstairs in our farmhouse in “civilization.”
Let’s look at some real-life possibilities and what to do about them, assuming that there is no doctor or hospital available. Remember that if trained medical help is available, one should always consider this course first as many conditions can be made worse by incorrect diagnosis and treatment.
Hypothermia
Believe it or not, hypothermia (the condition where the body temperature is lowered below normal) kills more people in survival/stress situations than does gunfire, wild animal attacks, poisonous reptiles and spiders, wounds, or drowning.

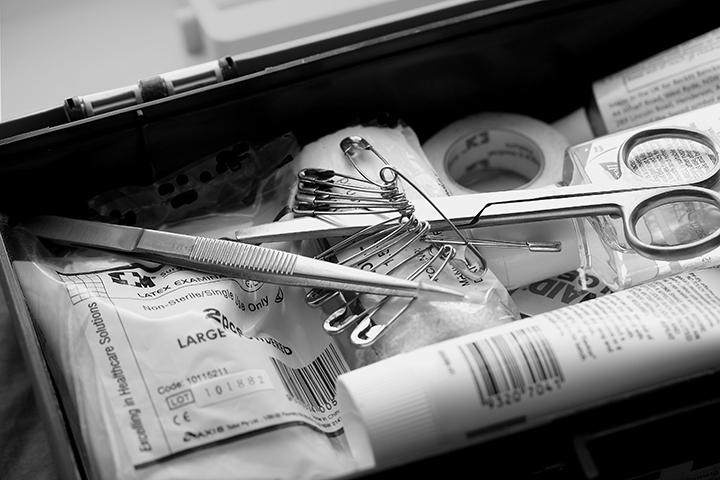
The large medical kit is portable. We carry it on all remote trips. |
Hypothermia has many causes, from shock following an accident to remaining outside in cold weather without adequate clothing or shelter to getting dunked in icy water-even for short periods of time. It is definitely something to watch for in any survival situation.
Identifying hypothermia can be a problem with the uninitiated, as it comes on slowly and the person still can walk and talk. But by paying careful attention, one can usually notice body shaking, paleness, and a tendency toward poor judgement and/or speech that doesn’t make sense.
Taking the victim’s temperature, you will quickly see that it is subnormal.
Hypothermia must be treated vigorously and immediately. Warmth is the key. As the body has lost it’s ability to warm itself, simply putting a blanket around the person is not enough. Build a warm fire. If the victim is wet, get them into warm dry clothes quickly. Warm a blanket or sleeping bag, then wrap it around them while they sit or lie in front of the fire. If they are not too bad, a drink of warm coffee or tea often helps. But do not give anything to eat or drink to a victim that is dazed or unconscious.
If nothing else is available, have one or more persons crawl into a sleeping bag or blankets to provide bodily warmth to the victim. Then keep the person warm and dry until they are fully recovered. You don’t have to be a mountaineer to suffer hypothermia. I have had several encounters: falling through thin ice while crossing a beaver dam, getting stuck out in an unexpected blizzard in June, and getting drenched in the rain while making a mile and a half canoe portage in Minnesota’s Boundary Waters. Hypothermia can be just plain uncomfortably miserable, but it can also kill.
Wounds
Most wounds that folks suffer in a survival situation are relatively minor, and though they may be uncomfortable and even bleeding, they are not usually life-threatening. The thing is not to panic. A little blood looks like a lot, especially when it is on yourself or a loved one.
If the wound is combined with possible other injuries, such as following a tumble down a rocky slope, you have to first assess the possible damage.
Could there be a broken bone? A concussion? Internal injuries?
Don’t panic. However, if you suspect such complications, do not move the injured party unless absolutely necessary, and then do it with great care.
Talk to the victim. He can usually tell you a lot about where he hurts and how much pain he is in. If the only injury seems to be the wound, reassure the victim and begin treatment.
Check the wound. Is it visibly dirty? Is the blood simply flowing from the wound or is it spurting? In survival situations, more people die from infected wounds than bleeding to death.
If the wound is relatively minor and the bleeding is minimal, you’ll want to gently clean it before any attempt is made to bandage it. Nothing causes infection more than bandaging an unclean wound, even if it contains no visible dirt. Remember that deadly staph organisms are commonly found on human skin.
A good way to clean most wounds is to gently bathe the area with mild soap and water. Mop away from the wound, as one would sweep a floor, instead of scrubbing back and forth. The latter only moves bacteria around rather than removing it from the area. Rinse or soak the area well, removing any debris carefully with sterile tweezers.
When the area is clean, pat it dry with sterile gauze or air-dry it, then apply Betadine or antibiotic salve. We use Betadine for deeper wounds, and antibiotic salve for lesser injuries. Minor wounds seldom require bandaging, healing quicker by air exposure. Deeper wounds and ones in areas where they will be constantly irritated by clothing or work should be bandaged. A simple adhesive strip usually does the trick.
If the wound is bleeding quite a bit, simply applying pressure to the area with a sterile gauze pad will usually stop it within a few minutes. Where tourniquets were once advised, it has been found that more damage was done by the tourniquet than the bleeding would have caused in most instances. The application of firm pressure directly to the wound is very effective. After the severe bleeding has been stopped, gently clean the wound, but do not destroy the clot that has formed or bleeding will probably resume.
Should you be dealing with a more severe wound, covering it with a Betadine soaked (but not wet) sterile gauze, then a plain sterile gauze square, then adhesive tape is usually sufficient. If the edges of the wound gape or there is a flap of skin hanging down, either gently match the edges with butterfly adhesive strips or suture them, if you have the experience. Remember that most wounds will heal fine without suturing, especially with a little help from gentle butterfly adhesive strips. Sutures that are too tightly drawn will cause pain and scarring.
Never bandage a wound tightly with gauze bandage or anything else. This will restrict circulation and can cause pain and severe problems and even gangrene.
In the following days, keep the wound clean and dry. Change the dressing as needed, usually twice a day, leaving the dressing off and the area open to fresh air and sunlight as much as possible. This will greatly reduce the healing time and reduce chances of infection. Bacteria love damp, dark, warm areas, including a wound which is bandaged.

Our medical kit comes in handy in daily life, from cuts to colds. |
Watch for ugly redness or a fever in the patient, which would indicate infection in the wound. In this case, keep the area soaked in Betadine and give the patient antibiotics for 10 days, even if they seem better within a day or two. Immersing the infected wound in a hot Epsom salts solution also helps reduce pain and swelling along with cleansing the area.
Simple pain and swelling from the injury can be alleviated by plain aspirin, taken orally. Do not give aspirin immediately following an injury if there is a possibility of internal injuries, as aspirin may enhance hemorrhage. Do not give aspirin to young children. Use Ibuprofen instead.
Colds and flu
These common conditions are bad enough when things are fine, but are downright miserable in a survival situation. And remember that stress helps these overcome your body.
At the first sign of a cold or the flu, do those things your grandmother told you: keep warm and dry, rest, and drink plenty of fluids. Then add vitamin C and zinc lozenges, and most folks can overcome that mean cold or flu in a few days. If you need to alleviate symptoms, such as fever, runny nose, or coughing, take a cold/flu medication that covers your symptoms. By now, you probably know what works best for you and your children. The key is to have the medication on hand.
If the cold or flu lasts for longer than 10 days or seems to get worse, it may have turned into bronchitis or pneumonia, and antibiotics are necessary. Remember that home treatment is only for when no doctor or hospital is available.
Sprains
Believe it or not, sprains are one of the most common injuries in a survival situation. And often one of the most painful. The sprain can arise from walking over debris, logs, rocks, and even urban curbs. It can come from a fall or even an ankle turning over. (Your family will experience less sprains if they wear good, sturdy footwear, not flats or sandals. Ankle support is very important.)
When a sprain is new, immerse the affected part in cold water or apply ice packs to reduce pain and inflammation. I’ve found that when I take two plain aspirin immediately following such an injury that it greatly reduces both pain and inflammation later on.
If possible, rest the sprain, keeping it immobile and elevated for as long as reasonably possible. I continue taking the aspirin to keep down the inflammation. If you must move about, gently wrap the area with an elastic bandage to support it. Do not wrap area tightly or you will restrict
circulation and make the pain much worse. Use a cane or crutches if the sprain is in a foot, ankle, or knee to reduce the amount of weight put on the injury. If the sprain is in the hand, wrist, elbow, or shoulder, keeping the arm in a sling will greatly reduce the pain and help it heal.
After a day, begin using hot Epsom salts soaks or packs to reduce the swelling and pain. And remember, the more you use a sprained joint, the longer it will take to heal and it may not ever heal completely if you persist using it before it heals. Rest is the key.
Slivers and spines
Getting a sliver or sticker of some kind is awfully common, especially in a survival situation, when one may be building a wood fire or foraging for food. Most of the time you can simply get hold of it and pull it out and be no worse for wear. But sometimes it is in too deep and painful and seemingly impossible to remove.
For relatively minor, but painful slivers, I use a sterile hypodermic needle, choosing the gauge (diameter/size) to fit the sliver size. Most smaller slivers are removed very easily with a 20-gauge needle. Now I use a hypodermic needle for several reasons, as opposed to using a sewing needle.
First, and most important, they are hollow. This allows one to slip them into the sliver track with little pain, as less bulk is pressing on that tender skin. They are also sharp, which lets me carefully pick away the skin layer above the sliver which has no feeling because there are no nerves, until the sliver is exposed and can be either snagged with the needle and drawn out or picked up with a pair of sterile tweezers and removed.
With larger slivers, I use an 18-gauge needle, which does the same thing but is a bit stronger. When the sliver is very painful, using a local anesthetic, such as oral medication or antibiotic ointment containing an anesthetic on the area about 10 minutes before the procedure, helps a lot.
The main thing is to keep the sliver aligned with its track, and not to pry it upright in removal, which is extremely painful.
Once the sliver is out, a little alcohol or Betadine will disinfect the area and let it heal quickly.
I’ve discovered a great treatment for small stickers and cactus thorns which break off when you try to remove them from tender skin. Should you or a family member fall into a cactus or other plant with fine stickers, simply coat the area with Shoe-Goo or Sportsman’s-Goo, which is a clear silicone-type produce. Just a thin coat is fine. In about fifteen minutes it will be dry, and you can just peel it off, complete with all of the painful stickers.
Of course, there are many other possible injuries and illnesses. With a little advance preparation and study, you’ll be surprised at what you can glide smoothly through. There is seldom any benefit to panic; a positive mental outlook can save lives.
|
||||||||||||||||||||||||||||||||||||||||||||||||||||||||||||||||||||


Good, well thought out!