
By Kai Moessle
I opened the valve on the output side of the pump slowly, like the instructions said, and after a few more starts it ran just by itself. Still skeptical if this contraption could really work, I ran up the hill to the building site and when I got there — lo and behold — there really was water coming out of the pipe!
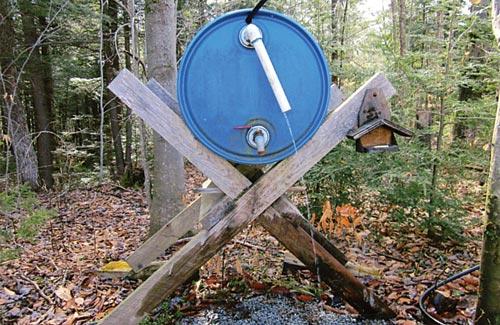
When I got up the next morning and saw water coming out of the overflow pipe of the 50-gallon barrel I had set up, I was a believer.
This happened in April 2011, eight months after I had stood on the same spot and wondered how on earth I could get water from my spring up to the cabin site. Initially I had wanted to build about 50 feet away and only 8 feet above the spring, but sanitary concerns (a septic tank and leach field have to be at least 100 feet from any open water or well) forced me to 120 horizontal and 20 vertical feet away on top of a small rise. In the original spot, I could have used a regular hand pump to get my water into the cabin. The problem is that suction pumps can only lift water up about 22 feet — above that, the water column gets too heavy. Even though I was only 20 feet higher than the spring, I had to add one foot to the lift for each 20 feet of horizontal distance due to friction in the pipe, which put me at about 26 feet — too high for my pump.
What to do? I had never given any thought to a ram pump until I talked with my mother one day and she mentioned having seen one on TV in a report about a historic village. To say the least, I highly doubted the claim that “It pumps water really far uphill without any power,” but since I was out of options (I couldn’t afford to have a well drilled), I started to do some research.

According to a few websites I looked at, ram pumps have been around for at least 200 years, but fell out of favor when electricity became available. Even with a step-by-step explanation on how they actually work, I still wasn’t convinced; it just sounded too good to be true: With only the force of water running through a pipe and two valves, it could pump water anywhere from 20 to as much as 700 feet higher than the pump itself.
The other deterrent was the price on one of those “physical wonders.” The cheapest I found cost $520 — too much to spend on something I wasn’t sure would work.
While researching, I came across a few plans for building one yourself, but all of them required extensive metalwork knowledge and some welding, drilling, and threading — none of which I knew how to do or had the tools for.
I finally found the website of a gentleman named Don Wilson (www.atlaspub.20m.com) where he describes the “Atlas Ram Pump” as easy to build with “no welding, drilling, or tapping involved.” (Note from the editors: Don Wilson wrote a few articles for BHM; you can read them in The Best of the First Two Years and The Third Year Anthology.) All the parts used would be regular galvanized pipe fittings and therefore the cost would not be more than $100. That sounded exactly like what I needed, so I sent a check for $10.95 to Mr. Wilson and a couple of weeks later had a copy of his booklet, All About Hydraulic Ram Pumps, in my mailbox. After reading through its 40 pages, I had a basic understanding of how a ram pump worked and was beginning to think it was actually possible that I could get my water that way. As it was now December and I wanted to start the foundation for the cabin in April (at which point I would need lots of water for the concrete), I decided to give it a try.
Mr. Wilson’s book includes a very detailed parts list and first-rate instructions, so off to the hardware store I went. Neither of the three clerks who asked if I needed any help while picking out all the parts could wrap their head around what I was trying to build. One flat-out refused to believe me, even after I let him look through the book and told me he thought I was wasting my time and money. Since I wasn’t fully convinced yet either, I just thanked him and went on my way.
The assembly itself went fairly quick with only one hiccup: One of the parts needs to be fabricated by fixing a 1-inch street-ell inside a 2-inch street-ell with epoxy resin. To keep the resin from flowing out the bottom, a seal is made from a drain gasket and that’s where I wasn’t careful enough. I had just finished pouring the resin and was admiring my handiwork when I noticed a drip of resin oozing out from under the gasket — oh crap! I managed to pull everything apart and get it cleaned up with acetone before the resin hardened out — saving myself from having to buy all the parts again.
The rest of the build went well, thanks to Mr. Wilson’s detailed instructions. Since it was below freezing outside, I cast the concrete base in my kitchen sink so it could cure slowly.
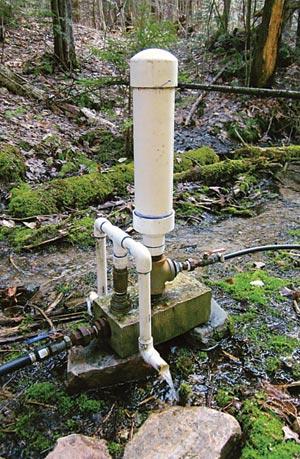
Fast forward four months and I had the pump, 100 feet of 1-inch black poly pipe (intake), 300 feet of ½-inch black poly pipe (to get the water up to the barrel), and other assorted odds and ends sitting next to the spring. The Atlas Ram Pump needs at least four gallons per minute of water flow (not a problem; my spring has around 20 gallons per minute) and 6 feet of fall to work right. Downstream from my spring I don’t have a lot of drop and according the instructions the intake pipe could not exceed 100 feet of length or the pump would not work. I’m 5’11”, so I took the upper end of the pipe, dropped it into the stream and went to the lower end, held it a bit higher than my head, and waited for the water to come out. After a couple of false starts I found a spot that would work and set everything up.
The pump needs a certain amount of backpressure in the delivery pipe to work, so initially it has to be “started” a few times. After that it went just like I described at the beginning — and I finally believed everything I had read!
A ram pump takes the basic principle of inertia and uses it to push a small amount of water far uphill. The book contains a step-by-step explanation with pictures, which makes it easy to understand, but basically it works like this: Water enters the pump through the intake pipe and runs out of the waste valve, which is first in line. Once the water builds up enough speed it will slam the waste valve shut. With this path now blocked, the water keeps going and opens the check valve leading into the pressure tank and from there into the delivery pipe. The momentum forces a small amount of water into the tank until both pressures are equalized, at which point the check valve closes again. Now, for a split second, there is nowhere for the water to go at all. The water column in the intake pipe still has some momentum left, but nowhere to go so it “bounces back” up the pipe itself, almost like a rubber ball bouncing off a wall. This creates a slight vacuum inside the pump, which lets the waste valve drop open again. Now that the water has a place to go once more, the cycle starts all over. The time for one complete cycle varies with the amount of drop in the intake pipe; mine takes about three seconds.
The “bounce back” is the reason why the intake cannot be longer than 100 feet: Any longer and the pulse travelling up the pipe would be cancelled out by water coming in from the upper end and the vacuum in the pump could not form, effectively stopping it. That pulse is known in the plumbing trade as a “water hammer” and can be quite destructive to pipes and fittings if it happens inside your house (if you slam shut a faucet, for example).
It is pretty powerful as you can feel the whole intake pipe “thump” all the way to the upper end.
The output is only about 10-15% of the total water flowing through it, but it runs 24 hours a day, so that little bit adds up. My initial setup gave me around 10 gallons per hour (measured by timing how long it took to fill a gallon jug) at the barrel. Since I mixed all my concrete for the cabin foundation in a wheelbarrow by hand, that was plenty to keep me going. At the end of the day, the 50-gallon barrel still had enough water left to wash the tools and myself.
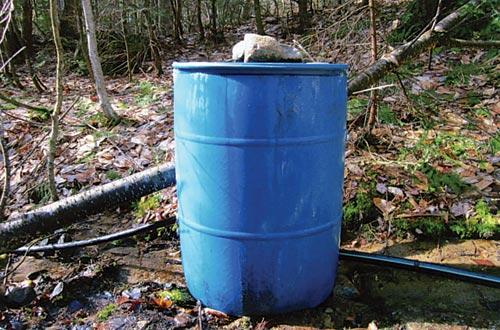
Over the past four years I modified a few things on the intake side. I added a collection barrel to act as a settling tank for the fine sand that’s in the water and to get more fall. It’s a 50-gallon polyethylene barrel that was used to ship propylene glycol (non-toxic antifreeze), cleaned out with soap and water. The pump intake pipe comes out of that barrel while the barrel’s intake pipe starts another 100 feet further upstream (actually right in the spring pond) and adds four feet of fall to the seven feet from the barrel to the pump. With this setup I’ve raised the output at the cabin to 20 gallons per hour.
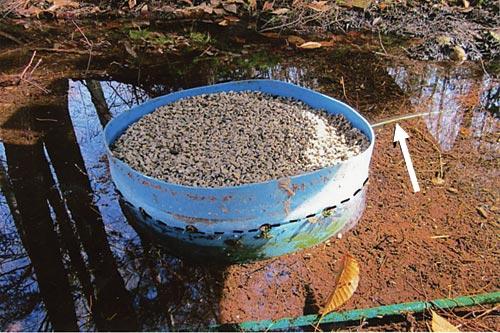
Another area of experimentation was the intake filter. I started out with some screen tied over the pipe, which plugged up at least once a day. I went through about 10 different designs and this spring finally came up with the one that’s been working all summer without plugging up: I took the bottom half of a 50-gallon poly barrel and drilled ¼-inch holes all over it. The intake pipe and filter went through a hole in the side and then I filled the whole thing with #1 crushed stone, which helps to keep it submerged and also prefilters the water before it gets to the actual screen filter.
The pump has to be level in order to minimize wear on the shafts of the valves. Initially, I used concrete blocks to set it up, but they fell apart due to the water freezing in the winter, so now I have it sitting on two flat rocks and shimmed with some scraps of wood.
It is also a good idea to connect both intake and delivery pipes to the pump with a union and either a gate or ball valve. It makes pulling the pump out for inspections and/or repairs much easier. There’s no draining either pipe and once you’re done, all you do is reconnect the two unions, open the valves, and she’s off and running again. I wrap some teflon tape on the union threads so they come apart easier and don’t rust together.
I also made a diverter for the waste water out of some 1-inch PVC pipe, so it doesn’t splash all over the pump.
The coldest temperature I’ve had my pump running at was 20° F one spring morning last year. Since I don’t live at the cabin yet I usually pull it out and drain it in late October and put it back in use in mid-April. The biggest danger of freezing (as long as it stays running) is in the small pressure tank that sits on top of the pump and has a static water level in it. Of course, if it gets too cold or the pump stops for some reason it will freeze and possibly burst, so I’d rather be safe than sorry. Once I move to the cabin, I’ll build an insulated enclosure for the pump with room for a kerosene lamp to supply some heat if it gets too cold (the record low here at the cabin was -24° F two years ago).
Once I’m all set up, the pump will supply a 50-gallon barrel in the loft (with an overflow back outside) which will gravity-feed the water to the kitchen and bathroom.
Maintenance is almost nonexistent with this pump. After five summers (about 30 months total) of use, the only wear I’ve noticed is on the shaft of the check valve plunger, which has lost about 1/32″ of diameter. Both of these valves are standard 1-inch brass check valves (which cost around $20 at the hardware store) and are easily reached for inspection or replacement. If I wasn’t pulling it out each fall anyway, I would take it apart once a year just to check everything. The only regular maintenance I did so far was to flush the accumulated sand and dirt out of the collection barrel — a 10-minute job once a month.
The best feature of this pump is its quiet operation. The only noise it makes is a muffled “thump” each time the first valve shuts, which is every 2-5 seconds, depending on the setup. It sounds like a heartbeat out in the woods and I have to strain to hear it from 100 feet away.
Its small size also lets it blend in with its surroundings. One could paint the outside to match the environment or build a small box around to protect and hide it.
I fully expect this little marvel to outlast me, it is so rugged!
Finally, I have to agree wholeheartedly with Mr. Wilson when he says on page 10 of his book: “There is no equal available today for economy, rugged reliability, and simplicity of operation.”


I built a hydraulic ram pump back in school for a science project. I found that you can squeeze a little more efficiency out of it by varying the length of stroke of your first check valve—-the valve that is held open and creates the water hammer when it slams closed. The best experiment would be to have 3 valves to test….each one with a slightly different length of stroke. Additionally, I experimented with varying the k value (Spring strength) of the spring holding open the valve…this can also affect efficiency. With 3 different stroke lengths and 3 different k values, and then testing all combinations enough times for good data, you have a good weeks worth of work. I don’t have my data anymore, but objectivity will allow you to find that perfect sweet spot of stroke and k value. Watch it! With a closed valve after my pressure gauge, I was able to generate over 120 PSI….the max of the pressure gauge. Open valve operating pressure was somewhere in the order of 15 psi if I remember correctly. This was a ram that had 6 feet of drop from a 5 gallon bucket of water and I was shooting water out of a small 3/8” plastic tube running 50 plus feet up a white pine. Good luck!
Great read. I’ve looked into this technology before. I don’t knits that I’ll ever actually use it. But, it was nonetheless very interesting.
I grew up in Switzerland and we had a ram pump like that in the cabin in the alps where I spent most of my childhood during the 1960s. But it had been there since the 1930 s and is still working.
Nice to see that people make use again of technology that doesn’t require much high tech material nor maintenance. Love your article. Hans Burch
I first saw one of these pumps on a little ranch in Brazil in the 60’s and was fascinated by it. It was a cast iron globe shaped pump that just pumped away. I was so fascinated by it, I bought one and put in my overweight luggage and brought it home. I still have it but have never found a place to set it up. Great ancient technology that works today. Nice article. Thanks
I love this idea! What kind of pressure can I expect?