By Jacob Duffy
Summertime is fire season. Red-Flag Warnings abound and many property owners surrounded by acres of forest or tall grass often become acutely aware that their homes are more vulnerable this time of year. There’s no perfect method to avoid a wildfire disaster, but there are ways to reduce that risk.
The most immediate and obvious step is to remove any abundance of combustible debris from the property, especially along the ground. Even among tall trees, most fires will travel low, staying at ground level. The more combustible material available in the fire’s path, the longer and hotter it will burn. You don’t have to remove trees from your property to make yourself safer from a fire, but you should remove the debris they drop.
This helps reduce the threat of a super hot fire, but it certainly doesn’t make a property fireproof. There’s no way to make a rural property totally fireproof without decimating it and paving it over but that totally eliminates the purpose of having it; however, there is a way to make very specific sections of a rural property fireproof without destroying too much of its natural appeal.
Cut a fireline
Fire requires three ingredients: fuel, oxygen, and heat. Remove just a single ingredient and the fire will die out. If you can successfully remove fuel from the ground, you’ve created an area where fire cannot burn along it. Armed with this knowledge, you can cut a trail where all fuel, i.e., all organic material, has been removed from the ground. This will expose mineral soil which does not burn.
After a fire has burned through all the organic material on one side of a fireline, it will hopefully whither away and extinguish. It cannot burn the mineral soil of a fireline, but it can still “jump” across if the trail is too narrow. A fireline should be between six inches and three feet across.
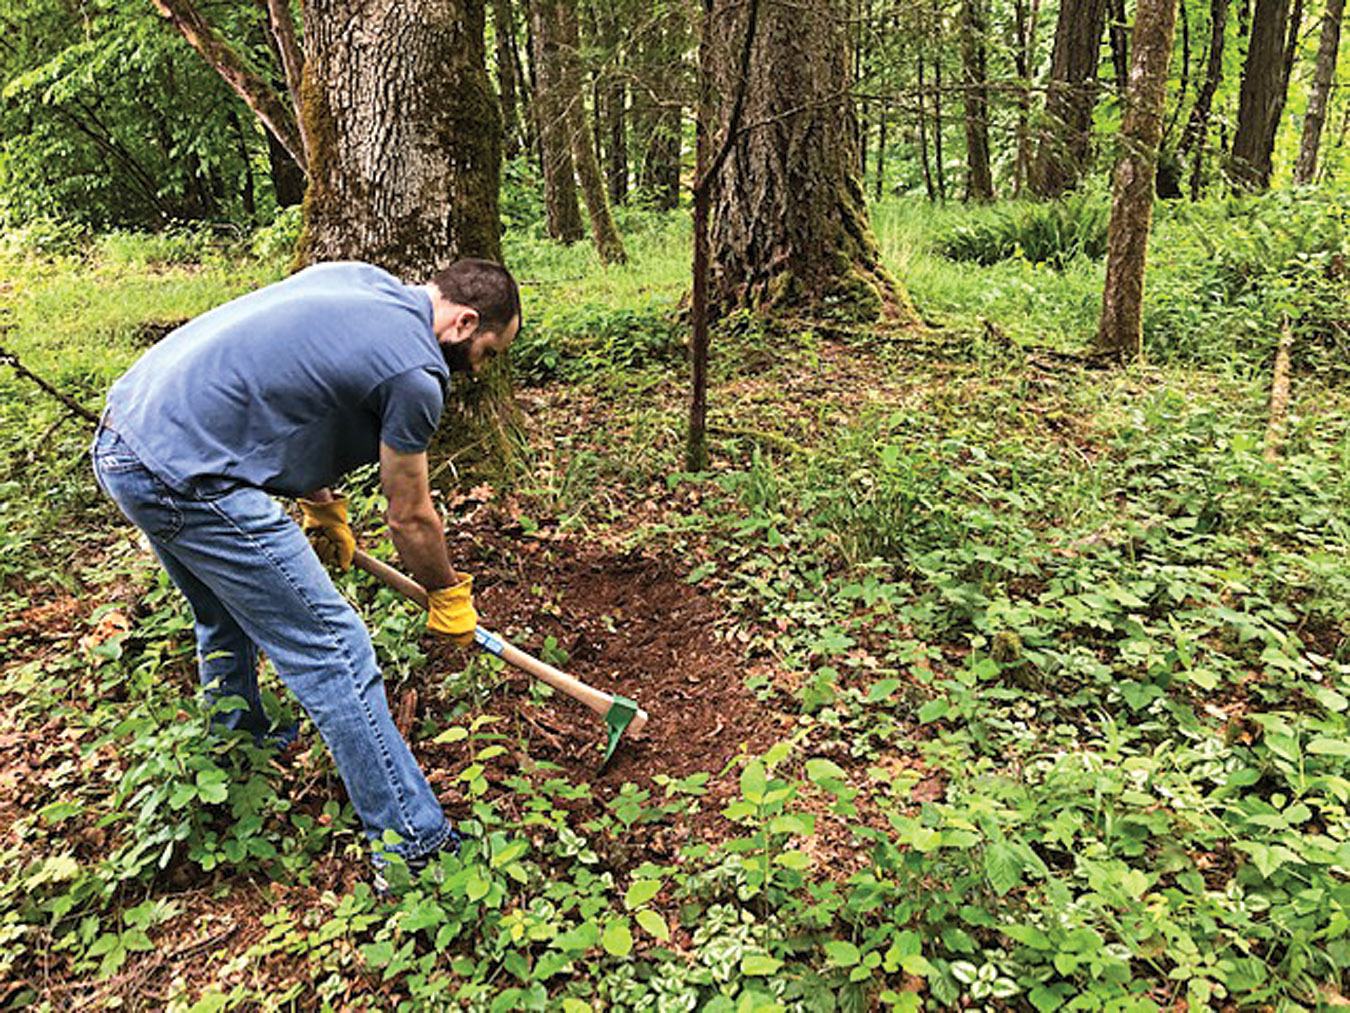
Here I demonstrate how to cut a modest-sized fireline. It is very straightforward.
Giving your fireline a better chance of preventing a fire from “jumping” across is often simply to make it a bit wider. It’s also important to make sure that burning debris has a lower chance of falling or rolling across the fireline. Large combustible debris should already be removed from around the area where the fireline is to be cut. On steeper terrain, a fireline can be dug out a little deeper and fashioned into a slight cup to help catch rolling debris. A fire can also slowly burrow beneath a fireline if there is a root smouldering away underground. Preventing this is as simple as removing the roots within the area of the fireline.
At the very least, a fireline can help slow the spread of a fire. This gives professional firefighters a better chance to save the property. If a property is too dangerous for firefighters to save, they will let it burn. It’s not worth their blood. It’s your responsibility to make sure your property has a reasonably defensible chance ahead of time.
Crews of wildland firefighters often cut firelines while a wildfire is burning, but this isn’t advisable for the average property owner. A crew of wildland firefighters is made up of 20 people. It’s lead by its most veteran members, often having decades of experience between them, and usually backed by plenty of resources. This article is not a guide to fight a wildfire while it is burning, but rather a guide on how to build defensible firelines ahead of time. It is still best to pack up and leave when a wildfire is bearing down on you.
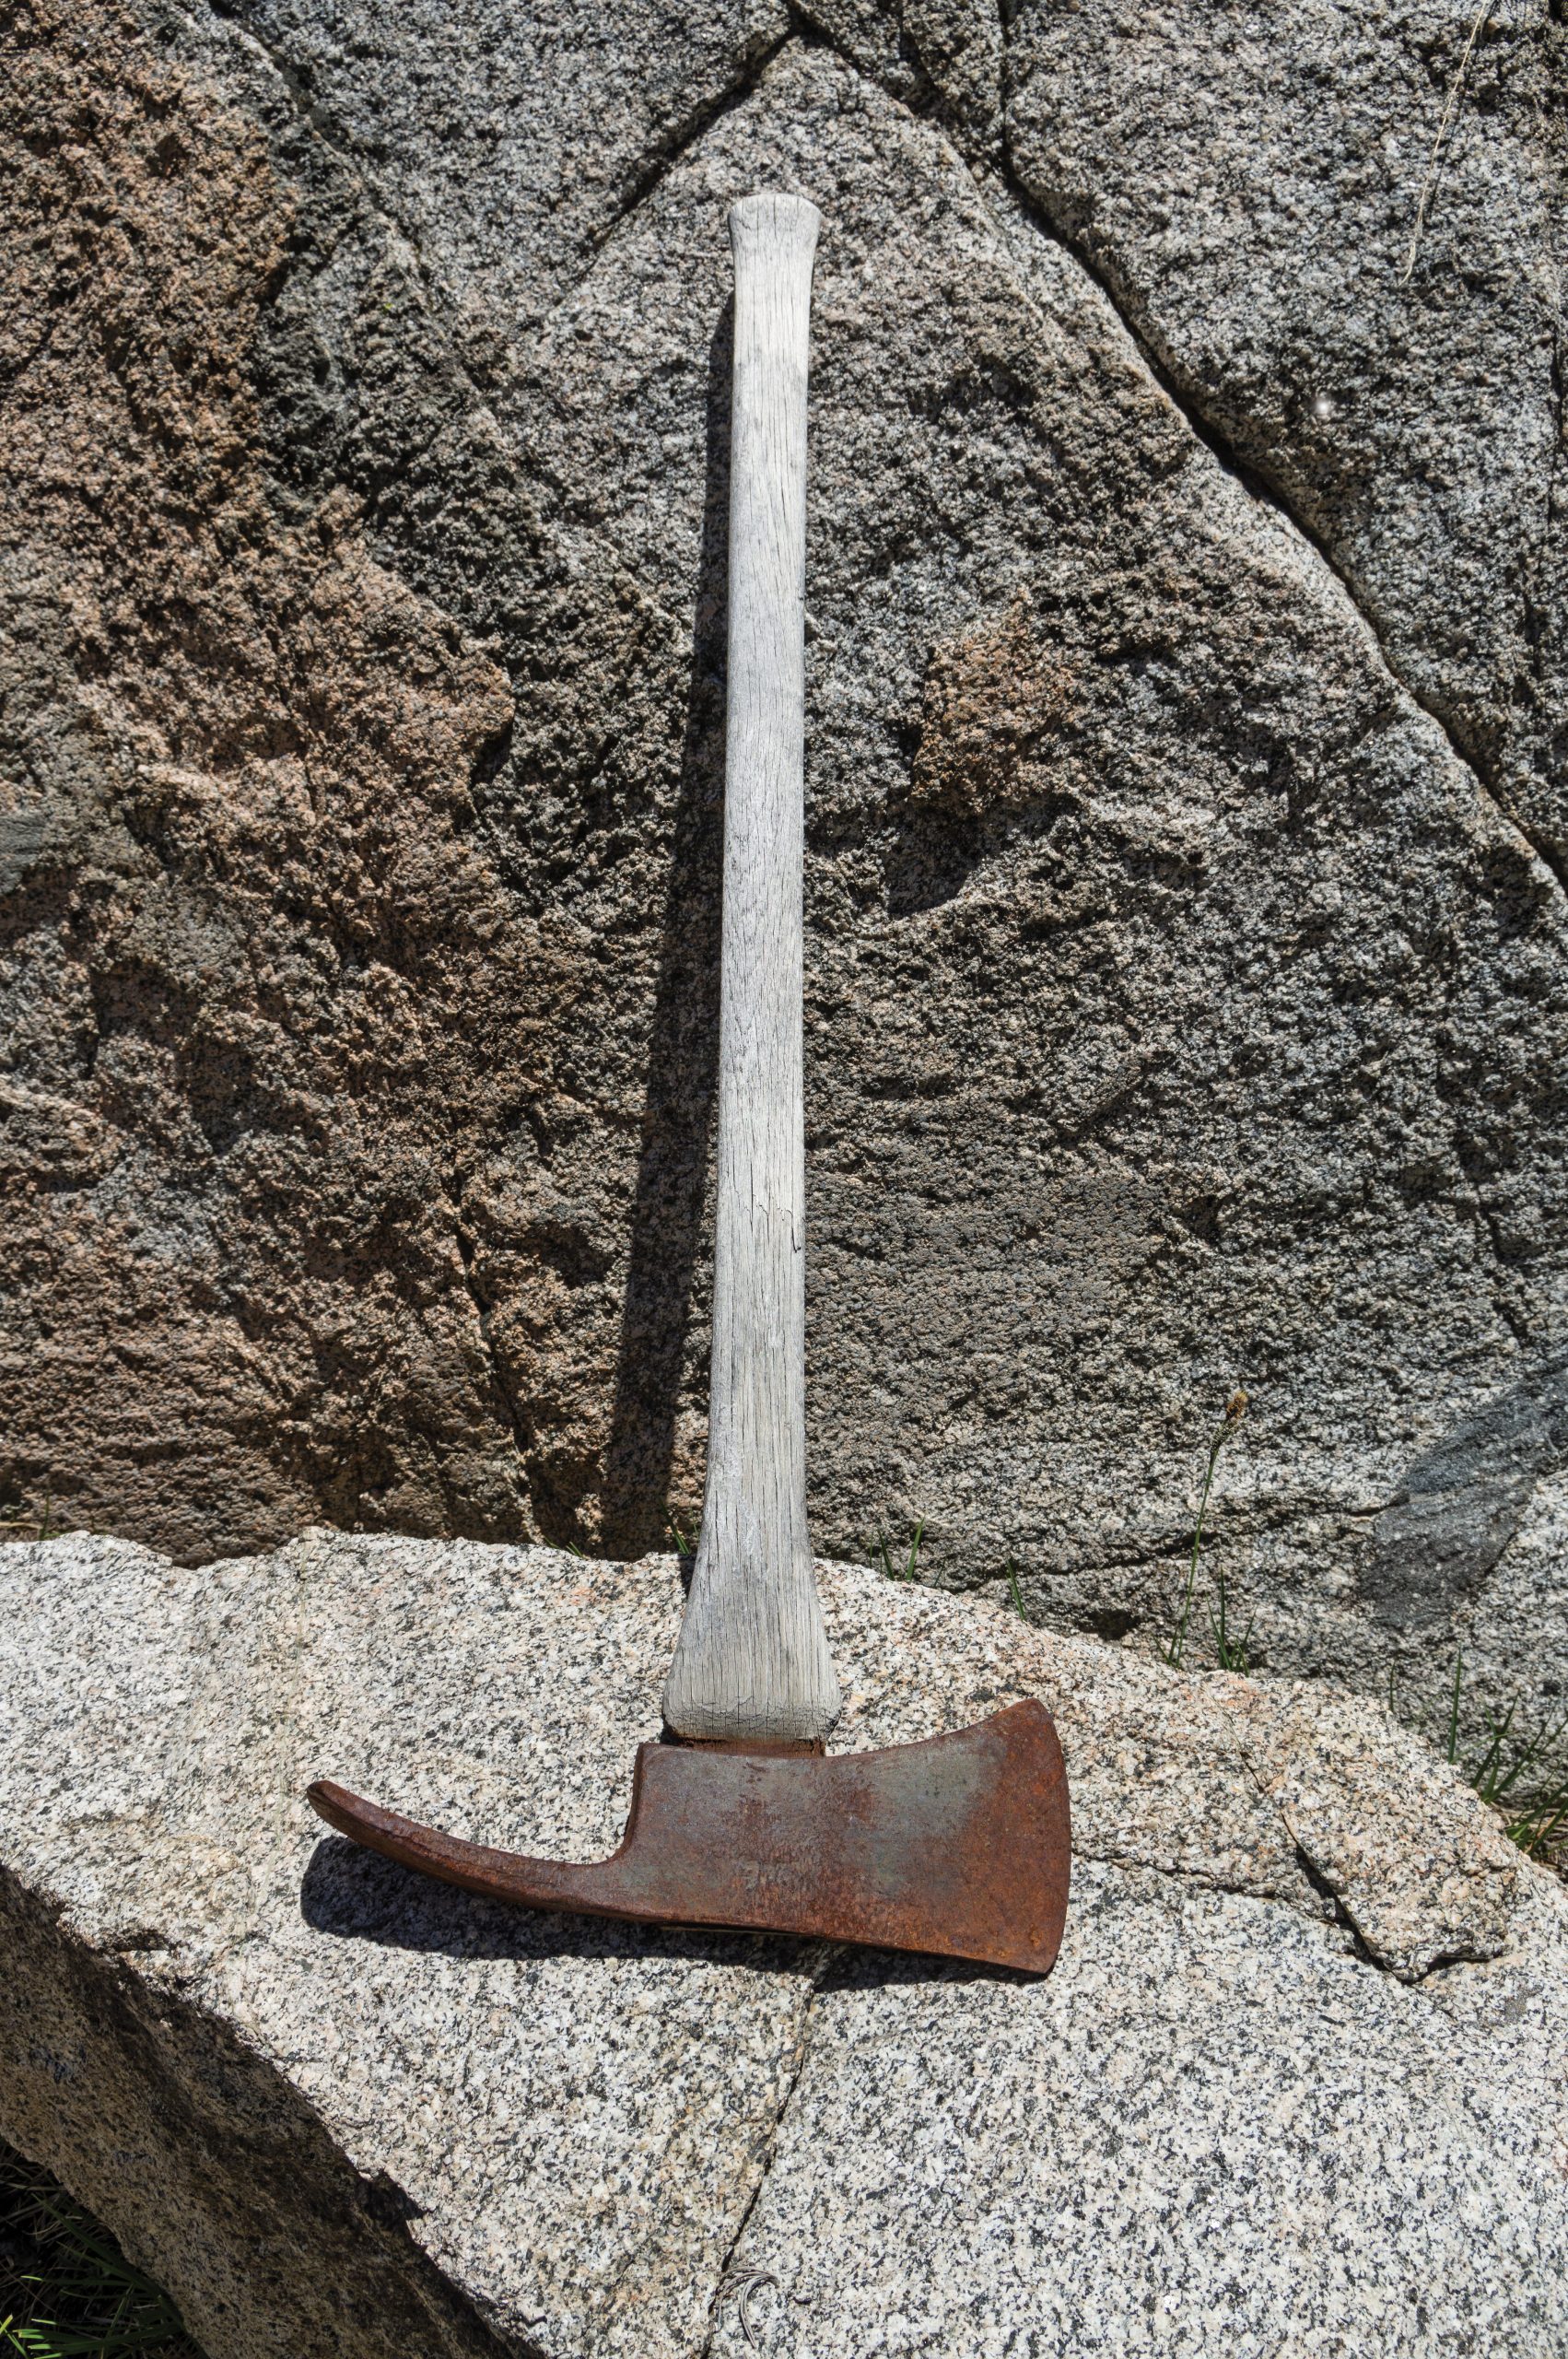
An older pulaski
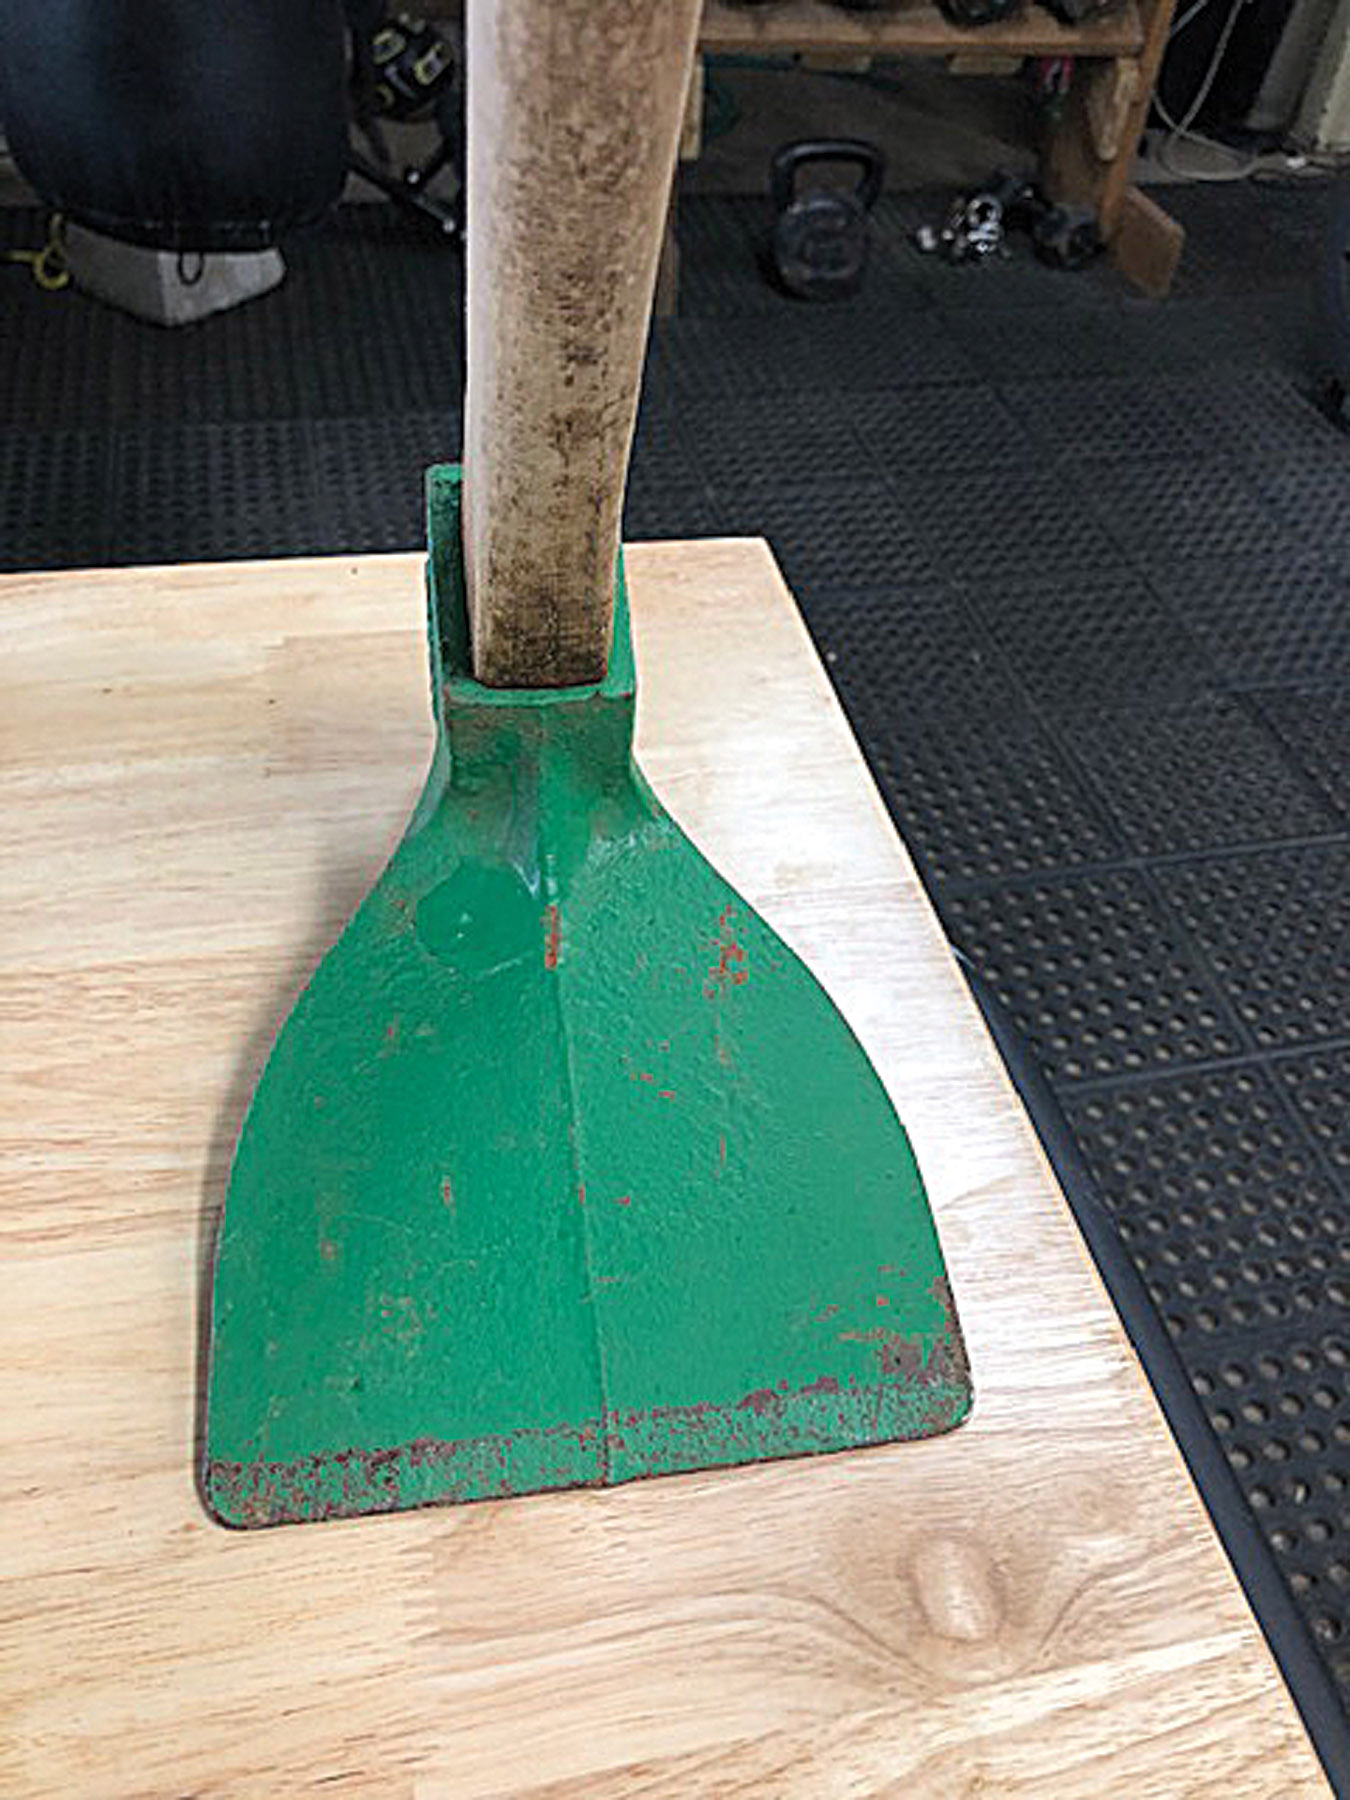
A barely used hazel hoe that has never been sharpened; there is still some paint on the bevel.
Tools of the trade
A tool used to create a fireline can ultimately be anything that removes organic combustible material and exposes the bare mineral soil beneath. Hand tools, heavy machinery, and even fire itself can be used to this end.
Utilizing fire as a fire prevention tool technically works; combustible material can only burn once. However, there’s obviously a much higher risk involved. Back-burning, as this is called, is sometimes employed by wildland firefighting operations but I am not going to recommend this to the average homeowner. Burning an easy-to-control slash pile (during the appropriate weather) is one thing, but back-burning an entire field is quite another. This should only be done if you know what you are doing and it is legal.
Larger firelines, often called fire breaks, can be made with heavy machinery. Wildland firefighting operations often have bulldozers cut large paths through the forest. This wide path not only acts as a large fireline, but also gives vehicles access to remote areas. Crews of wildland firefighters can now be dispatched to the area. Although the bulldozer is a great help, most of the manual labor needed to quell a wildfire will still often be done with hand tools. Hoes and pulaskis are the most common.
Shovels aren’t terribly useful for the type of digging involved. The point isn’t to dig deep into the soil, but simply to expose the top layer. The scraping motion typically used to cut a fireline is significantly easier to do with a hoe or pulaski. A hoe can scrape away material with a simple downward motion while a shovel must be swung from side-to-side.
The pulaski is largely synonymous with “wildland firefighting tool” and is the most iconic hand tool associated with the job. The head of a pulaski has an axe blade on one side and an adze blade on the other. Unlike many other adze blades, the pulaski has a narrower width. It’s excellent at piercing through compacted dirt but it doesn’t remove all that much at a time.
The hazel hoe (forest adze) doesn’t look as cool as the pulaski, but it’s the tool a wildland firefighter will grab if he’s serious about getting a good day’s work in. The cutting edge is significantly wider so it can move more material per swing.
However, it isn’t so wide that it can no longer get a good bite into the dirt. The wider the cutting edge, the more the downward force from each swing is distributed along the ground, i.e., there will be less force applied per square inch. In my opinion, the hazel hoe is the best hand tool if you’re looking for a sweet spot between the ability to move more material and the ability to cut through the ground.
My preference for the hazel hoe is partly due to the fact that I’ve lived in the Pacific Northwest my whole life. Out here the wilderness is largely dominated by fir forests with a very soft layer of duff beneath them. This soft forest floor of partly decayed organic matter is significantly easier to dig through than packed soil out in a field. A hazel hoe is outstanding for moving large amounts of duff, but a tool with a narrower adze head will pierce tough sod much more easily. If you live in a different biome than I do, your favorite hand tool might be different than mine.
Work smarter
You should know how to use these tools efficiently. A hoe is not an axe. Do not swing it like one unless you need the extra power to deal with a particularly stubborn root. Even then, a few moderate swings will usually do the job just fine. Swinging your hand tool down like a wild man with all the force you can muster might seem cool if you’re an energetic youngster but you’re actually just wasting your energy.
As I’ve said earlier, depth is generally not needed when cutting a fireline. Occasionally some forested areas will have a very thick layer of duff to remove but this is much softer and easier to cut through than regular dirt. While depth might be needed for this terrain sometimes, a shovel is still not.
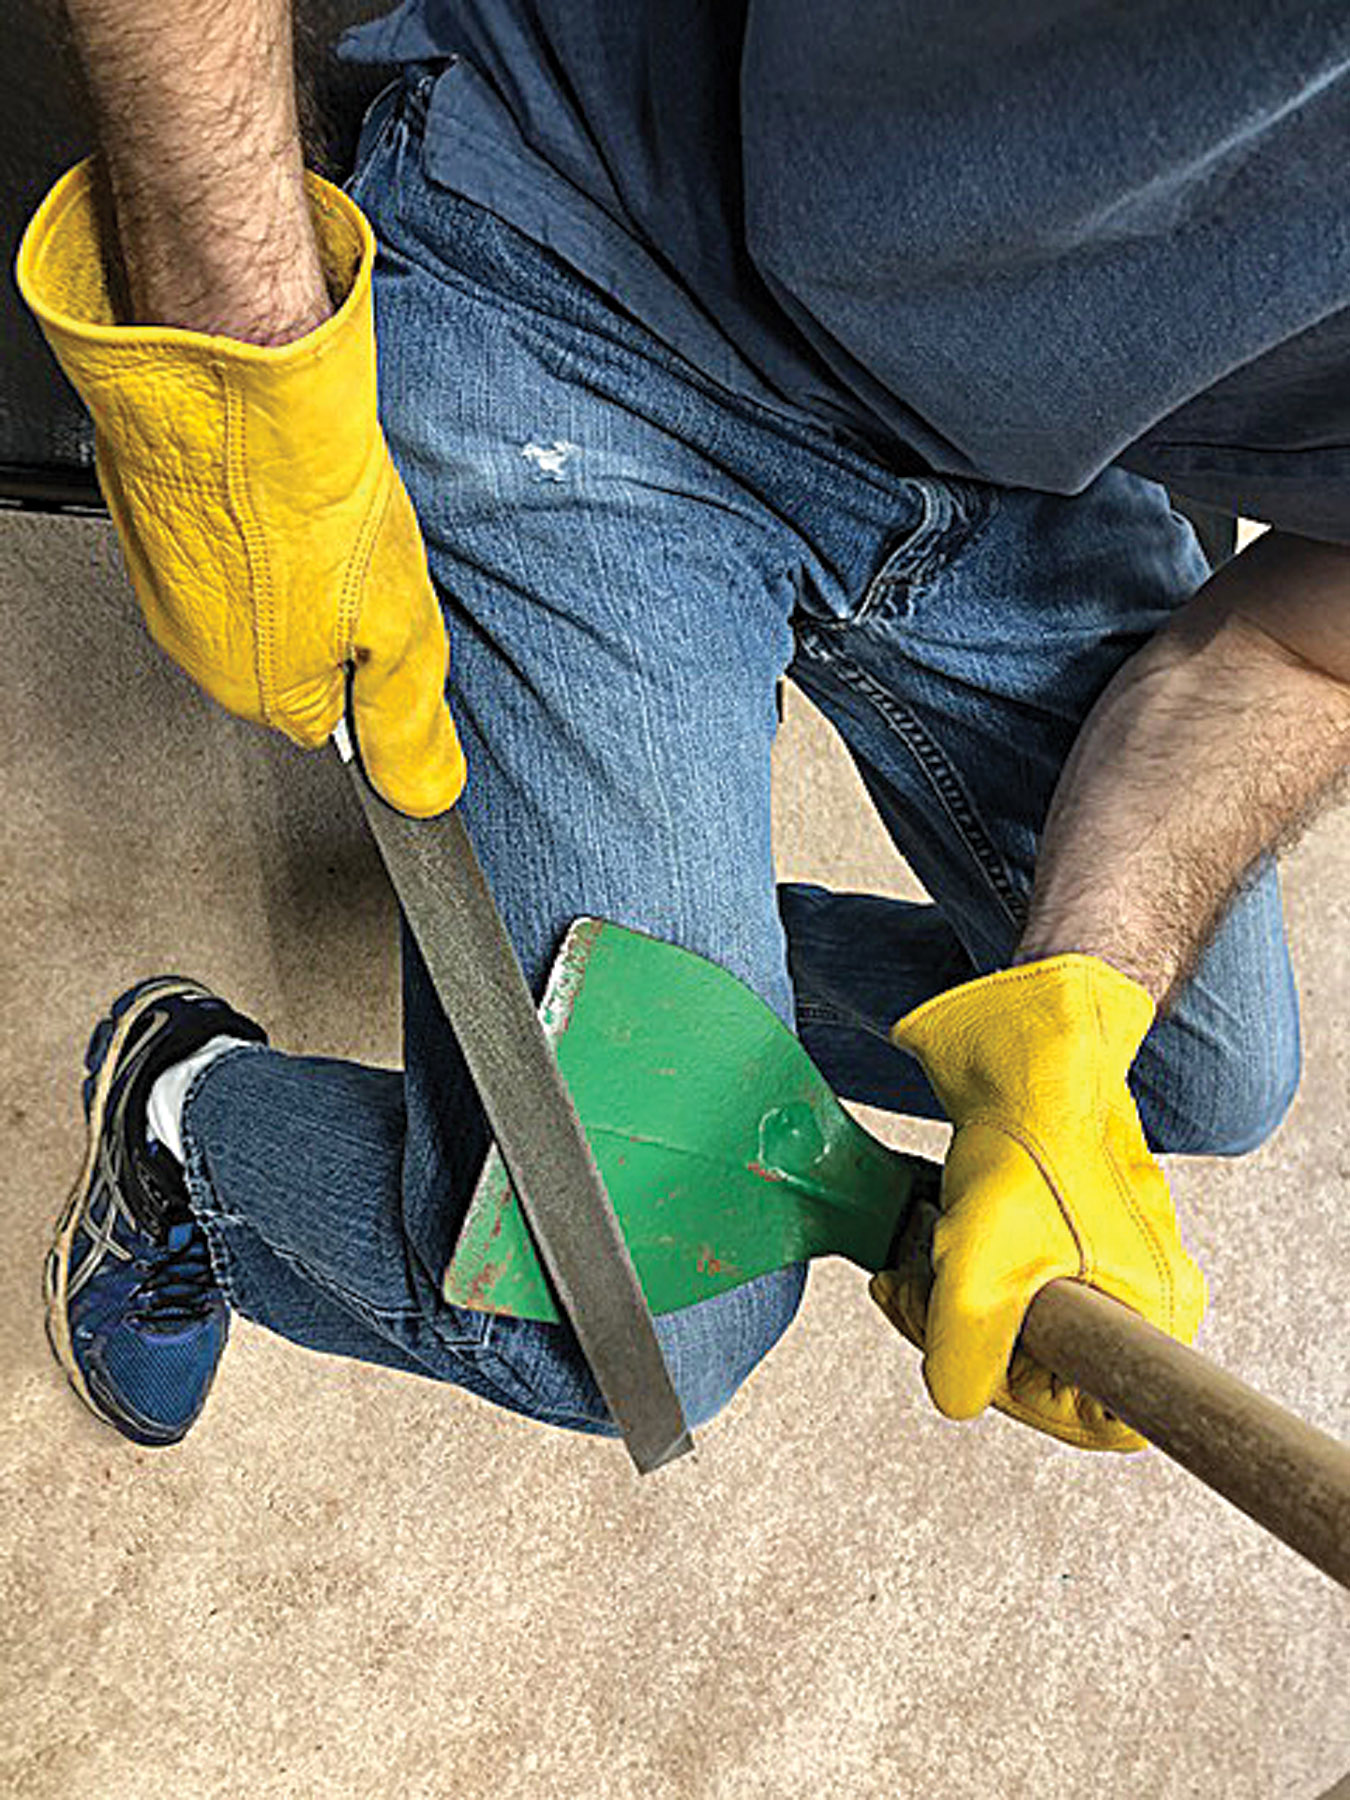
How to sharpen an adze head out in the field without the convenience of a workshop.
Small swings from a hazel hoe or pulaski will cut through most organic material just fine. And when you swing, you don’t generally have to apply much force. Gravity does the work for you. If more force is needed, simply raise the head of the tool a bit higher on the next swing. If gravity needs a bit of help, pull the tool downward as gravity would just after the highest point of your swing. Go ahead and let gravity start the acceleration downward for you though. Gravity is doing the work; you are simply the aid.
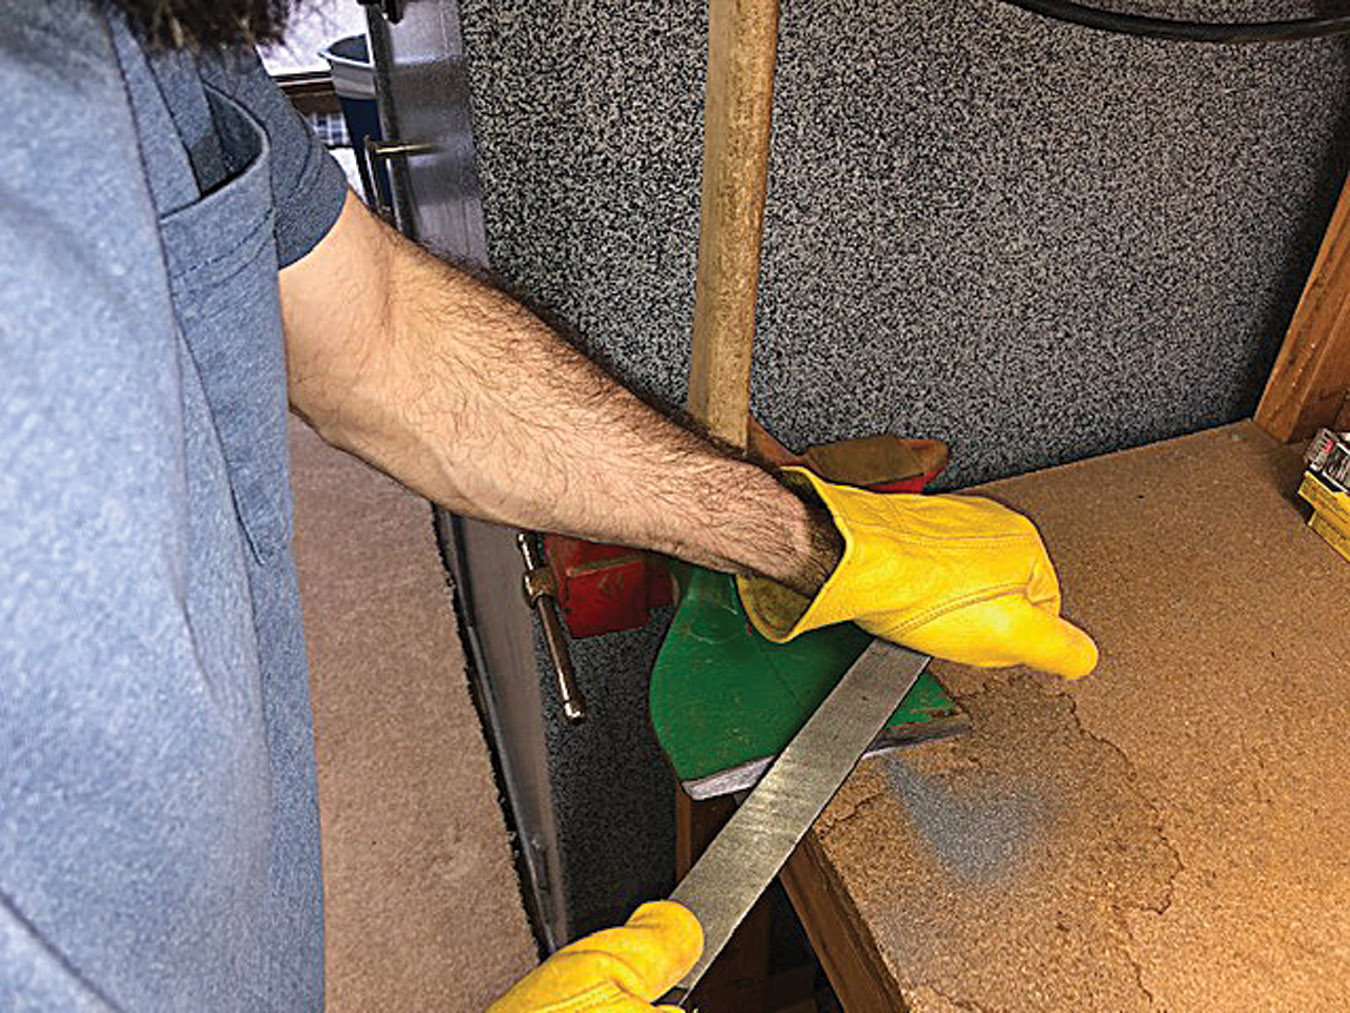
Using a vice is significantly more convenient. I don’t use a bench grinder because it’s fairly easy to ruin the temper.
While you are pulling the hand tool downward, you should also be mindful to pull it slightly inward (toward you) as well. An adze cutting edge is perpendicular to the haft unlike an axe which has a cutting edge that is parallel. This cutting edge is also bent inward slightly, toward the user. This slight angle of the cutting edge is very convenient for scraping away the top layer of ground. Rather than landing the cutting edge of your hazel hoe straight into the dirt and making deep gouges, pull it back as it’s about to connect. This will result in a nice convenient scraping motion that still has a decent amount of power behind it. Your hands should move the head of the hazel hoe in an easy oval motion.
I know I said that a hazel hoe is not an axe, but your front hand should still function as a guide while swinging it. The only heavy work your front hand should be doing is helping to raise the hoe up for each swing. As the hoe comes down, the front hand is merely a guide for where the cutting edge lands. Move the front hand along the handle as needed.
The back hand is responsible for keeping a firm grip on the hand tool. Like using an axe, the rear hand must remain secure. If you never switch hands, this one will become considerably more prone to blisters. If you’re working for several hours, I recommend switching sides to save your energy and the skin on your hands. To drive this point home, if you simply use gloves to avoid blisters, you only need a glove on the rear hand. The front hand has a relatively low chance at blistering while the rear hand has a considerably higher chance.
An adze blade has a single bevel and should be sharpened from only one side. Use a file (a 12-inch flat bastard file is the most convenient) and sharpen the blade from the inside face of the adze head (the one closer to the user). The outside face of the adze head should remain flat; do not file that side. The bevel should be maintained at a 45-degree angle. Make sure to sharpen the blade evenly across its length; the blade should remain straight.
This type of digging tool obviously can’t make use of a razor edge but it still benefits from having an edge free of chips and dings. Digging through dirt and other various things in the ground will invariably scuff and dent the blade. A thicker and more robust edge is needed. Three different grits and a strop would be superfluous. A simple file is sufficient.


