
By Watt Jones
Issue #177 • July/August/September, 2019
Even with a 12,000 BTU Mini Split System installed in our cabin, my wife and I have experienced some spotty outages with our local electric cooperative and numerous power surges. Before the approach of winter, we decided to install a propane heater to add an additional heat source in case our power went out for an extended period of time.
What parts do I need?
Tanks & fuel:
Well, propane heaters can’t work without fuel … but our local liquid propane (LP) suppliers wanted us to get a minimum of at least a 250-pound tank with fuel. This would cost anywhere from $600-$800 in propane and then another $200+ to install the line and make the connections. With that kind of expense, we decided to purchase our own tanks and have them filled. We could also get a better price per gallon by having our own tanks filled. Commercially, suppliers will either provide or lease you a bulk tank in order to sell you more fuel. There are smaller tanks available in either 100, 40, or 20-pound tanks for purchase from retail stores that have them.
A co-worker of mine gave us a 40-pound tank that he wasn’t using and wanted out of the way. We decided to purchase another 40-pound tank at our local Tractor Supply and had both of them filled while we were there.
We could have easily gone with two 100-pound tanks, but it wasn’t necessary, as the heater would only have occasional use and wouldn’t be constantly demanding propane.
Note: I did transport my 40-pound tanks home in our utility trailer in an upright position. Many places will not allow you to transport filled propane tanks in an enclosed vehicle, especially if they are horizontal. It is highly recommended to always transport a filled propane cylinder in the upright position and properly secured to your trailer or vehicle.
Regulator:
Depending on the size and manufacturer, be sure to review the operating and instruction manual included with your heater for the compatible regulator type and size.
Most heaters are not provided with a regulator and you will have to purchase one on your own. The purpose of the regulator is to control the high-pressure gas that exits the propane tank and reduce it to a safe level. This is done by the force of the spring against the diaphragm to exert a back pressure. This back pressure retards the flow of the high-pressure gas in the tank. This will explain why it’s important to have the right size and type of regulator. Our particular heater called for a regulator with a maximum pressure setting of:
Pressure Regulator Setting: 10 inches of water
Inlet Gas Pressure (Maximum): 14 inches of water
Inlet Gas Pressure (Minimum): 11 inches of water
All of these should be listed on the regulator packaging for compatibility with your heater or compatible model numbers with your heater. Your regulator should match these numbers for your heater in pressure or your heater may not work properly.
Service lines:
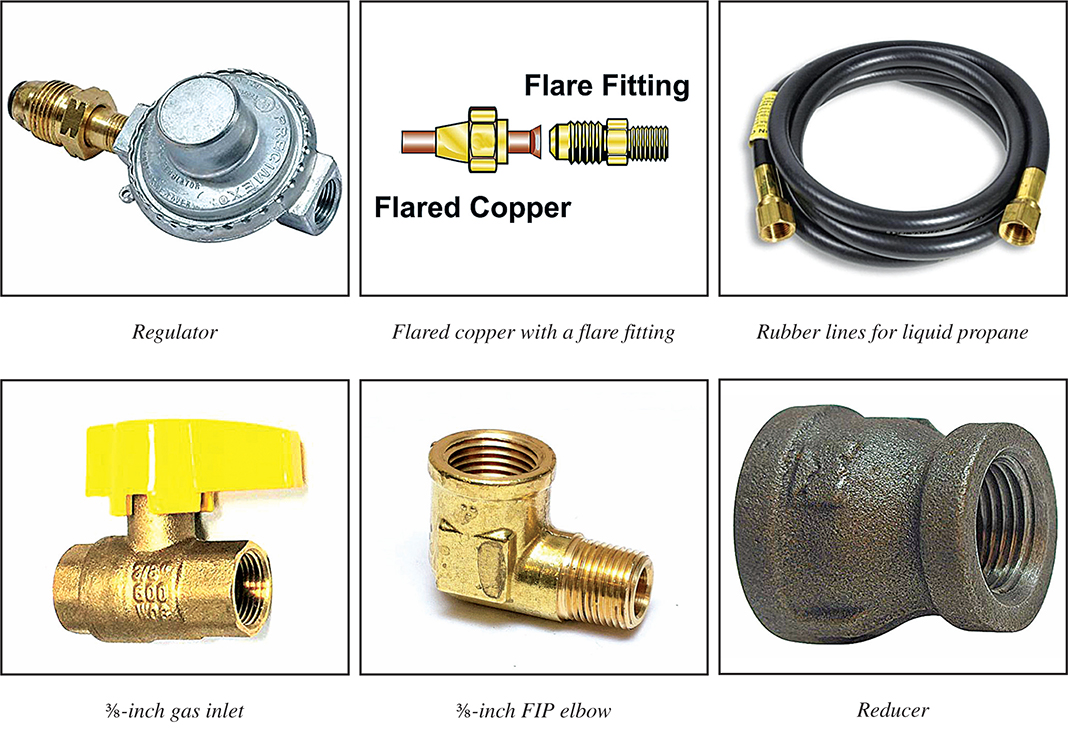
In order for your heater to operate from your fuel source to the heater, you will need the proper lines between both to supply your heater. Most common is the use of copper lines with flared fittings.
As an alternative with occasional use and a shorter run between the tanks and appliance, you can use pre-made rubber liquid propane lines suitable for use with liquid propane gas. These work great, and cost less than copper tubing and fittings. For a more permanent solution, I would recommend copper lines and fittings. Most major LP gas suppliers and regulations require a 10-foot minimum distance between the tank and dwelling. Your local codes will also dictate a minimum distance and connection.
I chose the pre-made lines with attached fittings for ease and the shorter distance I had between the tank and the appliance.
Dual-tank hookup kits:
Due to having two LP tanks on hand, I decided to go with this handy dual-tank hook-up kit I found at our local Tractor Supply. I had both tanks connected safely together in less than five minutes.
Liquid propane gas valve:
I installed a ½-inch liquid propane gas valve, available cheaply online or in hardware stores.
Our heater was provided with a ⅜-inch gas inlet located on the bottom of the heater. The heater also came with a ⅜-inch FIP (female iron pipe) elbow provided with male and female ends.
When connecting all joints with gas line piping, be sure to use a compatible pipe thread sealant made especially for gases. Thread tape for gas will usually be sold with an orange cap and orange colored tape. This is double layered and only used for gas and oil applications. You can also purchase a tube of pipe thread sealant called “RectorSeal 5” for gas applications.
I used the gas threading tape to connect the ⅜-inch elbow provided with the heater to the bottom of the heater. I also purchased a 1½-inch length of ⅜-inch black iron pipe and attached it to the elbow with the sealant tape. On the end to the right, I replaced that flare fitting (for copper tubing) with a black iron ⅜-inch to ½-inch reducer (be sure it’s compatible with any type of gas application). If using metal piping, it’s usually better to use black iron as it is more compatible with gases. I think that black iron threaded piping gives a better and safer connection when dealing with gases. It’s also harder to jar your connections loose as opposed to using copper which can be easily bent and create a hazardous gas leak.
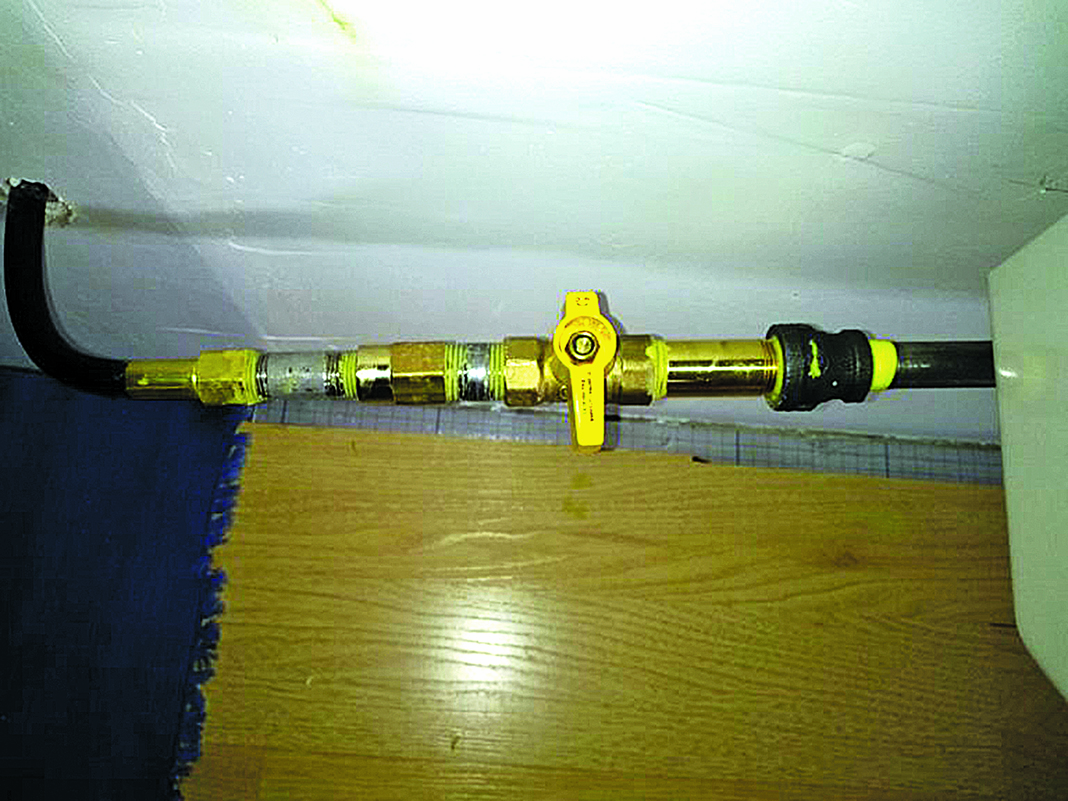
At the ½-inch end of the reducer, I added a ½-inch brass pipe nipple in any length you need for your particular project. In my case, I used a 1½-inch-long brass nipple to connect the reducer to the gas valve.
I connected from the reducer on the right using the brass nipple into the gas valve by threading it in (using gas threading sealant). To the left on the opposite side of the gas valve, I added a ½-inch close nipple, another ½x⅜-inch close nipple (black iron or brass) into a brass ½x⅜-inch reducer, another ⅜-inch close nipple, and then connected to the black LP gas line coming from the tanks outside. It made it very easy to connect to the gas valve with the ⅜-inch connector already made into the hose line from outside. Be sure to make all connections with the gas thread tape or sealant. Your gas valve should be located inside next to your heater or appliance. This will allow you to stop the flow of gas going to the appliance in case of an emergency or a gas leak at the appliance.
Before making the gas line connections to the outside tanks, mount the heater. My unit came with a mounting bracket and hardware for either mounting to the wall (as I did) or with floor stands provided for floor applications. When mounting to the wall or the floor, be sure to follow the manufacturer’s recommendation for acceptable clearances around all sides of your heater. I chose the wall mount on my particular project.
Connecting your tanks
I connected both 40-pound LP tanks using the dual-tank connection kit. Many of the threads going into the tanks will screw in counterclockwise instead of clockwise. Disconnecting the lines from the tanks, unscrew in reverse. One line will simply screw into the second tank, then connect to the end of the brass tee. In the middle of the tee will be the tank connection which will thread into the tank counterclockwise again. Your regulator will screw into the opposite end of the tee. The remainder is your line going through the wall to your appliance.
Again, be sure to use orange thread tape or sealant at all connections to prevent any leaks. Propane is very explosive if not used properly.
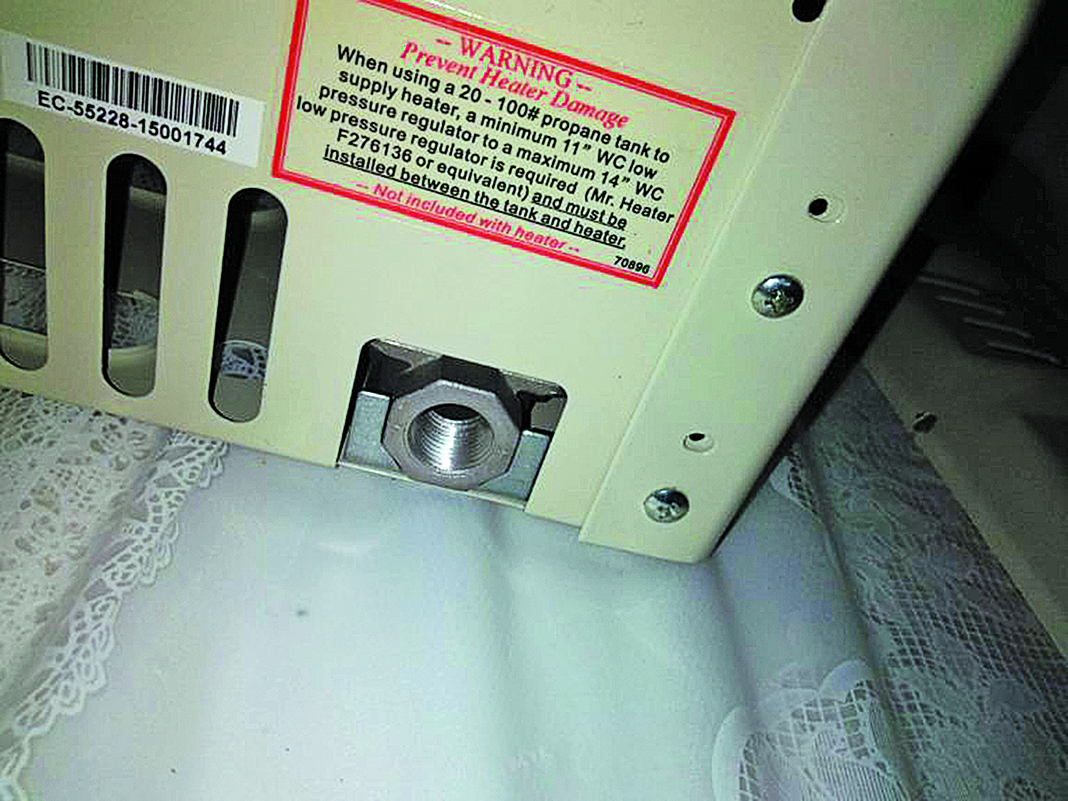
The LP gas inlet is on the bottom corner of our heater
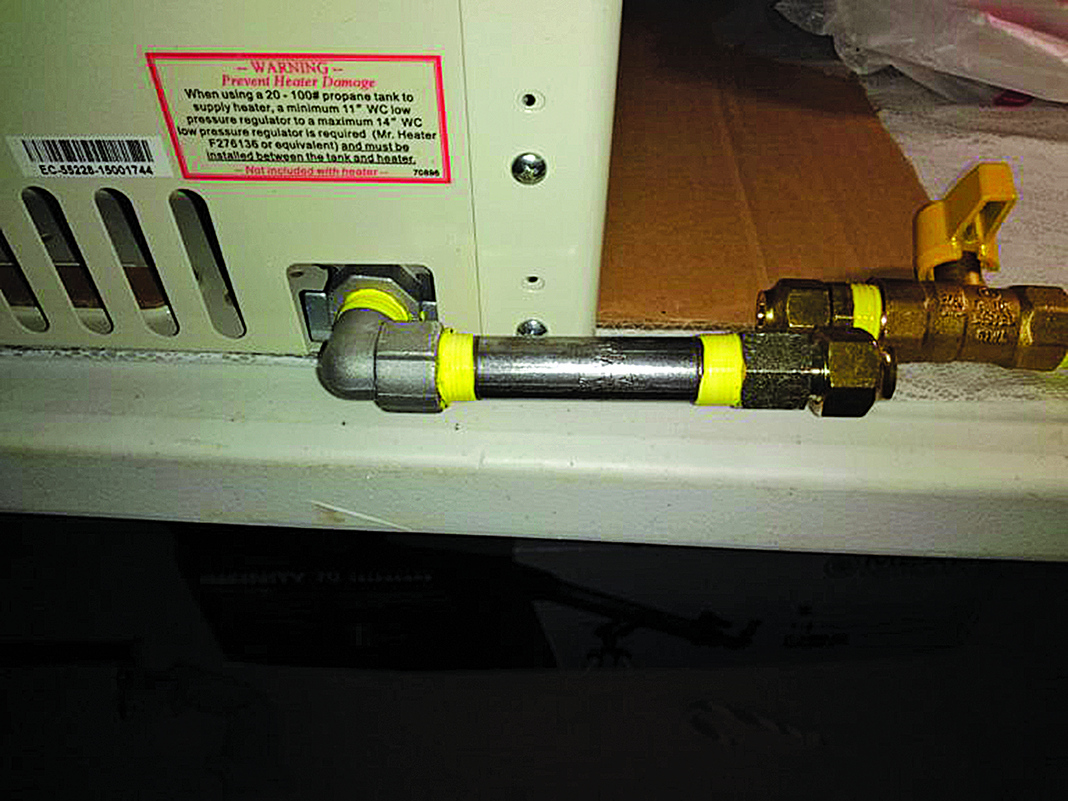
I used gas threading tape to connect the ⅜-inch elbow to the heater, then attached 1½ inches of ⅜-inch black iron pipe.
I used a brass nipple to connect from the reducer on the right by threading it in.
Now what?
Before installing any gas line (whether propane or natural gas), be sure you follow all safety precautions and know what you are doing. I would recommend hiring a trained professional to install natural gas applications, as their regulators are much more complex than liquid propane. Almost all natural gas lines are run by a local utility and they require you to have one of their installers perform the work. Tapping into a natural gas line without authorization is a criminal offense in almost all states.
It is also beneficial to check with your local authorities to learn the requirements (if any) for installing LP gas tanks for residential or commercial use.
Once you have connected your appliance to the outdoor tanks, it’s now time to test for leaks and to make sure your appliance is working properly.
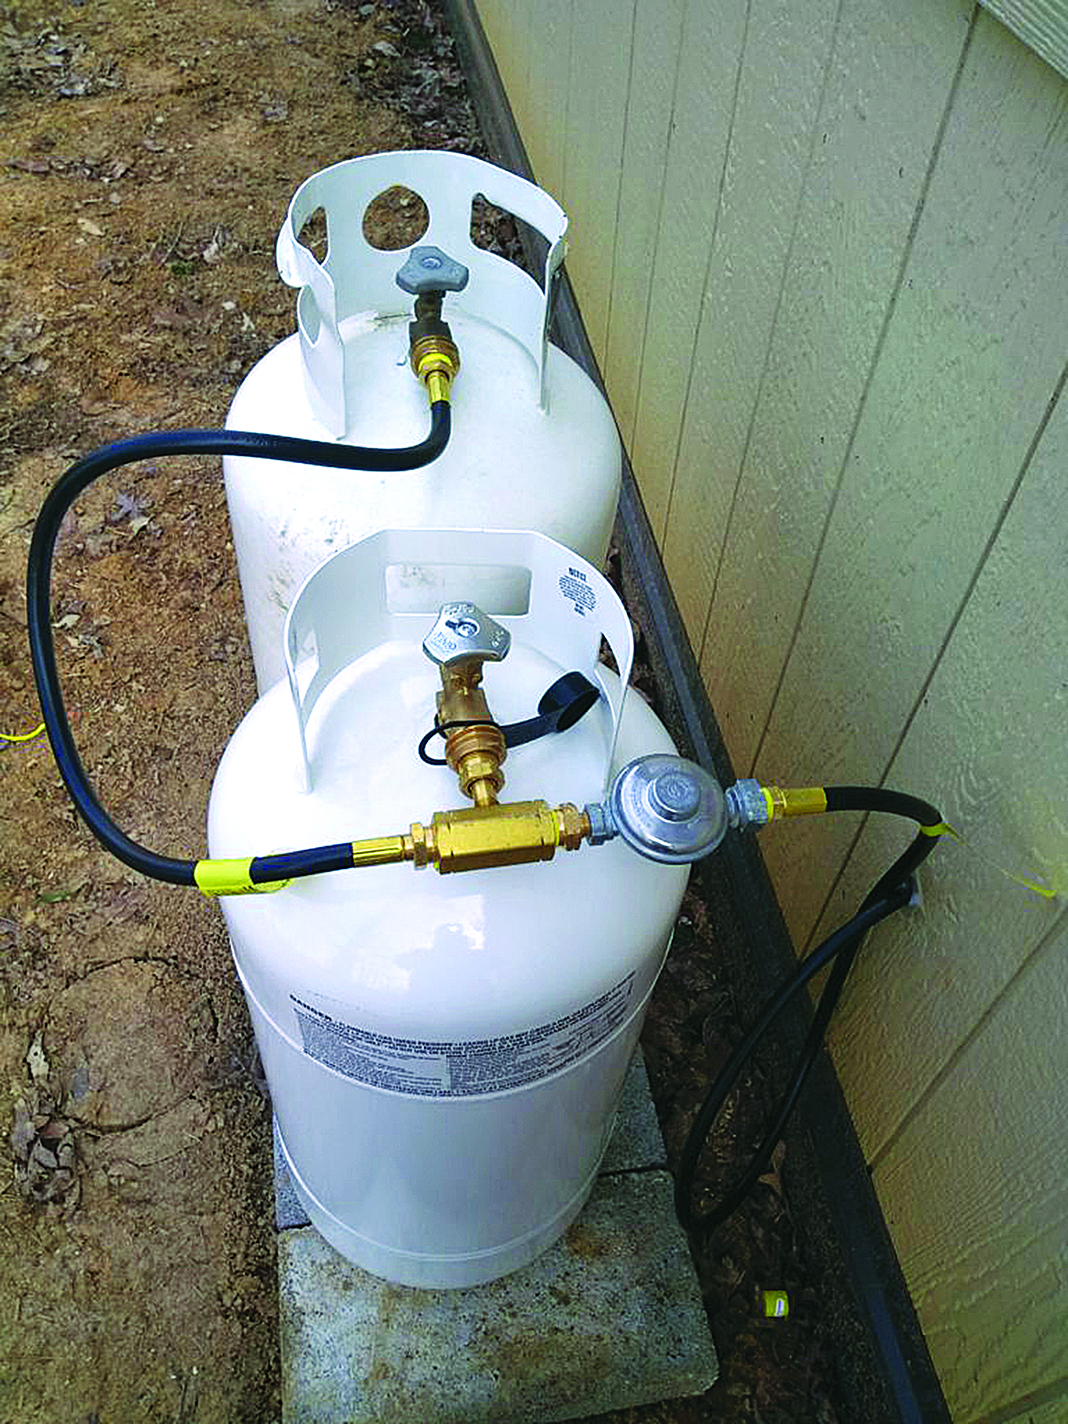
I connected both 40-pound LP tanks using a dual-tank connection kit.
Testing for leaks
Once you’ve made all connections, turn on the gas at the tanks by opening the valves located on the top of your tanks. Open them slowly and listen for any sounds of a leak. If you do hear a leak, STOP! Close the valves slowly and repair the leak.
If there is no leak at the valves, allow enough time for the gas to enter the lines going to the appliance before shutting it off. In the meantime, keep your gas valve inside near the appliance closed.
Use a mixture of water and dish detergent to spray on all connections and joints. If you don’t have a spray bottle you can use a sponge and apply the mixture on each joint. If you see bubbles forming, STOP! That means there is a leak. Repair the leak where you see it bubble. Again, shut off the gas before making any repairs.
You can now open the gas valve and repeat the same steps between the gas valve and the appliance. Follow manufacturer’s instructions to bleed air from the lines and light your pilot light.
Follow all safety precautions when installing or servicing liquid propane.


How have I not found this page before? This article was exactly what I couldn’t find online and done very well!
I have a small propane heater in the shed and I’ll be putting an addition on it. The tank that I have is a 50 gallon. What is the suggested MAXIMUM distance that I should use when I move the tank? Thanks
Just purchased a dual-fuel generator and will rely on propane since it doesn’t grow stale and, unlike gas with possible ethanol mix, won’t gum up the carburetor. Finding your article was encouraging. It walked me through what I need to do to install and connect a small LP tank to my generator. You offer many helpful hints and cautions. Thank you.
Propane Heaters are the important things to warn our places in winter. From this post I know many things about LPG heater installation. Thanks for sharing the post.