
By Patrice Lewis

Water bath canning is one of only two scientifically-proven methods of preserving food in jars — the other is pressure canning, which will not be covered in this article. Water bath canning is used only for high-acid foods such as fruits, tomatoes, and pickles.
Water bath canning requires a limited amount of specialized equipment, most of which can be found in the kitchen aisle of many hardware and grocery stores. Even thrift stores are useful sources for large pots and glass jars.
For those new to canning, water bath canning is an excellent method to learn first. It’s not intimidating and the results are very satisfying.
What is canning?
In a nutshell, canning is the process of sealing food in airtight jars and heating the contents until all pathogens are killed. Since new pathogens cannot enter the sealed jar, the contents remain sterile and will not spoil. When properly canned and stored, this food can be wholesome for many years.
Canning is a long procedure requiring patience. Make sure you’re not rushed to go anywhere because you may be tempted to take shortcuts. When canning, choose a day you’ll be home and inside the house.
What can go wrong
Many reference books emphasize the dangers inherent in sloppy canning procedures to the point where beginners are scared off.
And you know what? The scary warnings are correct. Improperly canned food can lead to botulism, a life-threatening bacterial contaminate which thrives in low-oxygen environments. That is why strict adherence to cleanliness, proper processing times, and other scientifically tested procedures are so important. In other words, don’t take shortcuts while canning.
However, don’t let the scary warnings frighten you into abandoning a wonderful food-preservation technique. Instead, let the warnings prompt you into learning safe techniques.
Water bath vs. pressure-canning
Foods naturally high in acid can be canned simply in boiling water, because acidity plus heat inhibits the growth of microorganisms. All fruits (and yes, tomatoes are a fruit) can be water bath canned.
Low-acid foods include vegetables and meats, and these cannot be water bath canned. This is usually the first place people start to get sloppy about canning: They claim low-acid foods such as meats can be canned in a water bath “because Granny always did it that way.”
Granny was wrong, and it’s a miracle she didn’t kill someone. Make no mistake: Low-acid foods cannot be safely canned in a water bath. The only way to safely can low-acid foods is in a pressure canner.
Altitude adjustment
For safe canning, it’s necessary to adjust the processing time depending on your altitude (elevation) above sea level. Processing guidelines in reference books assume sea level elevation, but unless you live in Florida or in a coastal area, most of us live at higher elevations. To whatever the recommended processing time is for your food product, add extra time in the water bath according to the chart below.
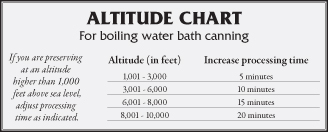
Let’s say you’re canning something that requires 20 minutes in a water bath, but you live at a 2,500-foot elevation above sea level. You should add an extra 4 minutes to the processing time for a total of 24 minutes in the water bath.
Equipment
Water bath canning requires a minimum of equipment:
• Canning jars
• Lids
• Rings
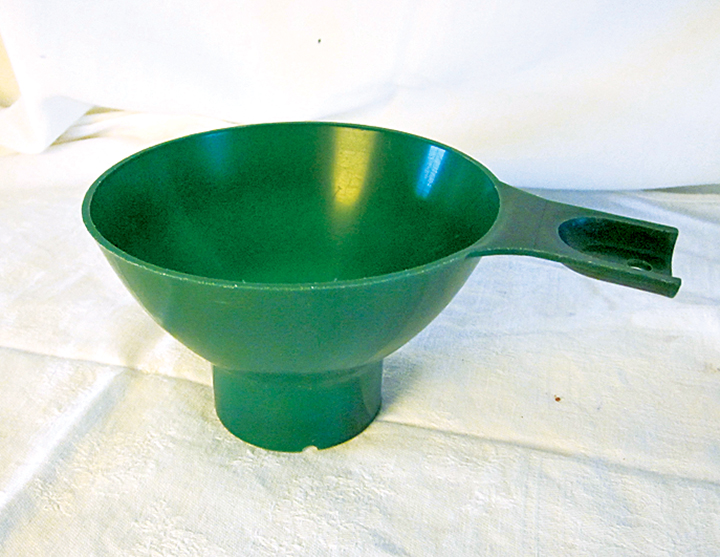
• Large-mouth funnel
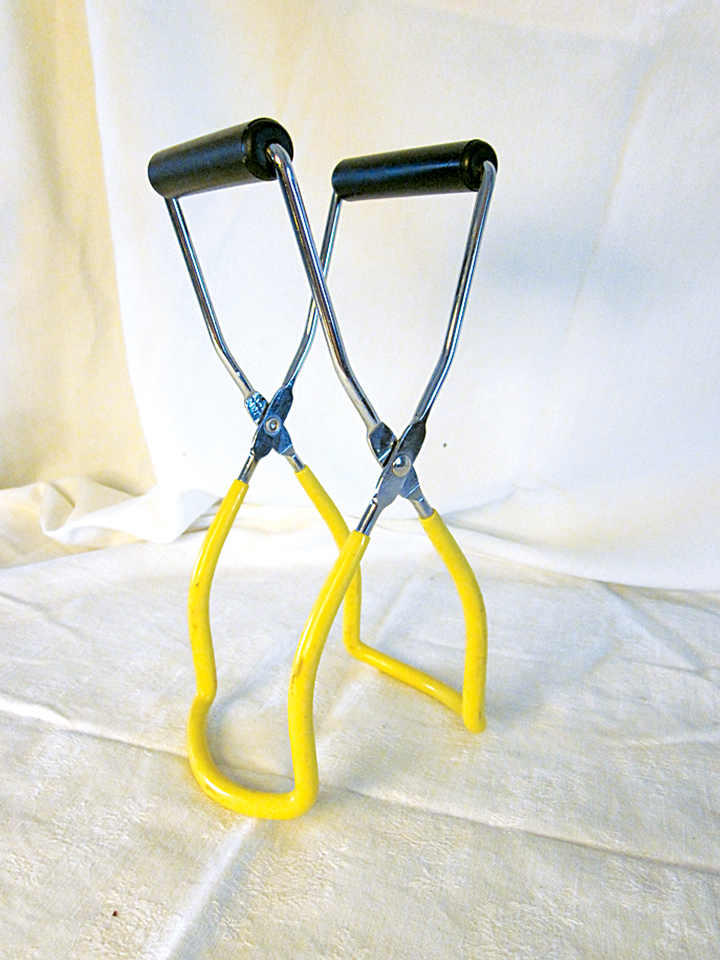
• Jar lifter
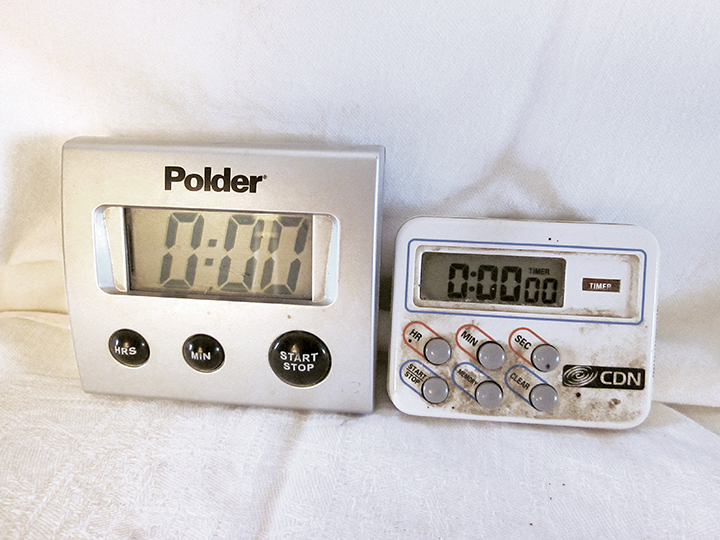
• Kitchen timer
• Large pot with lid
• Metal racks
• Reference book for processing instructions and times
Canning jars: While canning jars (half-pint, pint, or quart size) can be purchased new, you can find them used. Look at thrift stores, estate sales, and yard sales. Used canning jars are perfectly fine if they have no chips or cracks, especially on the rim. Canning jars come in small-mouth or wide-mouth sizes. Some bulkier foods are easier to pack in wide-mouth jars, but otherwise there is no difference between the two. Use whichever style you prefer.
Lids: Lids are metal tops with built-in narrow rubber gaskets around the edge. They must be new (unused). They’re available in almost every grocery store as well as many hardware stores, usually in boxes of a dozen. Bulk lids can be purchased as well (www.lehmans.com). There are also reusable canning lids available through Tattler (www.reusablecanninglids.com), but these use a slightly different technique than disposable lids. If you’re a beginning canner, I recommend learning with disposable lids before advancing to reusable lids.
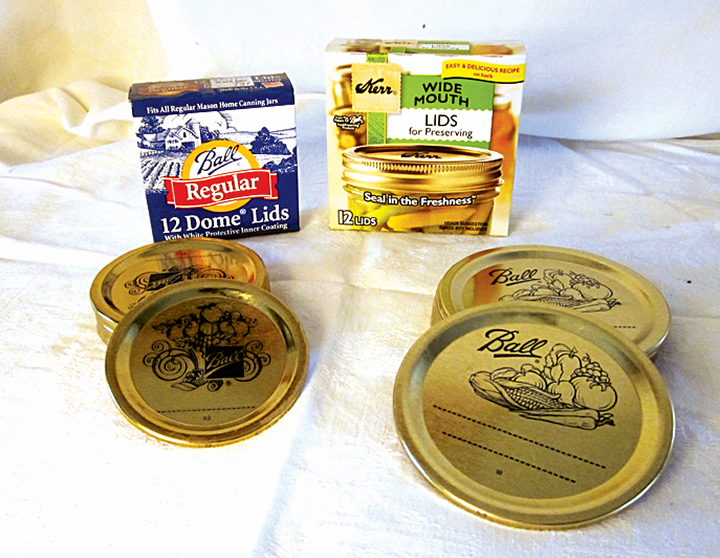
Rings: Sometimes called “bands,” these are used to screw down and secure the lids in place during the canning process. They are made of metal and can be reused for many years, so you only need a few dozen. If you’re just starting out and have no rings, they are available in boxes of a dozen (rings and lids) in most grocery or hardware stores. If you are buying used rings, they should not be dented or rusty, as this can affect how well the jars seal.
Large-mouth funnel: This is simply an inexpensive funnel with a base wide enough to fit inside the mouth of a small-mouthed canning jar. It is extremely helpful when filling jars, since it means you’re not dribbling juice or syrup all over the place. Funnels are available anywhere canning supplies are sold, and are worth every penny.
Jar lifter: This is a broad rubber-coated set of tongs used to lift hot jars out of the bath water. They’re not expensive, and they’re indispensable for canning.
Kitchen timer: You’ll need to keep track of time while you are canning. A timer keeps you vigilant and attentive about processing times. I prefer the kind I can clip to my collar so it acts as a reminder for me to keep an eye on the stove.
Large pots: These can sometimes be obtained at thrift stores or yard sales. The pots should be tall enough so when a quart jar rests on the metal rack on the bottom, it will be covered with at least an inch of water. The pots must have lids.
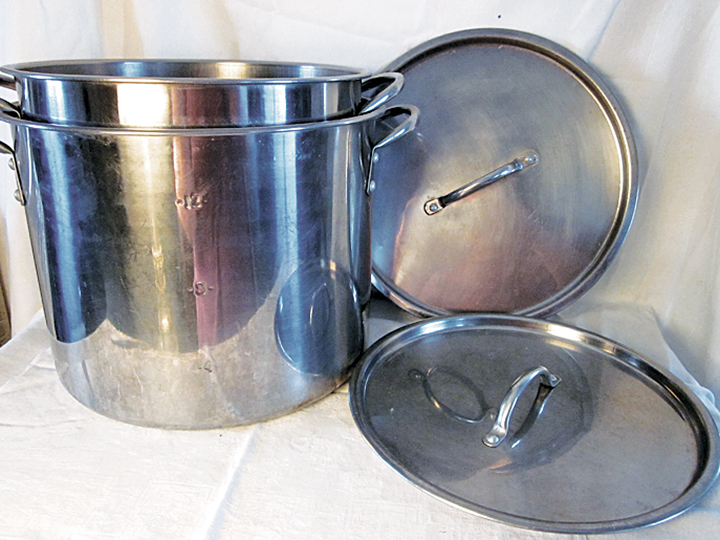
Racks: Metal racks are designed to hold the jars up about a quarter-inch from the bottom of the pot. If glass jars are in direct contact with the pot bottom, the heat from the stove may break the jars during the canning process. A rack elevates the jars just enough to eliminate the chance of breaking.

Reference book(s): Most people swear by the Ball Blue Book, which has beautiful illustrations and is an excellent beginner’s reference. I also depend heavily on the book Putting Food By (written by Hertzberg, Vaughan, and Greene). Reference books are essential to provide specific canning guidelines for a variety of different foods, as well as providing a great deal of helpful information.
Once this list of equipment is accumulated, it’s time to can!
Applesauce
Applesauce is one of the easiest foods to can and is very popular with beginning canners. Start with about a dozen (or more) apples. Avoid Red or Yellow Delicious varieties, as these are too soft to produce decent applesauce. Nearly any other firm variety can be used.
The rough rule of thumb for applesauce is about two to three apples per pint, or four to six apples per quart. If you start with a dozen apples, expect to fill about five pints, or two to three quarts, with applesauce. (Though it will depend on the size of the apples.)
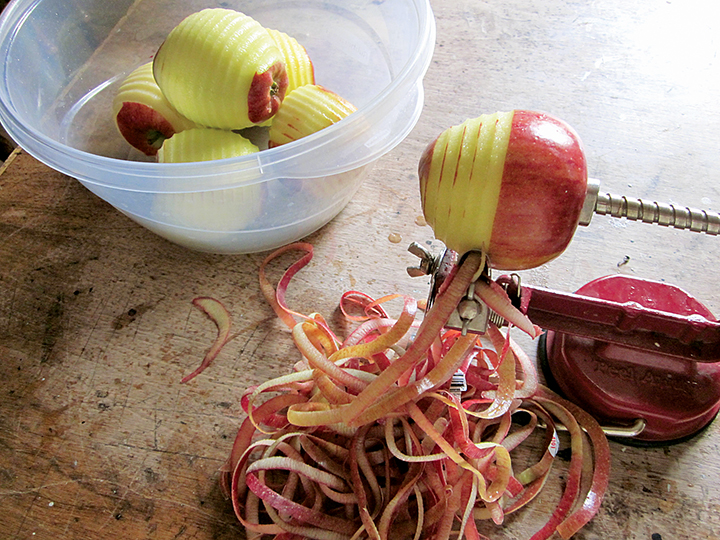
Peel and core the apples, then cut them into about eight chunks. The apples will start to brown as they’re exposed to air, so spritz the apple pieces with a bit of lemon juice to slow the browning. A small amount of lemon juice won’t affect the taste of the applesauce. Browning won’t affect the taste either, but it’s not visually appealing.
Put the apple pieces into a pot (not your canning pot) and add water to about one-third the volume of the apples. In other words, if your apples pile about six inches deep in the pot, add about two inches of water. Applesauce is very forgiving, so don’t worry about being overly precise with your measurements at this stage.
Cover the pot and bring the temperature up until the water boils, then reduce the heat to low and just let the apples steam. The house will smell delicious. Don’t bother stirring the pot, just let the apples steam.
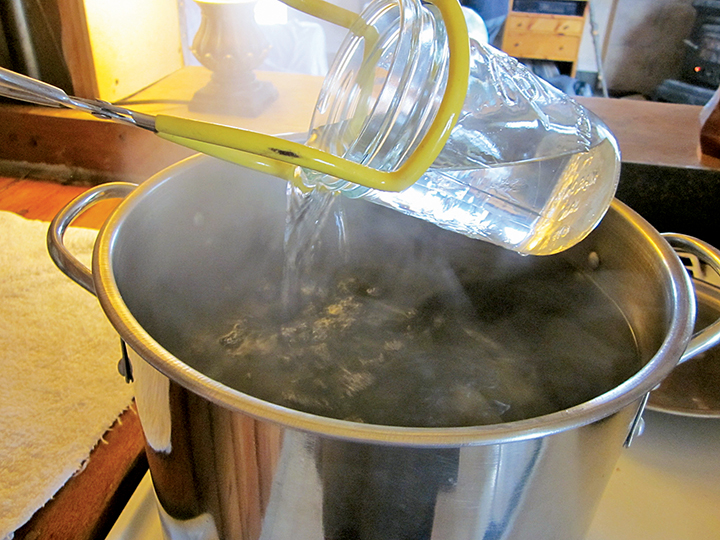
While the apples are cooking, it’s time to sterilize your canning jars. Take your large canning pot, drop in a metal rack, fill it with water, and entirely submerge your empty canning jars, right side up. Water should cover the jars to about an inch above the rims. Cover the pot and let the water come to a rolling boil. Boil the jars for about 10 minutes, adjusting the processing time for your elevation. Use your kitchen timer to keep track.
When the jars are sterilized, turn off the heat and use the jar lifter to lift the jars out of the water. Pour the hot water out of the jars and back into the pot. Up-end the jars on a clean towel until you’re ready to fill them. Don’t get rid of the hot water in the pot! You’ll use it later.
Now it’s time to scald the lids. In a small saucepan, heat water to boiling, then turn off the heat. One by one (so they don’t stick together), drop the canning lids into the hot water. The heat will soften the gaskets and help them seal better. Leave the lids in the hot water until you’re ready to use them.
After about half an hour of cooking, check your apples by putting a fork into one of the pieces. If it’s tough, let it cook longer. If it’s mushy, they’re ready. The apples will still be in chunks, but fragile and soggy. Perfect! Now you need to blend the apples and water.
Pour everything into a large bowl. You can either use a potato masher to mash the apples and water together, or use a mixer. You can also use a blender (which is what I prefer) to get the applesauce the consistency you prefer. Some people like chunky applesauce, others prefer smooth. I started making applesauce when my kids were toddlers, so I didn’t want big chunks.
At this point you can flavor the applesauce however you wish — cinnamon, sugar, nutmeg, even cinnamon red-hot candies. My personal preference is not to add anything, not even sugar.
Now fit the wide-mouth funnel into one of the sterile jars and fill it with applesauce. Don’t overfill the jars — leave about ½- to ¾-inch headroom. Repeat until all the jars are filled.
Once the jars are filled, wipe the rims with a damp cloth to make sure no applesauce residue got on the rim. Clean and un-nicked rims are essential for the jar to seal properly.
Place the lids over the jars and screw on the rings. Don’t crank the rings tight. They should be a bit tighter than finger-tight, but not so tight they’re hard to untwist. Jars must “vent” a bit while processing, so don’t think you’re doing the right thing by screwing the rings on so tightly no air can escape.
Make sure your metal rack is at the bottom of the pot of hot water, and submerge the jars full of applesauce (using your jar lifter). You’ll have to remove some of the water from the pot since you’re now processing full jars instead of empty ones. Keep enough water in the pot so that once all the jars are in, the water level comes to at least an inch higher than the tops of the jars.
Put the lid on the pot and turn up the heat. You don’t start timing the processing until the water has come to a rolling boil, and I mean a rolling boil.
Once the water is at a rolling boil, start timing (use your kitchen timer). The applesauce needs to process for 10 minutes if your elevation is below 1,000 feet (see altitude chart to adjust the timing for your elevation). You may have to adjust the heat down enough to keep the water boiling, but not so furiously that it splashes out of the pot.
Once the processing time at a rolling boil is complete, turn off the heat and let the jars sit in the hot water, undisturbed, for five minutes or so. Then use the jar lifter to remove the jars one by one onto a towel on the counter or other flat surface. Try not to tip the jars, as this might interfere with sealing.
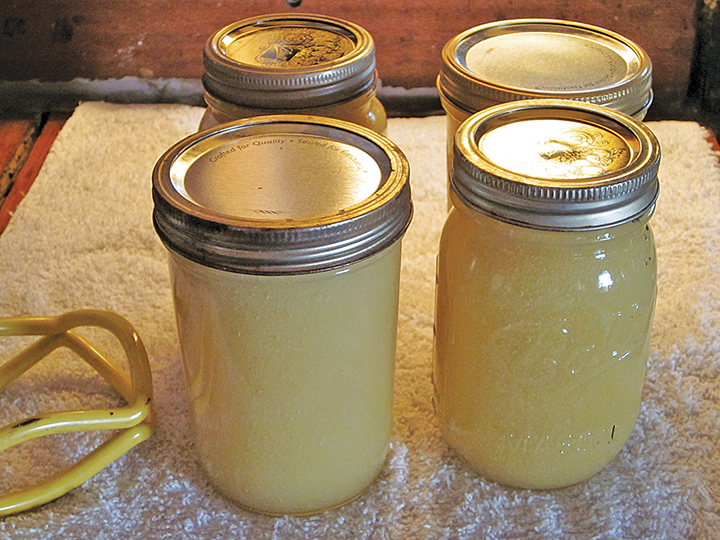
At this point, leave the jars alone. Don’t fiddle with the rings or lids, and don’t move the jars around. Just let them sit and cool. Don’t worry if you see a bit of leakage around the rims. After a few minutes, you should hear a dull “pop” sound. This is the sound of the lid sealing under vacuum pressure. It’s music to the ears of a canner! It means the jar has sealed correctly.
Once the jars are cool, check the lids to make sure they’ve sealed. Disposable lids are very easy to check for sealing. Simply press your finger on the center of the lid. If nothing happens, the lid sealed. But if there’s a quiet “pop-pop” sound and the lid depresses under your fingers, it means the jar has not sealed.
You can either re-process the jar once more (use a new lid, and check to make sure the rim doesn’t have nicks which might have prevented a seal from forming), or you can just put the jar in the refrigerator and eat the contents in the next few days.
After the jars have cooled, remove the rings. Do not store jars with rings on them. Rings will rust if they’re stored on jars, especially in areas of high humidity. Also, you won’t be able to tell if a seal has failed later on if the ring is artificially holding the lid in place.
After canning, I like to wash my rings (scrubbing the inside) and allow them to dry before storing them away. Keeping rings clean and dry will help prevent them from rusting, and you’ll be able to get years or even decades of use from them.
To open a sealed jar, use a standard bottle opener and gently pry up the edge of the lid. It will resist at first, then you’ll hear a “shhhhTHUNK” as the lid pops off. The “shhhhh” sound preceding the lid’s removal is the air rushing into the jar’s vacuum. Once again, this is music to a canner’s ear because it confirms your jar was properly sealed.
Your canned applesauce can be stored at room temperature for a long time — at least several years.
Ready to try something a bit more complex?

Peaches or pears
In-season fruit such as peaches or pears are wonderful to can. If you’re not picking fruit from your own trees, you can buy flats of fruit from farmers’ markets or on sale at a grocery store.
Start with firm, ripe fruit and cut out any mushy or bad spots. I prefer to use freestone peaches rather than cling peaches. Freestone simply means the pit comes out easily. Cling peaches has the pit “attached” with fibers, which means the pit is harder to remove. They taste the same, so use whichever fruit you prefer.
If you’re canning pears, peel and core the fruit. They can be canned in slices or in halves/quarters. Spritz a little lemon juice over the pears to keep them from discoloring.
If you’re canning peaches, the easiest method to remove the skins is to scald them. Boil a pot of water, turn off the heat, and drop the peaches in the hot water for a couple of minutes. Then transfer the fruit to a bowl of cold water. The rapid heating/cooling will loosen the skin and it will slide off. Cut the peach in half, remove the pit, and scrape out any dark fibers from the pit cavity. (The fibers turn dark during canning and are a little less visually appealing, but they won’t make a difference in the quality or taste of the canned fruit.)
As with pears, you can slice or quarter the peaches if you wish, or just can them in halves. It’s up to you.
You should pack both peaches and pears in syrup. Sugar helps retain the texture and color of canned fruit, so most fruits are canned with a light sugar syrup. To make syrup, use a 2:1 ratio of water to sugar. Boil the water, turn off the heat, add the sugar, and stir until dissolved.
As a rule of thumb, I make about 12 cups of syrup when canning 15 pounds of peaches or pears. You’ll probably have syrup left over, so it might be best to start with 10 cups of syrup and be ready to make a bit more if necessary. Roughly, expect to use ½ to ¾ cup of syrup per pint, and double that for quarts.
You can either hot-pack or cold-pack your peaches and pears. To hot pack, pour all the fruit into the syrup and simmer for a few minutes. To cold pack, put the cold (well, room-temperature) peeled fruit into the jars and pour the hot syrup over the fruit.
To pack a jar, use your wide-mouth funnel and gently drop the fruit chunks into the jar. Tap them with a long-handled spoon or a dull knife if you need to rearrange them more tightly. Don’t mash the fruit! Your goal is not to pack a jar so tightly the contents are squashed. Think in terms of getting the most fruit into a jar without deforming the pieces. Leave yourself about ½- to ¾-inch headroom.
Once you’ve packed the jar with fruit, ladle the hot syrup through the funnel over the top of the fruit until the syrup level comes to about ½-inch below the lip of the jar. The syrup will fill the spaces between the fruit chunks.
While you’re packing your fruit into jars, start heating the water in the canning pot. It will probably be at the “warm” stage by the time you’re ready to put the jars in. (Don’t put jars into water which is already boiling — it might crack the jars.)
You’ll notice I didn’t recommend you sterilize your jars ahead of time. Why not? It’s because jars don’t need to be sterilized before canning if the food will be processed for more than 10 minutes. Make sure your jars are clean, of course, but you won’t have to sterilize them.
It’s advisable to scald your lids, however, since heating the gasket on the lid makes it seal better. But this is a simple process. Boil some water in a small saucepan, turn off the heat, drop the lids one by one into the water for a few minutes, and leave them there until you’re ready to put them on the jars. A magnetic “wand” can be purchased which make it easier to remove lids from hot water, though I just use tongs.
Fit a lid over your full jars of peaches or pears and screw on a ring until it’s a bit tighter than finger-tight. Then, using your jar lifter, gently place the jars into the pot of water. (Make sure the metal rack is at the bottom of the pot.) Once all the jars are in, add enough water to the pot so the tops of the jars are covered by at least an inch of water. Cover the pot and increase the temperature until the water comes to a rolling boil, at which point you can start timing.
For peaches and pears, you will need to process pint jars and quart jars for different lengths of time. For pints, make sure they boil for 25 minutes; for quarts, 30 minutes. (Remember, processing time doesn’t begin until the water reaches a rolling boil.) Refer to the altitude adjustment chart to correct the processing time according to your elevation.
When the processing time is up, turn off the heat and let the jars stand in the hot water for another five minutes or so. Then lift them out of the pot and set on a towel to cool. As with the applesauce, just leave the jars alone at this point. Within a minute or two, you should start hearing the welcome “pop” of sealing lids. After the jars are cool, remove and wash the rings.
Tomatoes
Tomatoes are funny things. Since tomatoes are a fruit, they were once considered high-acid enough to be safe to water bath can. However in the 1970s there arose some cases of botulism poisoning from home-canned tomatoes which left people scratching their heads in confusion. What happened? Why would tomatoes suddenly be unsafe to water bath can?
Hybridization is what happened. Modern tomato hybrids are lower in acid than their heirloom ancestors, and are no longer safe to water bath can without the addition of acidifiers. Even when canning heirloom varieties, I add an acidifier. It takes mere moments and ensures the tomatoes will be safe.
Start with firm ripe tomatoes. As with peaches, tomato skins can be loosened by scalding then cooling them. Peel the skins and cut out just a small core area around the stem. Simmer the tomatoes in their own juice for about five minutes. You can either can your tomatoes in chunks, chop them, or purée them.
These instructions are for plain tomatoes, so do not add anything to them such as onions or bell peppers. These vegetables are low in acid and require a pressure canner to safely process.
While you’re scalding your lids, fill clean jars with the tomatoes and their juice to within ½ to ¾ of an inch of the rim. Before adding the lids, you can add salt to the jars — ½ teaspoon for pints, 1 teaspoon for quarts (don’t mix it in, just spoon it over the tops of the tomatoes). Adding salt is optional; it improves the flavor, but does not play a role in the actual preservation of the contents.
However, adding an acidifier is not optional, since we can no longer be certain of a tomato’s acidity. Even if you’re canning an heirloom variety you grew yourself, play it safe and add an acidifier. To pint jars, add ¼ teaspoon citric acid or 1 tablespoon vinegar. To quart jars, add ½ teaspoon citric acid or 2 tablespoons vinegar.
Once your tomatoes are packed into jars and the acidifier is added, wipe the rims and fit the jars with lids and rings. Place them on a metal rack in a pot of water. Make sure the water depth comes to at least one inch above the jar tops. Cover the pot and increase the heat until the water comes to a rolling boil before you begin timing.
Boil pint jars for 15 minutes, or quart jars for 20 minutes, adjusted for your elevation. As mentioned before, never undercut processing times. After the tomatoes have processed, turn off the heat and let the jars sit undisturbed in the hot water for above five minutes before lifting them out and placing them on towels to cool.
Often tomatoes will separate as they cool. The pulp will float to the surface and the juice (a beautiful amber color) will be at the bottom. This is perfectly normal, and a quick shake or stirring of the contents after the jar is opened will re-mix the pulp and juice.
Conclusion
Water bath canning is just the opening chapter of the wonderful world of canning. The best way to learn how to can is to do it. You’ll make mistakes (I once lost 36 pints of barbecued chicken), but that’s part of the learning curve. I hope you, too, can discover the joy and satisfaction of filling your pantry with home-canned goodies, literally the fruits of your labors.


Courtland apples will yield a pink sauce. More so in some years and you can tell by the peel color. Light sugar and maybe a dash of cinnamon. Mill, and less friut prep.
When boiling the lids make sure the rubbers are up……the magnet to remove is nice.
I dishwash jars and then position, in 250 oven, with jars on side, stacked. Tongs only to remove and the water bath is canceled. 30 years and works fine. If some dont pull down(never happened) you can refrigerate or water bath as a backup.
I use/cook fresh garlic in sauce and no issue on acid. Kosher salt and dont be shy, no herbs or anything else. No Chink garlic, as all their imported food is unsafe, like words.
R
what are the best apples to use?
Thank you so much for this very clearly explanation of how to do water bath canning. I’ve never canned anything. I’m growing tomatoes in my raised garden bed this year and I suspect that I’ll probably have enough to make a few pints of canned tomatoes/tomato sauce. I’m thinking about trying to make homemade applesauce first, as its a favorite of my family.
You explained that so well and in terms that are so easy to understand. After reading your article,I am subscribing to your magazine and purchasing yours books. Thank you. When I was married I grew and canned everything, as a way to make sure that there was food in the house for my child. Following my divorce I worked two to three jobs to keep the bills paid and no longer lived in an area I could have garden. It has been over 30 years ago and I’ve been laid off due to COVID 19 I am no longer employed. I will not only be canning food but will also be growing it in containers. I will also be teaching my now adult child how to can. It has been so long that I was afraid that I might have forgotten more than I remembered. Thank you for empowering me by guiding me through this.