By Don Lewis
In 1874, a United States patent (#157,124) was issued to Joseph F. Glidden, a long-serving sheriff in DeKalb County, Illinois. His invention — possibly one of the simplest ever recorded by the patent office — consisted of the artful arrangement of three wires.
He wasn’t the first one to think of it. Several other inventors had previously created something similar. But it was his particular combination of those wires that arguably changed the world. As a result of Mr. Glidden’s simple creation, the United States eventually became the planet’s bread basket. His invention changed the course of railroads, destroyed and created fortunes, incited violence, ended the Wild West, and made Mr. Glidden — for a brief time — one of the wealthiest men in America.
The modest title of Glidden’s patent application was “Improvement in Wire-Fences” and the accompanying diagram presented a view of his invention that, despite some superficial changes with the passage of time, will be easily recognizable by all backwoods home dwellers as barbed wire.
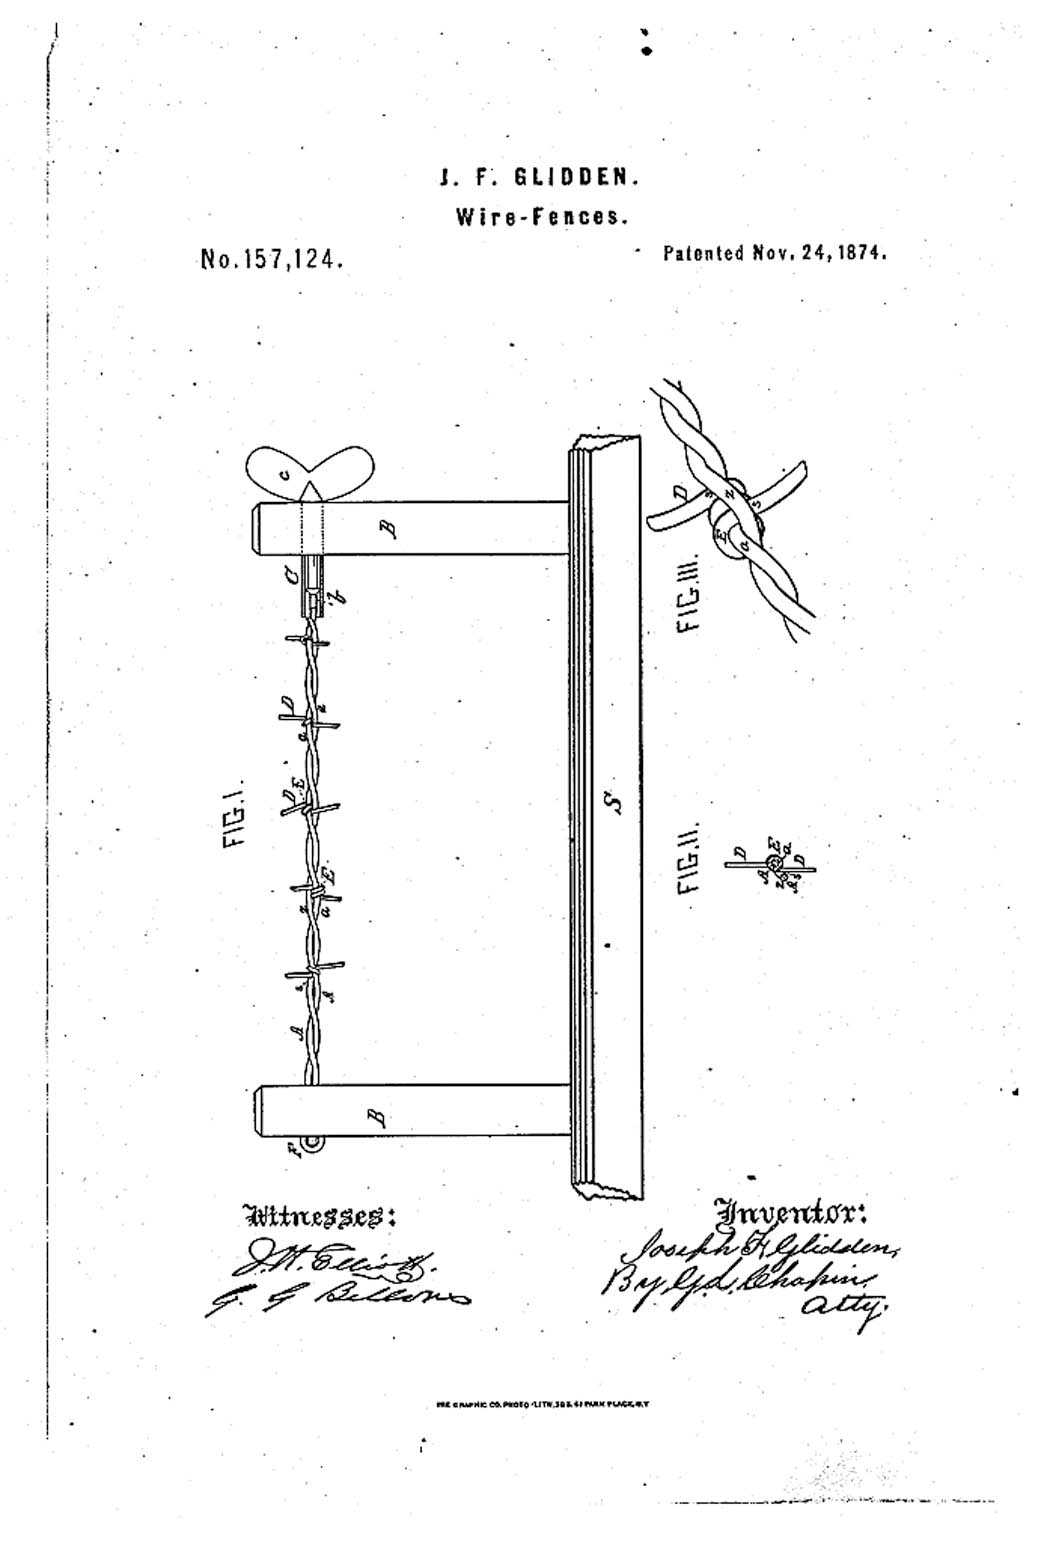
A barbed wire drawing from Glidden’s patent application, 1874
Most people don’t realize just how monumental the creation of barbed wire was. Those two twisted strands of soft iron wire that trapped regularly spaced and sharpened wire barbs was the first new innovation in fencing in over 8,000 years. A petroglyph discovered in Finland and dated to 6,000 BCE shows stick fences that were used to enclose reindeer herds, and similar fences were still the norm throughout Europe and Colonial America well into the 1800s.
Until barbed wire became commercially available, the fencing of large tracts of land for agricultural purposes simply was not cost-effective. Fencing around homes or gardens was made pretty much out of whatever the farmer or rancher had at hand.
In some rocky locations, stone was used to delineate small fields and yards. The well-to-do purchased wrought iron fencing to separate their holdings from the hoi polloi. A growing middle class used picket fences around their homes and yards. But of course, all of these fences were either expensive to acquire, or manually intensive to create, install, and maintain. Livestock such as cattle, horses, sheep, pigs, or goats generally had an easy time breaking out of such barriers.
For the earliest homesteaders of the American west, fencing was especially problematic. Wood or stone or iron was in short supply on the windswept plains, and having it shipped in was beyond their meager incomes.
For these pioneers, barbed wire was a game-changer. Rather than having to picket their livestock (as described by Laura Ingalls Wilder in her “Little House” books) or risk their loss to accident, predation, or theft by allowing animals to range free, the relatively low cost of barbed wire kept their critters safe and close, and at the same time served to define homestead and ranch property boundaries.
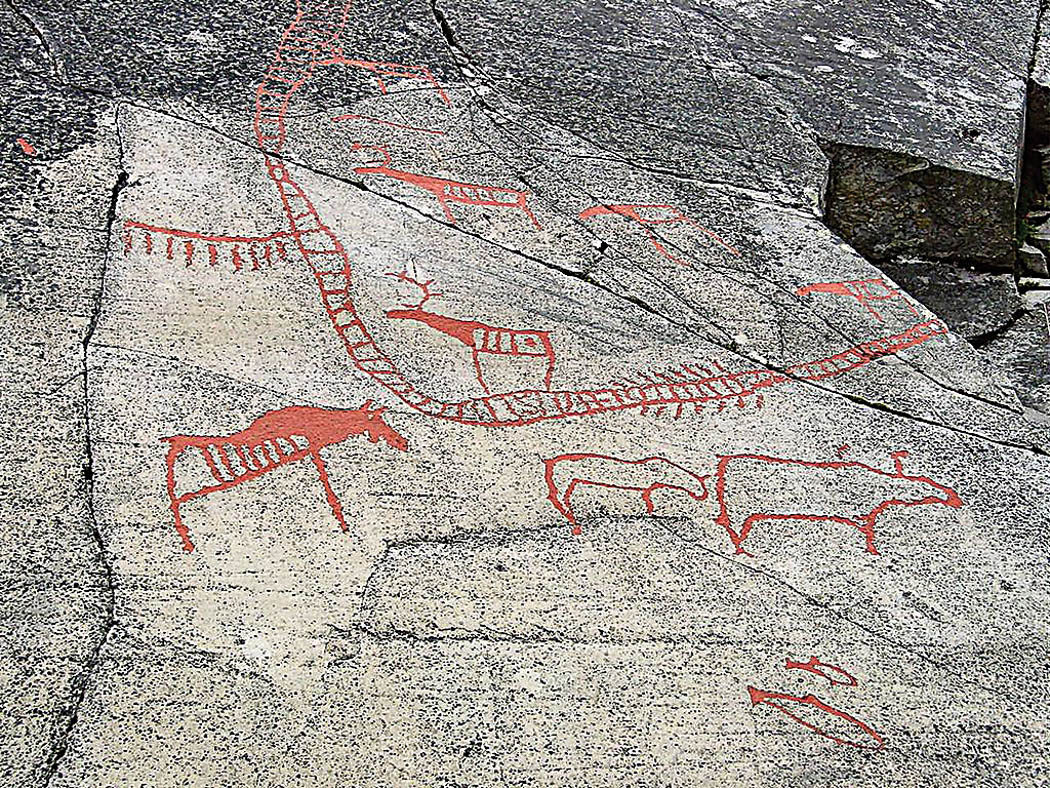
8,000 year old petroglyph from Finland showing reindeer fencing
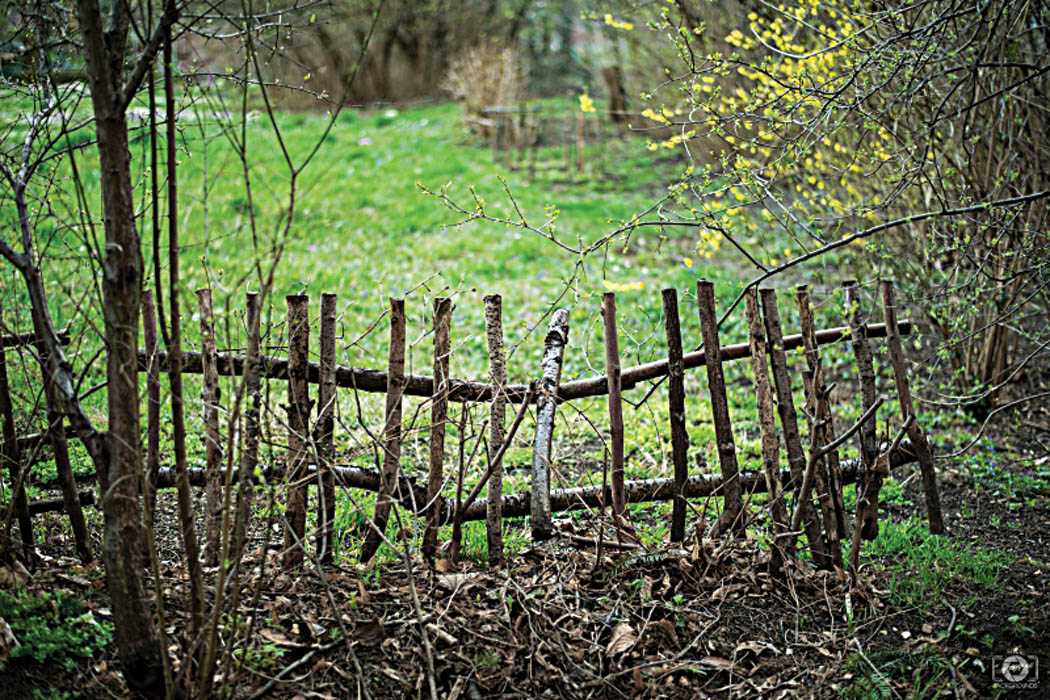
Old village wooden fence
Barbed wire — and the other wire fence products that came later, such as woven or welded fencing — changed the homesteading world. Wire fencing meant farm sizes could increase. Fencing helped delineate and secure property boundaries. Fencing made ownership of livestock obvious and controllable. It made it possible for small farmers and ranchers to leave their homesteads for extended periods. It allowed farmers to increase the size and variety of their herds with selective breeding. And livestock producers were better able to improve and control the quality and quantity of the feed they fed their animals, which increased yield.
Even today, despite the development of advanced polymer fencing and electric fences, wire fences in all their variations still reign supreme. It is estimated China and India alone produce over five million miles of barbed wire a year. That figure doesn’t include the millions of miles of other types of wire fencing produced annually that came along on the heels of barbed wire.
It’s all in how it’s built
Wire fence products are still the most commonly used rural fencing. The correct installation of these fencing materials is paramount with whatever form or type of fencing you choose to use. A good fence (meaning one that is well-built and correctly designed for its purpose) will last for decades with minimal maintenance. A poorly chosen or constructed fence will be in need of constant repair, and can actually be more dangerous to your livestock than having no fence at all.
Stone Crib fence post
This article will address some of the construction methods and tools needed to construct a “good” fence. Most of this information and instruction — leavened with research on the works of others — is based upon my own experience. I’ve been making fences for our property for over 30 years. And since failure is said to be the best teacher, I can easily say I’m extremely educated in the field of fencing.
For purposes of definition:
- A brace post (also called king posts or strainer posts) are the strong uprights found at corners. In-line braces are extra strengthening posts midway along long stretches of fencing. Brace posts (both at corners and midway along a fence) must be strong and beefy, since their job is to maintain tension.
- A picket is a lightweight upright added between braces, such as T-posts or narrower poles. They are meant to hold up the fencing, and resist lateral stresses, like pressure from livestock. They do not provide tensional strength.
Please note: Since fence selection and construction is akin to religion, guns, and politics as being amongst the more contentious topics discussed by country dwellers, all I’m telling you is what’s worked for me. Opinions will certainly differ. Occasionally violently.
First commandment: Fencin’ is tension
Almost all fences are tension fences. Fencing materials work (when they work right) by resisting the forces applied to them by the critters you want to keep in or keep out, as well as the force created in their construction. Those forces can be pretty forceful. I’ve seen what a 1,200-pound bull can do to a fence that’s between him and his girls.
Most fencing materials can be divided into two tension-related categories: One, whether that tension is correctly applied by the installer; and two, whether the tension already exists due to the nature or construction of the materials used.
For example, most wire fences work best on the basis of applied tension; while wood, stone or even newer materials such as nylon rail or heavy wire fences (cattle or hog panels) cannot be effectively tensioned by the installer. Each of these materials is pre-tensioned either by nature or by the manufacturing process. (Electric fences are an exception and will be covered separately.)
Determine your needs
Before you fence anything, you should know three things. First, what the fence is intended to do (i.e. keep in cows, sheep, goats, pigs, or horses; or keep out deer, predators, or neighbors). Second, what kind of fencing will perform that function best? And third, which one is the best cost per foot? Since most homesteaders aren’t awash in money, sometimes financial realities must take precedence over performance.
Steel pipe corner brace post
Let’s take a look at basic costs. All other things being equal (they’re not, but let’s start here anyway), the least expensive fencing by the foot is barbed or smooth wire. Note: These prices are for the running fence material and do not reflect the additional costs of fence supports. With the exception of electric fences, support costs are roughly equal for all of the fencing types listed below.
- Barbed or smooth wire fences: $0.03 to $0.05 per ft.
- Woven wire fence (330 ft. roll, 48 inches high): $0.40 to 0.50 per running ft.
- Wooden rail fence: $5 to $10 per ft. (each rail)
- Single-wire electric fence (Cost is variable depending on type of charger, length of wire, type and number of supports; but it can, with care, be less expensive per foot than barbed wire.)
In the following sections, we’ll look at the most common fencing materials, their construction, and their effectiveness for various types of livestock and wildlife. All of the fence types described are ones I’ve used and are currently in place on my homestead.
Wire fences
There’s an old saying: A good fence is “horse high, bull strong, and hog tight.” That aphorism is broadly correct, but it ought to read more like: “Horse high and tight, bull strong and tight, and hog tight and smarter than the hog.”
“Tight” is the key to wire fencing.
Installing wire fences like smooth or barbed wire, woven or welded wire, or high-tension wire is all about tension. Without the application of tension — and lots of it — your fence will go from being an efficient animal migration deterrent to being a potentially life-threatening hazard to livestock and wildlife. That was a lesson I learned early in my homesteading life each time I had to remove yards of broken wire fencing that ended up tangled around the legs and bodies of my animals.
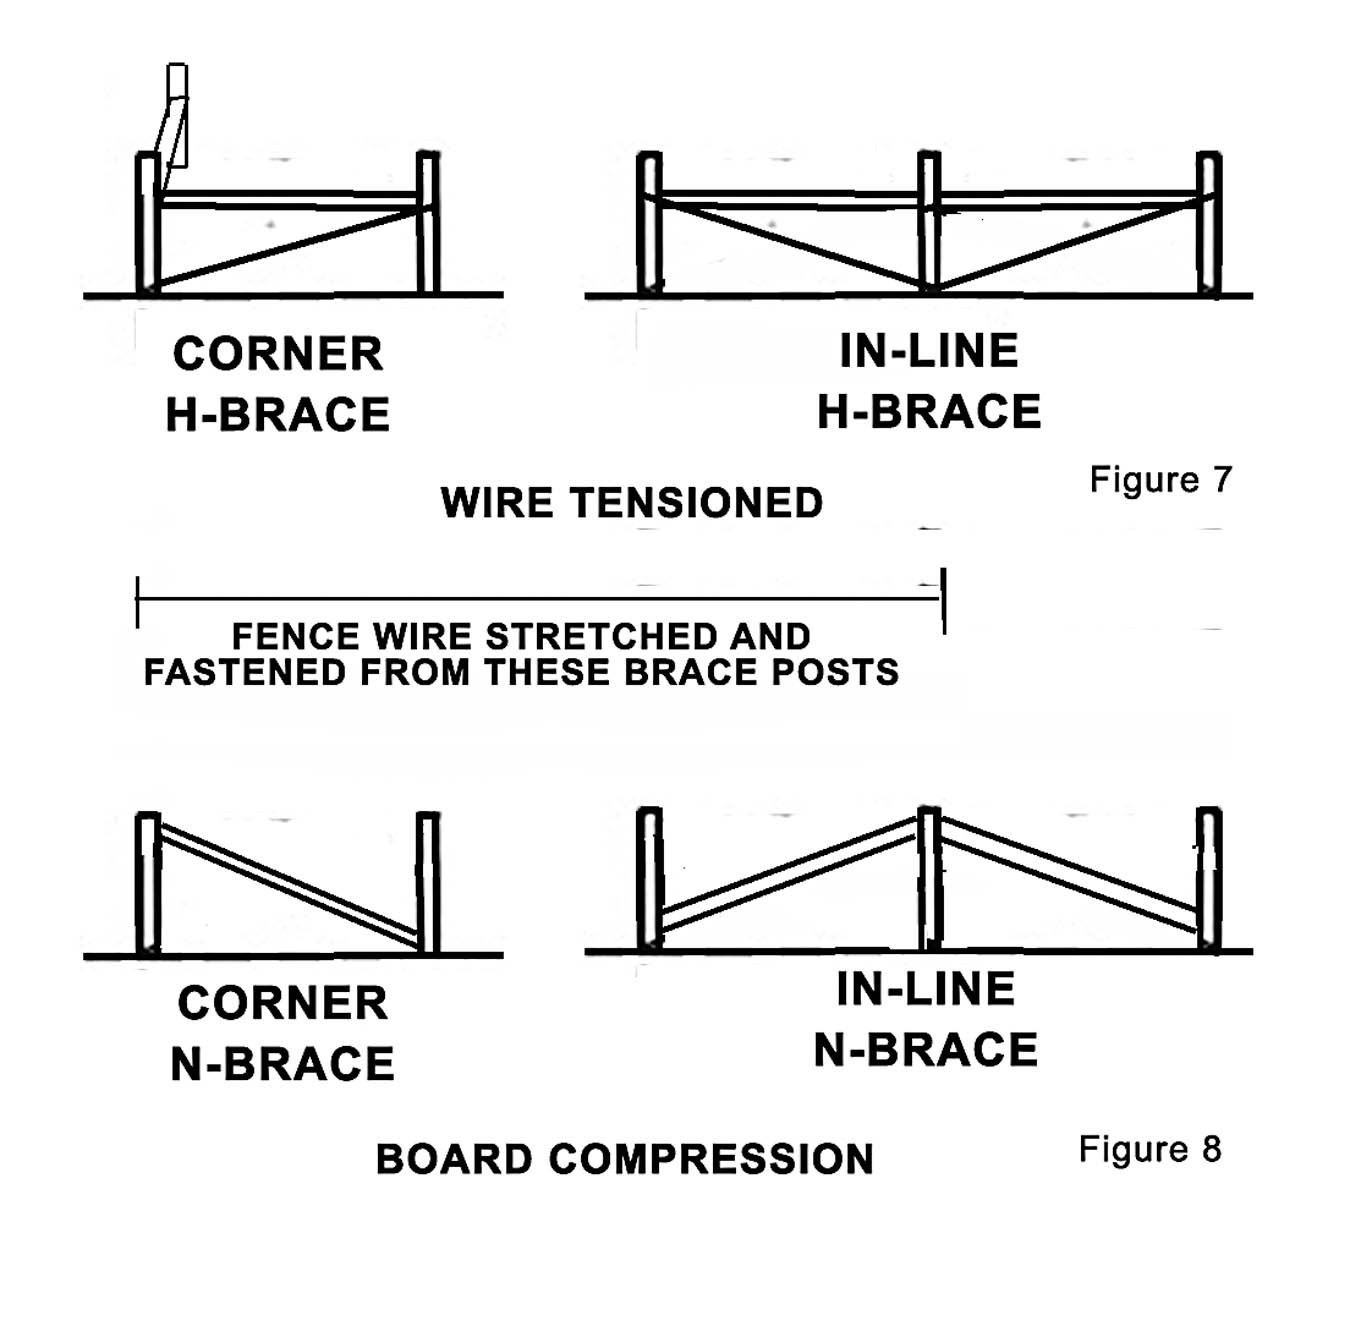
“H” Braces and “N” Braces
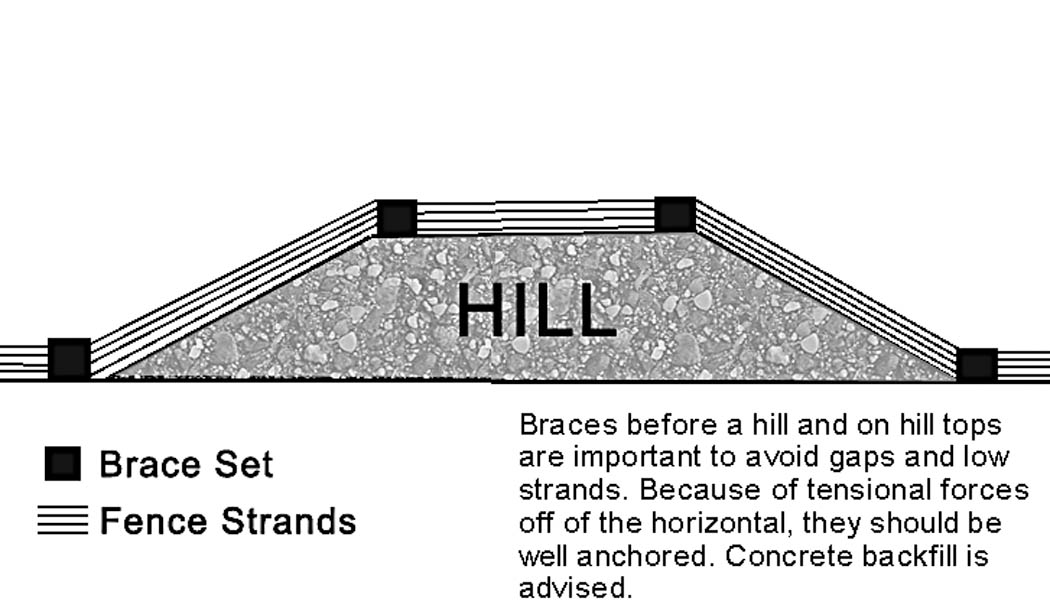
Bracing for hill fencing
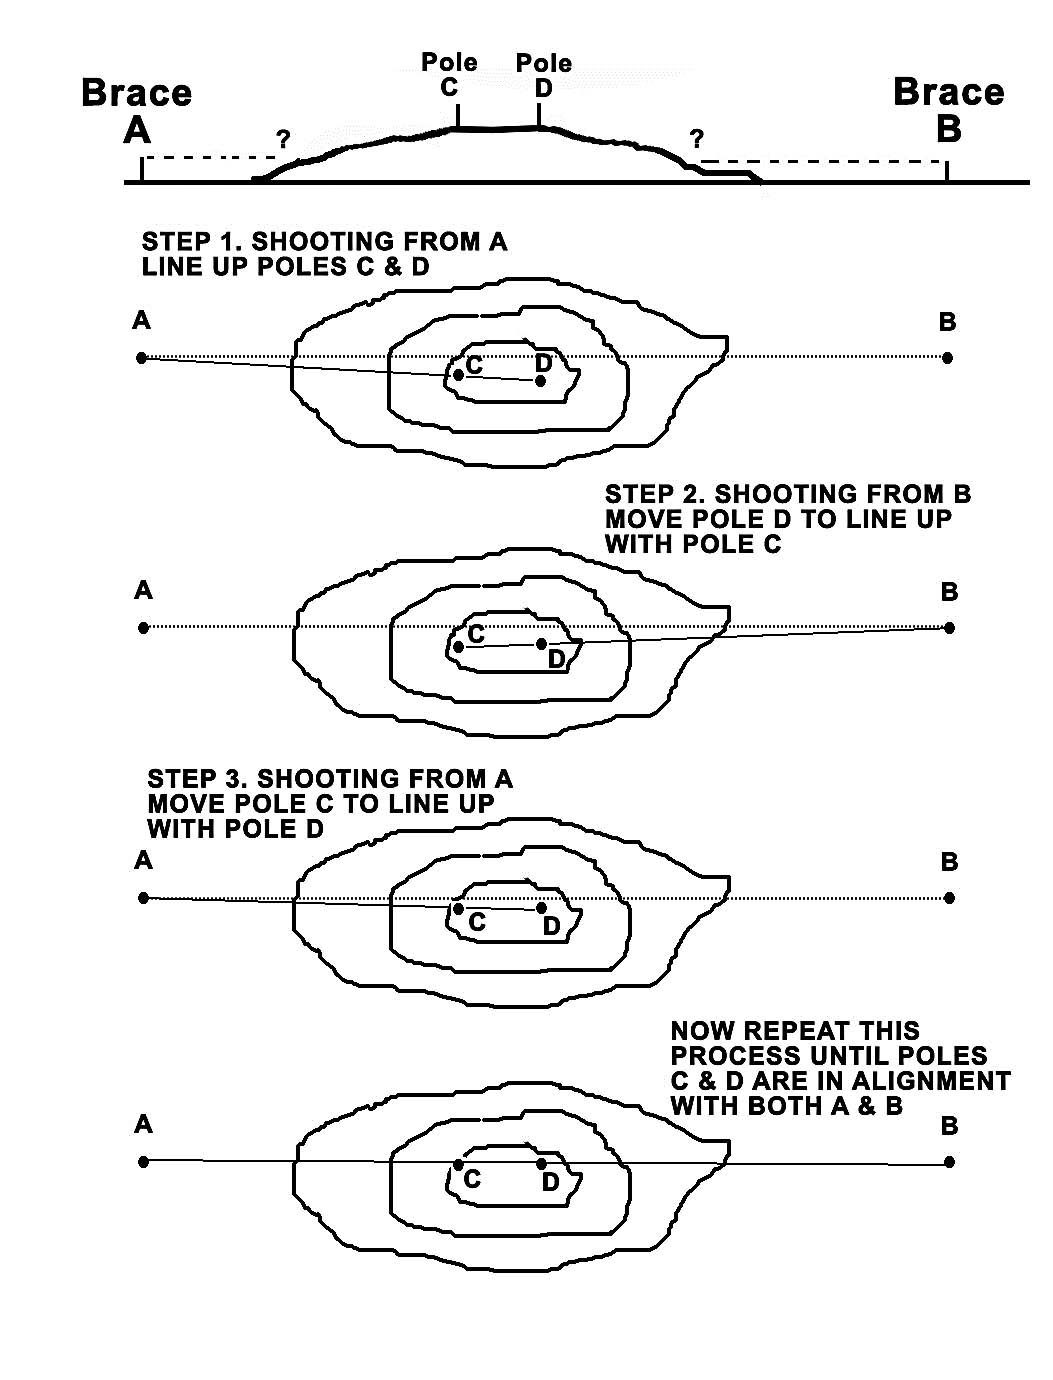
Making a straight fence over a hill
Never ever forget that fences are a frustration to livestock. They keep your animals from getting to what’s “greener on the other side,” and a poorly tensioned fence is just a sticky door that will open for them if they just push a little harder. I’ve had to help put down animals (thankfully not mine) who have broken legs or been skinned to the bone by wire fences that simply gave way because they weren’t tensioned correctly.
A word about barbed wire: Barbed wire comes on a heavy, tightly wound spool. Because it’s so tightly wound, it resists unwinding; and, being barbed, it will latch onto anything it touches (roots, sticks, the ground, and you) as it’s being unwound. When working with any fencing wire, but especially barbed wire: wear heavy leather gloves, eye protection, and puncture-resistant clothing. Be aware of where your helpers are located, and don’t be in a hurry. A long loop of barbed wire can suddenly flip in unexpected ways.
Tensioning a wire fence
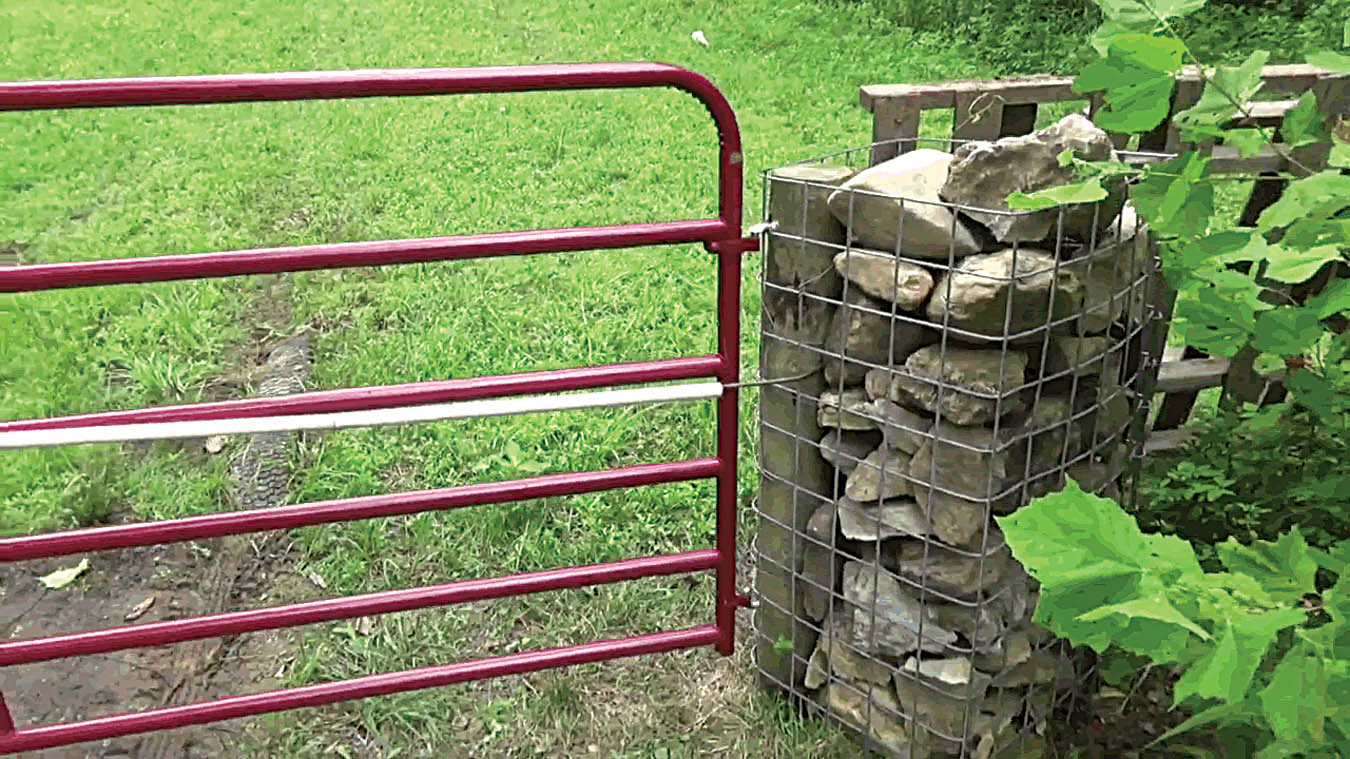
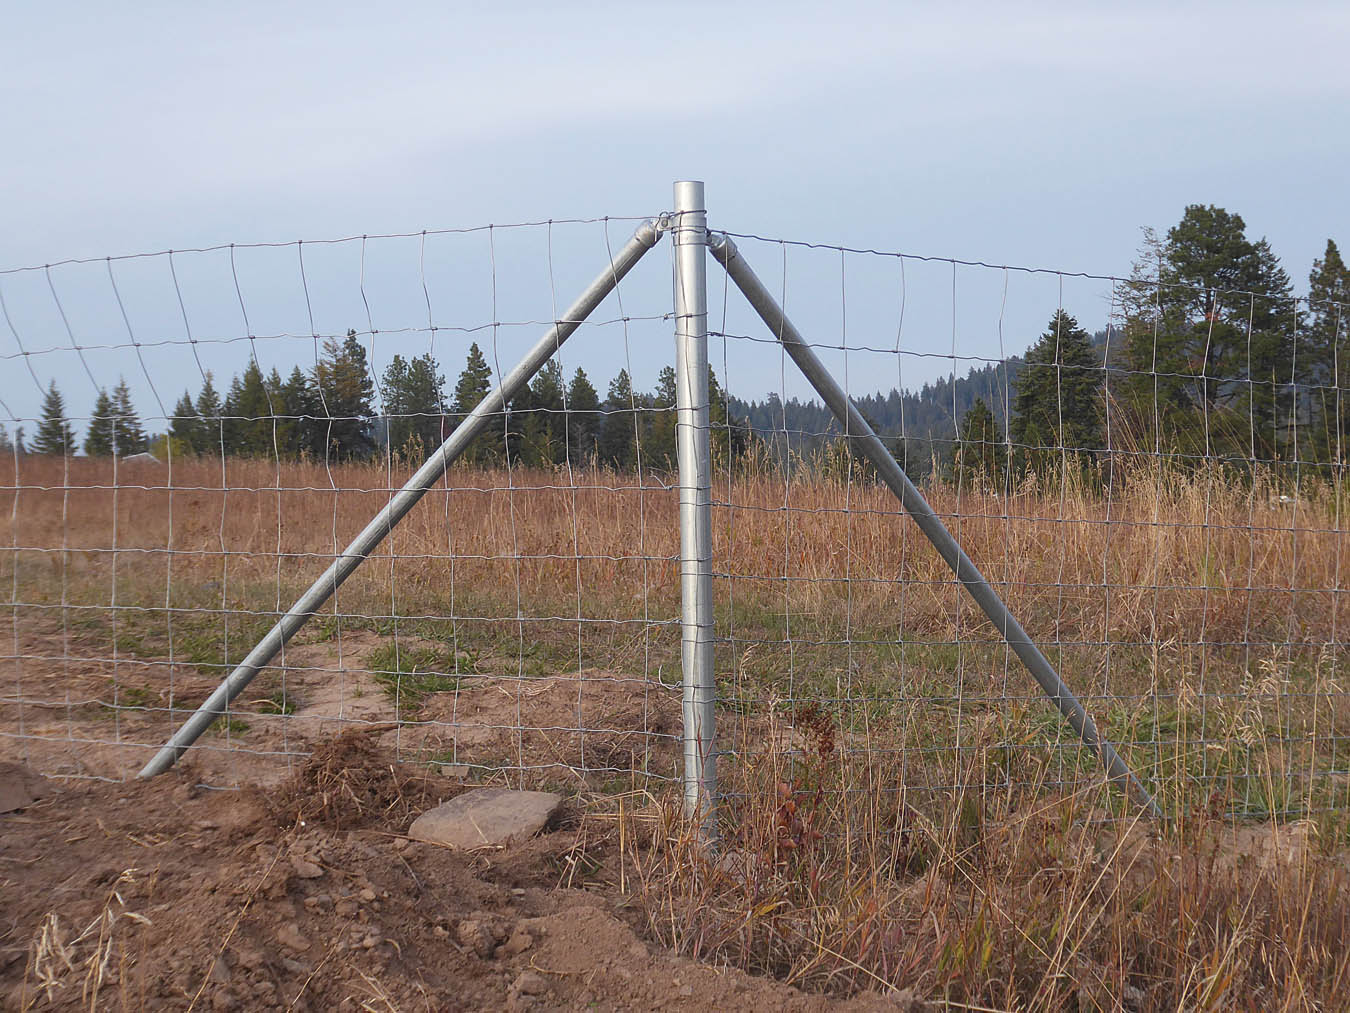
Whether barbed wire, smooth wire, or woven wire, tensioning a fence is all about the resistance to movement. That resistance is created by posts called brace posts (or king posts or strainer posts). These posts are the most important component in a well-tensioned fence, and should be installed with due care and consideration. Brace posts can be made of wood, metal pipe, or even reinforced concrete. In some places where digging or drilling to install posts is impossible, I’ve even seen them constructed of wire “baskets” filled with rock. Don’t forget that you’ll also need brace posts to hang any gates as well.
Brace posts have to be strong enough to resist the hundred (or thousands) of pounds of force exerted on them by tensioned wire. There is much information available online that will provide you with sizing guidelines for braces, but I’ve always used old railroad ties or sections of recycled power poles for my more serious fences, because too strong is better than not strong enough. However, it’s entirely possible to make great brace posts out of pressure-treated four-by-fours, if you build them right.
Whatever brace-post material you use, those posts need to be well-anchored in the ground (preferably below the freeze depth for your area, especially if your sub-soils are prone to frost-heave). You can dig your holes with hand augers or “clam-shell” post-hole diggers (I’ve used both for years).
But because I’m getting older and hopefully wiser, I now use my tractor auger and let the tractor power take-off (PTO) drill all my holes to a depth of three feet. This means my brace posts must be a minimum of seven feet in length if I’m putting in a four-foot-high fence (some people prefer 51-inch or even 56-inch-high fences).
Since the soil around my property is non-expansive clay, I usually don’t bother with concrete to backfill the hole around a large wooden post. Instead I use an iron ram to pack six inches of loose soil around the post in the hole, then another six inches rammed down, and yet another six inches until the hole is filled. I maneuver the brace post as needed to keep it vertical (using a hand level) while I’m ramming the soil. The post is properly set when it won’t move after a healthy shove.
My closest neighbor prefers metal brace posts. Metal posts, usually being of smaller diameter and round, are better able to resist movement when set in concrete.
(Speaking of neighbors, before you put up any fence that forms a border on your land, it’s a really, really good idea to make sure you and your neighbor agree on the location of the boundary. Good fences make for good neighbors, and any fence you build that traps your neighbor’s land is not a good fence.)
Better too much than too little
A quality brace post set consists of two or more vertical posts connected by diagonal twisted wire or wooden posts. One common variety is called an H-brace because it has an additional horizontal wooden or metal post. In an H-brace, diagonals between the vertical posts made of either twisted wire or wood are added to keep the vertical posts locked upright. Each of these variations have been tested by time, and — arguments across the coffee shop table aside — each will work to keep a fence tight.
My personal preference is the N-brace, which consists of bolted wood diagonals rather than twisted wire tensioner. I like the N-brace variation because a wood diagonal provides both tension and compression, and by bolting a diagonal to the upright posts, there’s no need for a horizontal beam or diagonal wire twists. But either system works, so choose whichever one you prefer.
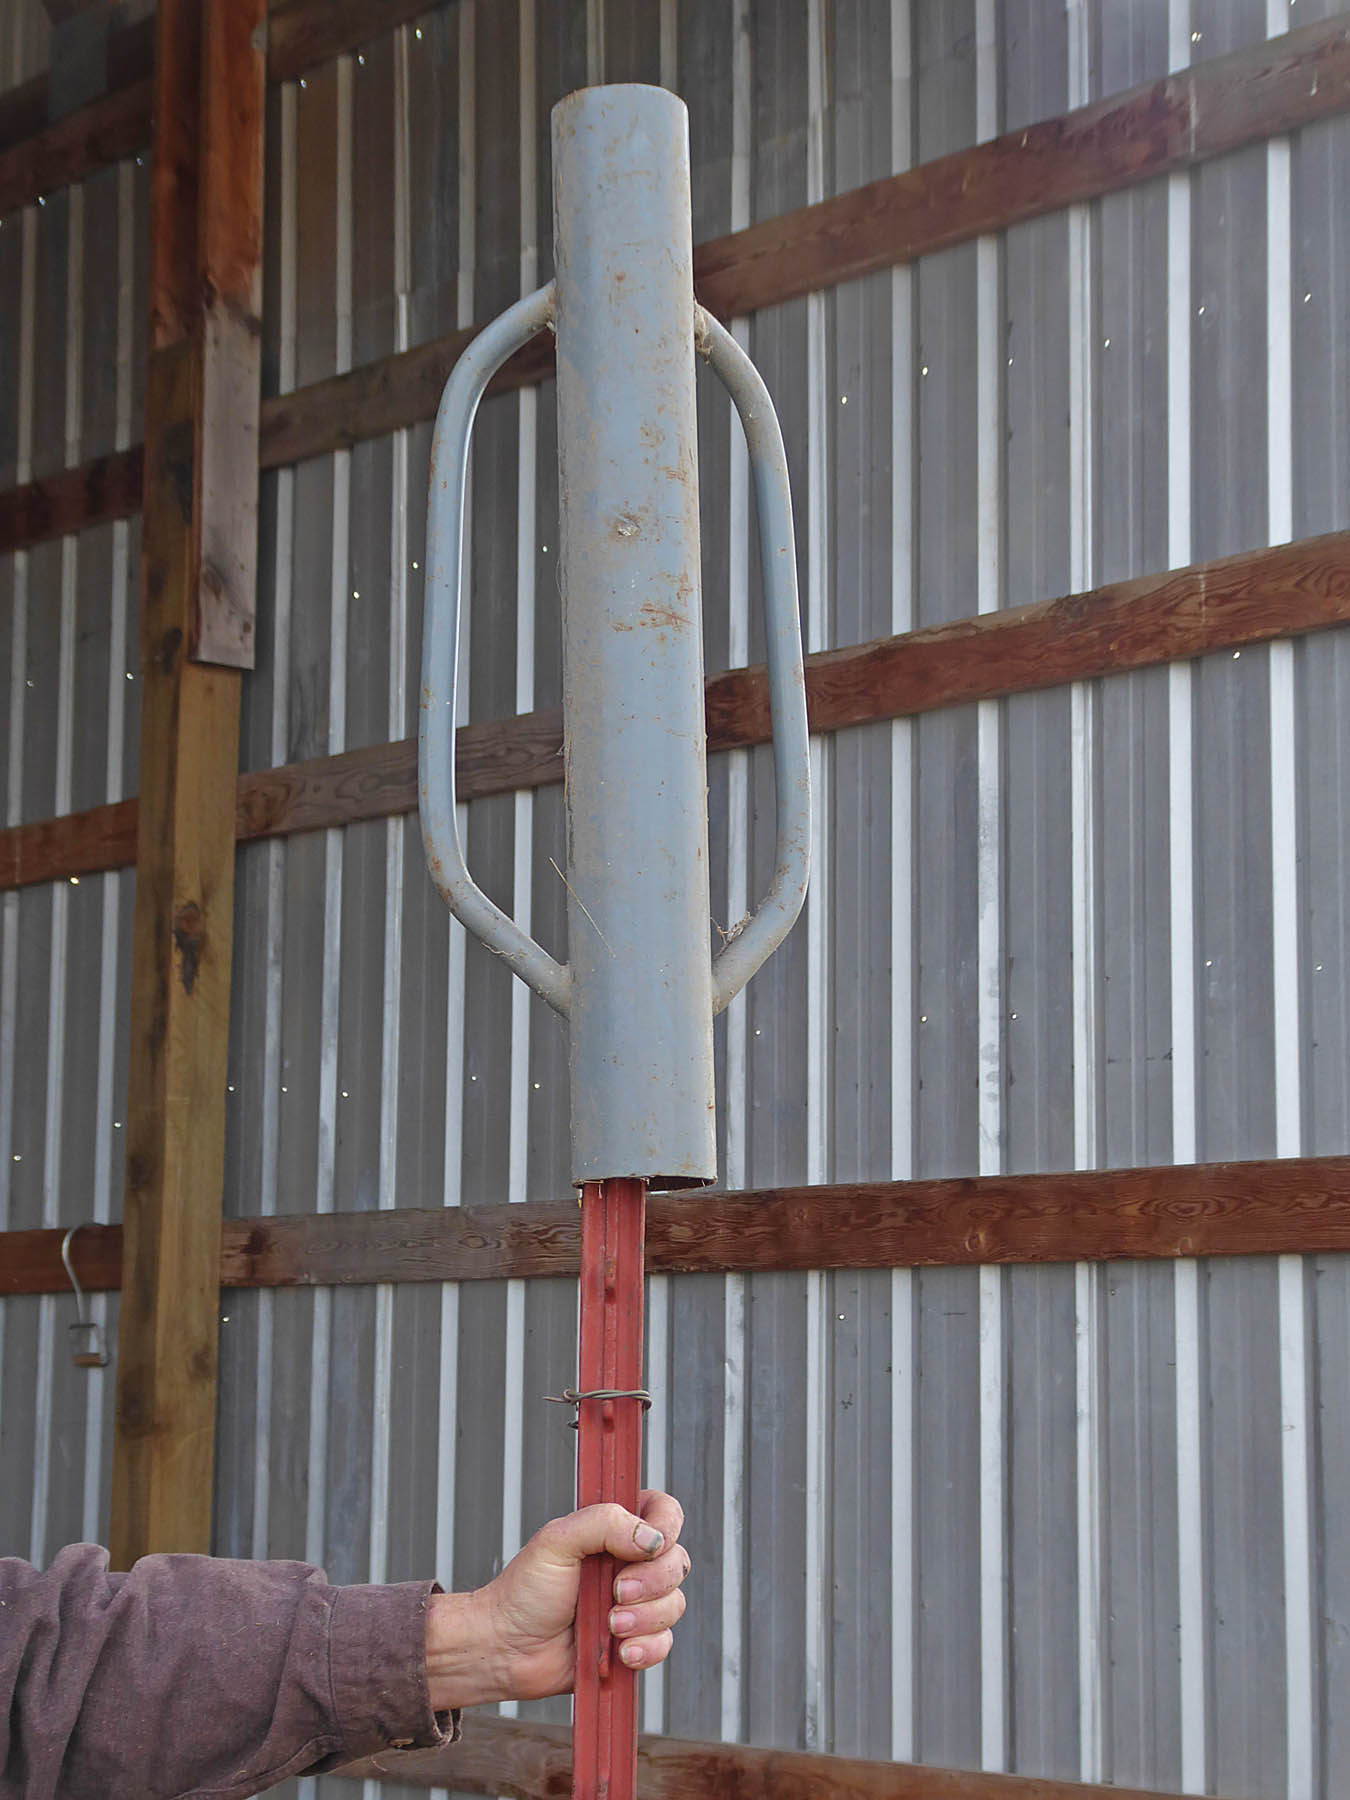
T-post driver and t-post
I recommend an in-line brace within a fence line at least every 500 feet, even on flat ground. Corner brace posts should have three or more connected verticals placed to handle fence tension from two different directions. Anywhere a gate is hung (whether in-line or along a corner), two brace posts are needed on either side of the fence.
The point here is that you simply can’t (time and money permitted) make a mistake in “over-engineering” your fence braces both in strength and numbers.
Laying the line
It’s a wise idea to always put the end points in first for every fence line you’re going to create. That way, you stand a much better chance of creating a straight fence line.
After your first brace is installed, it’s time to set the next brace — all the way down at the end of your row. More than likely that will be another corner. Make sure that corner is tight, too, because you’ve now made two tension points on the line that will eventually become a part of your new fence.
Now is the time to accurately mark in your fence line between those two corners. Here’s a simplified example.
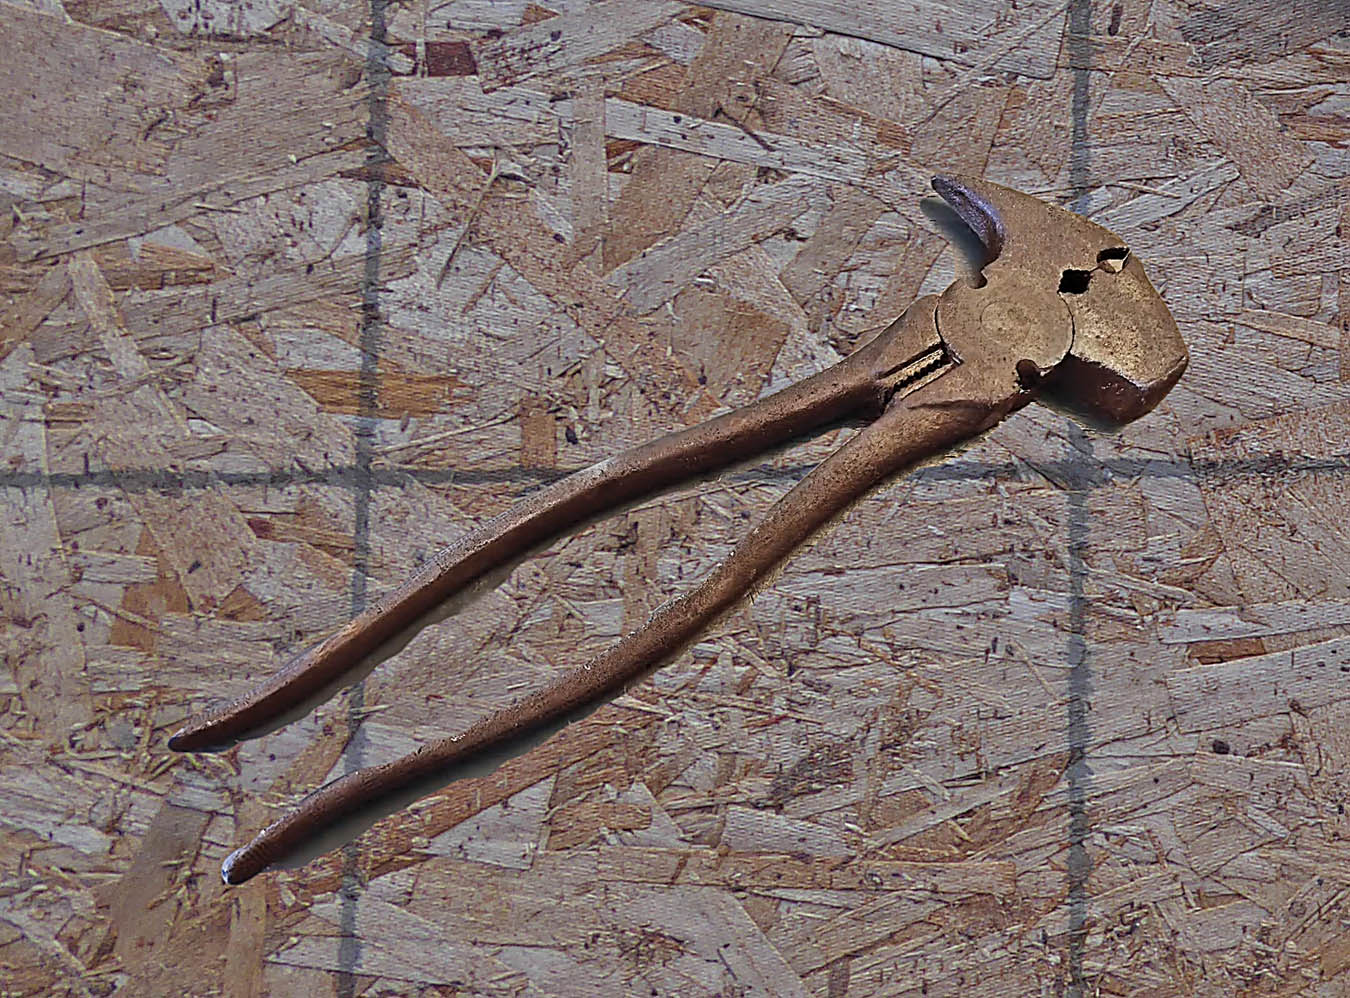
Fence pliers
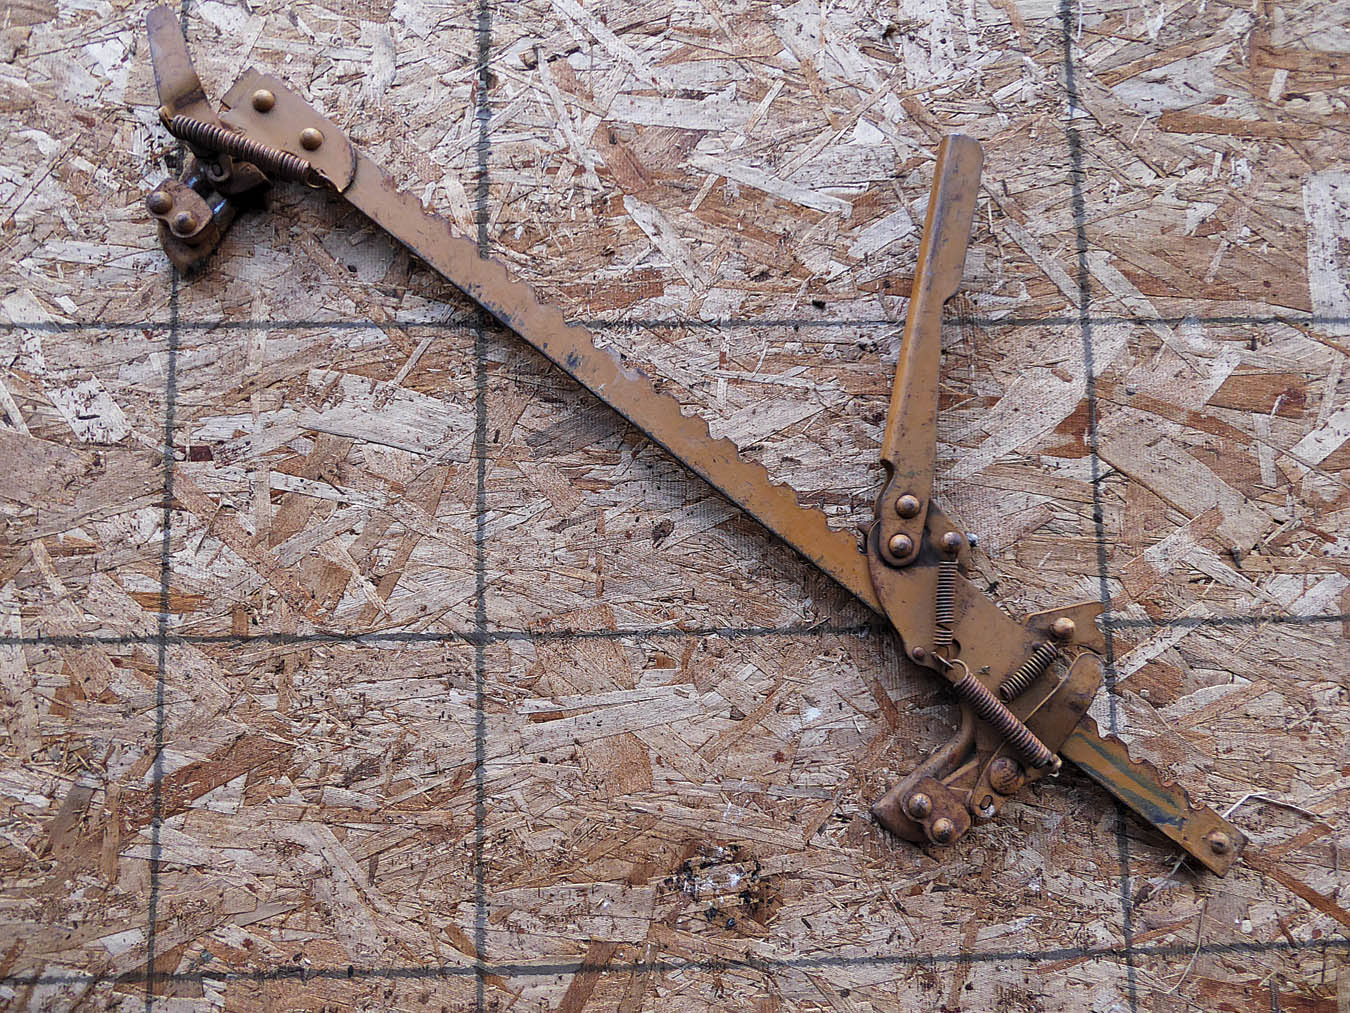
Wire stretcher/splicer
Let’s say you’re making a new barbed-wire fence enclosure. It will be roughly square, with each side 1,000 feet long. The land is level and there’s no serious vegetation like trees or heavy brush along the planned fence line (remember, this is an example; and as such probably bears no resemblance to your reality).
You’ve set your first two corner braces. Because the length of this fence line is 1,000 feet, you’re going to add a single in-line brace at the 500-foot mark. That way you’ll be able to tension your wire strands from that in-line brace to each corner, making it much easier to get the needed tension (since you’re tightening 500 feet of wire each time, rather than 1,000 feet).
But first you’ll have to mark out that fence line — and you want it to be straight as an arrow. You could purchase a surveyor’s level or laser level if you’re so inclined, but that can be pricey (and unnecessary, unless you’re going into the fencing business).
There are three proven ways to lay out a fence line that doesn’t require expensive equipment.
The first is to lay out a string between the two corners, which is then pulled taut until it’s straight. While this is a perfectly good way to do this, there are a few caveats. A thousand feet of string isn’t easy to manage and it WILL catch on every blade of grass, rock, or stick between you and the far post. When this happens, lifting, lowering, or tugging on the string at one end won’t solve every snag. So be prepared to trudge up and down the line, freeing the string repeatedly. The other problem with getting a straight line out of a long string is that if it’s windy, you’ll have a down-wind bulge in the string no matter how hard you pull it.
A second way to lay out a fence line is to use wire, especially if that wire will be your permanent bottom wire of the fence. (I don’t recommend this if you’re using barbed wire; it catches on everything.) However this method means the tensioned wire will now be in the way when you install additional brace posts and pickets. You’ll have to pull that tensioned wire away from holes that need to be drilled, which is especially a problem when using a tractor-mounted auger to drill holes.
Wooden stick fencing stays
The third method is the one I prefer and use regularly. It requires a hammer, a willing helper, and one sharpened wooden pole or metal stake (depending on ground hardness) for every 100 feet of fencing. The poles should be at least as tall as you (and in places where you’ll be going over hills, taller). Depending on the distance to be fenced, a pair of walkie-talkies is useful (or at least some agreed-upon hand signals with your helper).
In this method, you lean back against a forward corner brace post with the edge of the post centered between your shoulder blades, and have your assistant move about 20 feet from you in line with the distant corner. Direct your helper to move an upright stake left or right until it aligns with the corresponding post edge on the distant corner. When you’re satisfied on the alignment, your assistant hammers in the stake. Now, have your helper head down the line, pacing or taping off roughly 100 feet and repeat the procedure, using the first stake that was set at 20 feet and the far corner post to line up each additional stake 100 feet apart until you reach the end of your line. Easy as pie and as straight as you’ll need.
If the terrain isn’t as simple as our example (for instance if there’s a hill in the way that blocks the view of your distant corner or brace), your assistant starts the sight line on the hill using two stakes, adjusting those stakes as needed from side to side until you have a series of stakes across the rise that lines up with both distant corner braces. You’ll need to put in-line braces as needed along the top of the rise and at the base on both sides to insure your wire fence can stand the strain of the elevation change, as well as to keep either high gaps or low fence wires from degrading the effectiveness of your fence.
It’s possible to curve a fence, but if this is necessary, plan on using more in-line braces. It’s all about tension, remember? If your fence line curves, a portion of the tension is no longer concentrated along the wire and is instead directed perpendicular to the wire. Proper braces can handle a lot of that perpendicular pressure, but the pickets you’ll add between the braces (such as T-posts or narrower poles) can’t. After a period of time, those constant lateral pressures on your pickets will cause them to lean over.
Now that you have your fence line laid out, you can build your in-line brace roughly 500 feet from either end of the 1,000 foot line. If you know your pace length (a very good thing to know for a number of reasons), you can pace out that 500 feet, since being exact on the distance isn’t imperative. Remember, an in-line brace must be capable of resisting tension from both directions. You can make an in-line brace with a single brace post and two wooden diagonals that are sunk into the ground. But a much better and stronger brace can be created with two (or better, three) brace poles connected to each other in the H-brace configuration by a horizontal post and wire, or in the N-brace configuration with bolted wood diagonals.
Now it’s the time to add pickets to the line you’ve created. Now is also the time a bit of string will help, not only with putting those pickets on a straight line, but also for spacing them evenly. For most wire fences, the recommended picket spacing is 8 to 12 feet. (For this example, we’ll use 10 feet.) Since you now have stakes in the ground along the fence line every 100 feet, make the string at least 120 feet long.
Run the string from a corner brace as far along the staked fence line as it will go, and tie it to the last stake it will reach. Tie it to that stake and then take a tape measure (or better still, a 10-foot stick) and a marking pen, and place a mark every 10 feet on the string. You’ll have nine marks on 100 feet of string.
With the tight string marking out ten-foot intervals, you can start adding your fence pickets. After you’ve added a picket at each mark on the string, you simply untie the end attached to your corner brace and then bring that end past the end still tied to the stake and run it down to the last stake it will reach and install more pickets along the pre-marked string. Repeat until you’ve put in all your pickets along the straight line created by your string and stakes.
Types of pickets
So what kind of pickets will you use? Picket posts can be made of wood, metal, stone, or concrete. T-posts are probably the most common picket; but if you have a large or cheap supply of treated or rot-resistant posts available and you prefer the wood look, go for it. For our example we’ll use T-posts.
T-posts are steel bars that derive their name from their cross-section. They come in different lengths and usually come with knobs or ridges on the flat side of the “T” and a thin steel stabilizing fin on the end which is pounded into the ground.
T-posts are installed by driving them into the ground using a T-post driver. T-post drivers are made from a thick metal tube that is welded closed at one end. The driver has two heavy steel wire handles attached on opposite sides of the tube. The top of a T-post is inserted into the driver tube and the driver is then lifted and slammed down on the T-post, forcing the post into the ground. It’s noisy work, so ear protection is recommended.
You should always drive the T-post into the ground deeply enough so the stabilizing fin is completely buried. Not only will this help to stabilize the T-post, but an exposed fin can be a trip hazard or a danger to your livestock’s feet. You always face the nubs on the T-post into the area in which you wish to keep your livestock, because the T-post is designed to be especially resistant to bending when pressure is applied to the nubbed face.
A word of warning: I’ve known at least three people who were so zealous in driving posts that they lifted the driver too high. On the downward stroke the tube edge caught the top of the post and the heavy driver bounced off the post and crashed down on the person’s head. Be careful.
How much wire?
With the corner braces or end posts in place, the in-line braces constructed, and the pickets in the ground, it’s time to hang some wire. If we were a big farming or ranching operation, we could use heavy specialized fencing equipment and tension up to a quarter mile of wire at a time. But since this article addresses small homesteads, we’ll be tensioning no more than 500 feet (the rough distance from our in-line brace and each corner post) of wire each time.
Most non-commercial rolls of smooth or barbed wire come in lengths of 1,320 feet (one-quarter mile), which means if you’re thrifty, you need only three rolls for each side (assuming you’re hanging four strands) in our sample enclosure outlined above. One thing to remember is each roll weighs upwards of 40 pounds, so plan accordingly to save your back.
Before we begin — in fact, before we even buy any wire — the big question is: How many strands do we need, and at what spacing?
The recommended number of strands is animal size and species-dependent. Different types of livestock require different types of fencing.
For cattle, most experts suggest five strands of wire. Personally I’ve always considered that a bit excessive (four is my norm), but then most of my cattle are on the small side. Since I use 48-inch posts, I usually hang my wire at 12-inch intervals. If you’re planning to contain some of the bigger cattle breeds, you’ll probably want to use taller poles and more strands. Check online for breed-specific recommendations (or ask a neighbor).
Most sheep and goat breeders don’t like barbed wire, but those that do (usually for large pastures) recommend at least nine strands with three- or four-inch spacing between the strands. But at nine strands, the cost for woven wire fence is cheaper than barbed or smooth wire. (More on this later.) Sheep recommendations are similar to goats, with the added caveat that barbs and fleece don’t play well together.
Practically every horse breeder I know will only use smooth wire fencing and/or electric fences. I can understand that. Horses are much thinner-skinned than cows and consequently more likely to get torn up by barbed wire. And unlike cattle, horses are valued for their looks, not their meat. But just to be contrary, one of my best neighbors — a horseman with over 40 years’ experience — is presently removing all the smooth wire from around his pastures and replacing it with barbed wire. Why? He says horses tend to cut themselves more on smooth wire because they don’t develop an aversion to it as they do with barbed wire. So, once again opinions differ.
Hanging wire
When you’re finally ready to start hanging wire, you’ll need the following tools:
- Eye protection
- Heavy-duty and puncture-resistant work gloves (especially for barbed wire work)
- A good hammer, preferably one with a textured strike surface
- Fence staples (U-nails)
- Several beefy pairs of pliers, including one each of adjustable pliers, needle-nose pliers, diagonal pliers, locking pliers (vice grips), and (strongly recommended) a pair of bolt cutters
- A wire stretcher/splicer
You may notice I don’t list what’s commonly called fencing pliers. Over the years, I’ve owned several pairs of these hybrid plier-hammer-cutter combinations, and like most multi-function tools, they never perform as well as the single-function items they try to replace. They’re a good tool to carry along when you’re casually walking a fence line and doing spot repairs, but I prefer to have dedicated single-use pliers, beefy cutters, and heavy hammers when I’m installing fencing.
Always hang your fencing inside the pickets in whatever area you’re planning to place livestock. That way, when an animal leans into the fence, pressure is placed on the pickets and braces, not the wire.
Begin at an in-line brace. If using smooth wire, you can start laying strands from the bottom up. If using barbed wire, start at the top (so it doesn’t snag the other strands as you tension them into place). Mark the strand spacing on the center pole of the brace. Form a loop around the brace pole at the location of the top mark and wrap the wire to itself with at least several turns.
At this point you can use a couple of fence staples to hold the loop in place, but never, ever count on fence staples alone to hold a tensioned wire strand in place. Seriously, there’s nothing more alarming than watching a tensioned 500-foot strand of barbed wire breaking free from fence staples and rapidly head for you in great heaving loops.
Now unroll your wire (carefully) until you come to the next brace point. Run out enough wire to go beyond the brace pole and still have enough left (after tensioning) to loop around it and twist it off as you did at the starting point. Grip the wire with your locking pliers and use the bolt cutters to cut the wire beyond. Watch out for the now-free wire as it springs away. It’s best to have an assistant hold the wire as you cut it. (Having an assistant makes the whole process a lot smoother.)
Tension the wire by hand first before you trap the wire in the puller/splicer jaws. Using the wire puller/splicer, begin to tension the wire. Start working the ratchet to increase the tension. How much tension? Well, it’s pretty certain that you can’t over-tension a double strand of barbed wire using a hand-operated ratchet puller/splicer alone, so go until it gets to be too much trouble. Note that even a ratchet-tensioned wire over distance will have a catenary curve (a curve created by the weight of the wire) in the center. That’s okay. One way to further flatten that curve after the initial tensioning is to walk to the center of the curve and raise the wire with a stick. You’ll then be able to get a few more ratchet clicks. That’s good enough.
Here I’ll add a note of warning. You’ll see a lot of big ranchers and farmers tensioning multiple strands of wire at a time by using specialized power equipment on tractors. Don’t do this until you have a lot more fencing experience. A small tractor or even an ATV can tension a strand of barbed wire beyond its breaking point (particularly if that strand has any hidden nicks or flaws), resulting in injury as the snapped barbed wire ricochets toward you. A 500-foot stretch of barbed wire tensioned by a hand-operated ratchet is good enough.
Wrap the excess wire around the far brace pole and twist it off as you did at the first post. Put in a few fence staples and release the ratchet. You’ll lose a very little amount of the tension when you do, but that’s fine.
Repeat placing the top (barbed) wire for each section of fence between braces until you come to the end (or bottom wire if you prefer, for smooth wire). This way you’re balancing the pressure evenly on your center braces. Do the next strand down and repeat the sequence until you’re done.
Now that you have the strands hung and tensioned between the corner posts and the in-line braces, it’s time to fasten the wires to the pickets. If you’re using wood posts for pickets, drive the wire in place using fence staples. A word of advice: Fence staples (or U-nails, as I call them) are the very devil to drive in. You’ll surely end up with a smashed finger or two trying to hold the nail and wire in place while swinging a hammer. Avoid the damaged digits by holding the staple in place with pliers while starting the nails. Don’t forget to maintain the same wire spacing you used at the brace posts for a smart-looking fence.
If you’re hanging your wire on T-post pickets, you’ll be using wire ties. They make heavy-duty pre-bent wire hangers for this purpose, but I don’t like them. They’re hard to set on a tensioned wire and even harder to tighten enough to keep the wire firmly against the T-post so the wire doesn’t slip past the rounded knobs when pushed down or up by a cow. I prefer to use a lighter-gage galvanized wire I can wrap around the strand and the post a couple of times and twist tight.
Because your strands are already tensioned along the pickets, you can tie or staple each of them at each post at one time. Doing it this way, rather than tying down each strand as you tension, will save you a lot of walking.
Congratulations! You’ve just installed your first section of wire fence.
A note about stays
One of the major complaints about barbed or smooth-wire fences is livestock can damage the fence or escape by pushing between the wires. This is because the wires are individually tensioned. It was this concern that caused the creation of stays (sometimes called “droppers”). A commercially manufactured stay is a clever idea. It consists of a heavy galvanized wire that is doubled over and then twisted together.
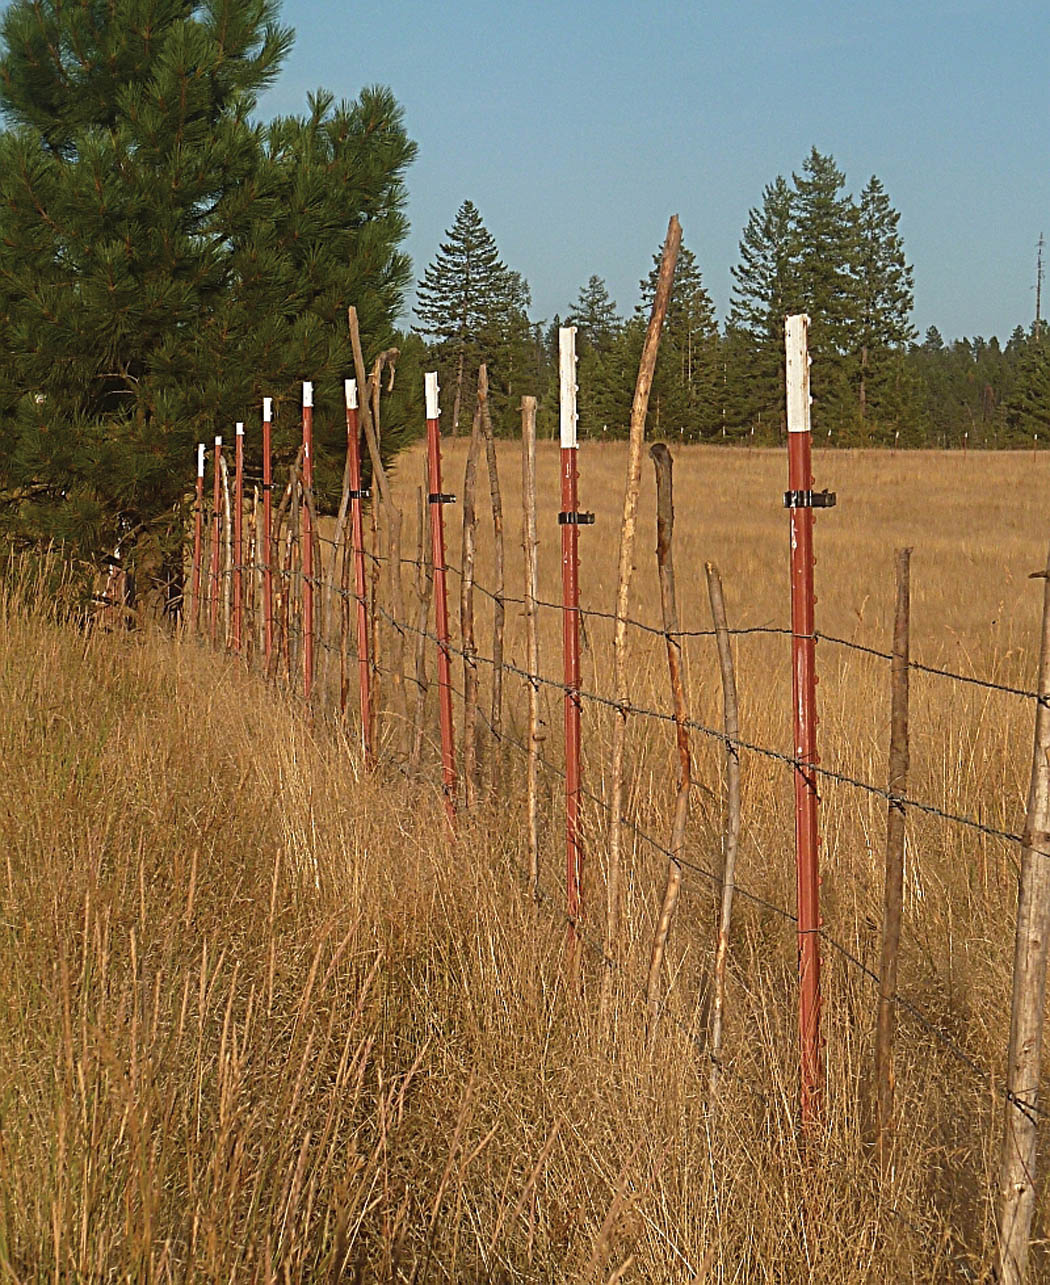
Stays work by twisting them over the top wire of the fence, and then continue twisting — collecting each subsequent strand — until all of your wire strands are captured by the stay. This binds the wires together so the section of fencing between pickets acts more like a unit rather than individual wires. The more stays you add, the greater the fence cohesion and the less distance that any two strands can spread apart. Planning the use of stays before putting in your pickets can allow you to increase (to some degree) the distance between pickets.
But stays cost anywhere from 50 cents to $1 each. A free alternative is to use sticks. Ten years ago, we sent out our kids and some neighbor kids to wire sticks to the fence strands in lieu of metal stays. Those homegrown wooden stays are still going strong, and my total cost for that installation was a plate of chocolate chip cookies. I really miss those kids.
End of part one
The information and techniques so far described are generally applicable to every other variety of common fencing on the small homestead, farm, or ranch. Because so much of the above information has been dedicated to the fundamental themes of fence location, layout, and post construction, this article will be continued in Issue #180 of Backwoods Home Magazine (April/May/June 2020).
In the next part, we’ll take a detailed look at woven or welded wire fences, wood rail fences, pipe fences, electric fences, and gates. There are a lot of options beyond Mr. Glidden’s barbed-wire invention. For specific uses, these options may be better for performing the simple basic function of a fence: keeping things you want in, and things you don’t want out.


We use square wire mesh and smaller chicken wire across the bottom of the fence. Also bury wire mesh fencing horizontally underground outside the fenceline if you have burrowing rodents. Deer fence 8′ tall on a hilltop which makes it more difficult for deer to jump into. Elk may not see a fence, so tear white plastic grocery bags into strips and tie to fence at elk eye level every 10′ or closer. When elk are spooked, they will go thru a fence and drag it, even chain link.
Leave an open perimeter outside a garden fence wide enough to drive around. This also decreases rodents and animals hiding in brush along the fence line. If you keep weeds down, it allows hawks to spot garden-robbing rodents like rabbits. They are also good for the stewpot if you live in an area where they are good to eat. (not diseased)
We perched a plastic owl on a corner fence post. Crows think it is real and occasionally come to scold it and try to drive it off.