 |
|
| Issue #84 • November/December, 2003 |
There’s nothing so comfy and warm in the snowy dead-of-winter as a pair of thick, soft woolen mittens. Many of us have fond childhood memories of a favorite pair that accompanied us out to play or to collect firewood. Wool makes one of the warmest and most sturdy winter fibers, is a renewable resource and, with basic care, can last literally for decades.
But really nice woolen mittens can set us back a significant sum or take quite a few nights to knit from scratch.
|
There’s another way to acquire these beauties. It only calls for basic stitchery skills and a few cast-off garments. It takes less than an hour to put a pair together. And they can be attractive enough to be given as holiday gifts.
The first step is to locate a wool sweatera favorite one that has gone past its prime, or one that accidentally went through a hot-water cycle in the washing machine. Our local small town has a thrift store which routinely carries wool sweaters in all colors and sizes, with lots of choices in style and texture. Your town probably does too. You can also find good buys at garage sales. Choose only pure wool sweaters for this project. These garments will have the famous overlapping circles “wool mark” on the label. Of course, you can make mittens from any fabric, although cotton ones simply will not keep your hands warm, and wool mixed with other fibers (such as polyester or Angora rabbit) won’t be as durable.
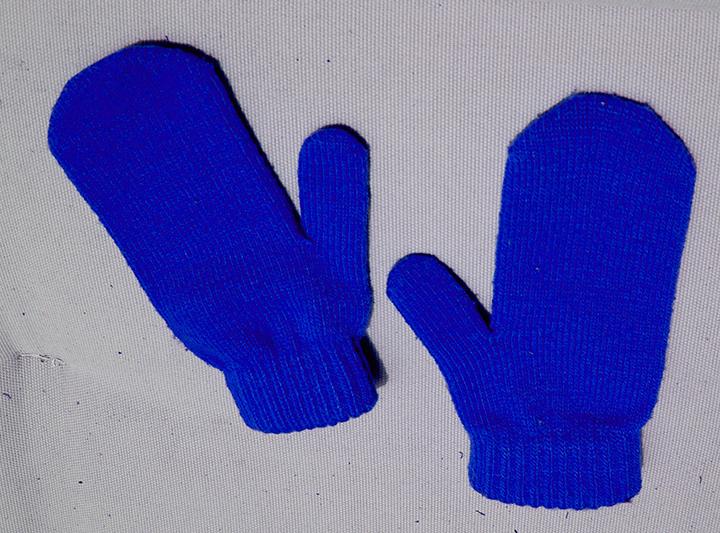
The blue men’s large-size wool sweater shown below ended up in the washer and super-hot dryer, which resulted in the garment shrinking, as wool will do, down to a child-size item. The arms of this sweater, however, had been stuffed with socks (don’t ask!), so they retained their bulky shape throughout the process. The final outcome was very heavy, sturdy semi-felted wool on the trunk, and loose, airy wool on the arms.
The thick, stiff fabric that occurs when wool is heated and agitated, such as in a washer or dryer, is actually a desirable product if you want the equivalent of “boiled wool.” Boiled wool was used during the Middle Ages as a type of poor-man’s armor: it was thick and durable enough to protect wearers against arrows and knife attacks. Today, the wool industry in France knits beautiful super-large berets and vests, then boils them until they felt and shrink into normal-sized hardy, warm, boiled wool garments.
So, although this favorite blue sweater is past the point where it can be used as a sweater again, it can still be converted into mittens, one “lightweight” pair from the sleeves, and one super heavy “boiled wool” pair from the body.
The second step is to make a pattern of your hand, or the hand of the person who will receive the mittens. Place your hand on a sheet of paper, fingers together and thumb extending to the side, with wrist extending straight (rather than angled to one side). Now, using a pencil, trace around your hand. Keep the pencil vertical (upright) as you trace. This will help keep the hem area consistent. When you’re done, you’ll have a pretty clear outline of your hand.
Next, soften the outline and round it out into a true “mitten” shape. Then add about ½ inch to the edge, all the way around. This will allow for the hem. Now, trim the pattern out of the paper, and make a duplicate pattern, so that you’ll have one for each hand.
The third step is to lay the two patterns onto the sweater. Turn the sweater inside-out first. You can use either the body portion of the sweater or the arms, or both, if you’re making two pairs of mittens. Leave the cuff edges on to act as cuffs on your mittens-to-be. Pin the patterns in place temporarily, passing your pins through both thicknesses of the sweater. If you use the sweater’s arms, lay the pattern so that the “pinky side” of your pattern is against the arm seam. This will reduce the amount of sewing you’ll have to do.
The fourth step is to mark around the edge of the pattern, leaving a clear outline on the sweater. I used a black indelible marker pen to outline my patterns on this blue fabric, but chalk or a wax marker may work just as well. Carefully remove the pattern, and pin the two layers of fabric together again. Now, trim around the pattern mark line, leaving the side-seam intact. The trimmed fabric edges may have a tendency to unravel a little bit at this point. You may wish to use your marker to draw a “sewing line” about ½ inch in from the cut edge. That’s where you’ll sew the pieces together.
The fifth step is to sew the mitten seam, about ½ inch in from the cut edge. If you’re handy or so inclined, you can use a running slip stitch to catch and hold the cut edge down (the same style as the arm seam on the sweater).
Plain cotton-polyester thread works fine for this, but for more fancy mittens you could use a lightweight worsted wool yarn in a contrasting color. I’ve sewed mittens using dental floss and probably fishing line would work as well. The thread should just be sturdy enough to hold the weight of the fabric firmly together.
The final step is to turn the mitten right-side-out, and try it on. If it seems too loose, you can turn it inside-out again and sew a new seam portion to tighten up the floppy areas. You’re done!
If you wish, you can sew additional designs, initials, or patterns in contrasting colors onto the back of the new mittens, or run a colored yarn around the cuff end. That will take a bit longer, but the result is a very personalized one-of-a-kind item.
Mitten care is simple: wash in lukewarm water using a mild shampoo or liquid dish detergent. Rinse in lukewarm water, carefully press out the excess liquid without twisting, and dry flat. Or, if you made your mittens extra-large to start with, just toss them in the washer, dry in a hot tumbling dryer, and take out a child-size pair of boiled mittens.


