
By R.E. Rawlinson

In 1845, Henry David Thoreau began his now-classic experiment in self-reliance at Walden Pond. He soon realized that if he was going to make a go of it he needed a tool, specifically an ax. Felling axes were a necessary tool for the early American settlers.
An ax is most simply defined as a cutting edge attached parallel to a handle. There are many different types developed to accomplish different tasks. Each type of ax has its own advantages and disadvantages, so let’s look at the general styles in order of use: felling, hewing, broad, mortise, and splitting axes.
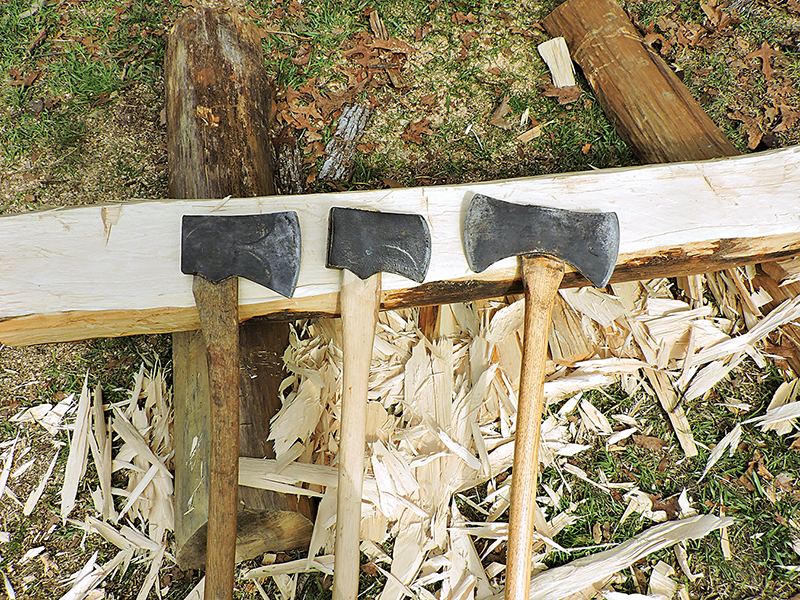
Felling axes
Felling axes are used to chop trees down with horizontal swings and then chop off the limbs and cut the log to length with vertical swings — all jobs that we now use a chainsaw for. In fact, the felling ax is the most common type of ax for very good reason — it is the most versatile and the one everyone should have.
In the Old World the American colonists came from, trees were largely the property of the wealthy. The axes they brought to the Americas were limited by both tradition and metallurgy. When confronted by seemingly endless forests, they developed what we now call the American pattern ax by the mid-1700s. With a head of about 3½ pounds, a wide but short bit counterbalanced by a poll, and a helve (handle) of strong, flexible hickory, this style of ax could fell trees, clear fields, build fences, be easily carried long distances, and create lumber for cabins (including a small cabin on Walden Pond).
A good felling ax has some key characteristics: fine-grained and well-tempered steel at the bit, a poll that provides the balance needed for horizontal swings, and a handle that is strong and flexible of comfortable length. Unfortunately, the ax-shaped objects typically found in stores today seldom meet these standards.
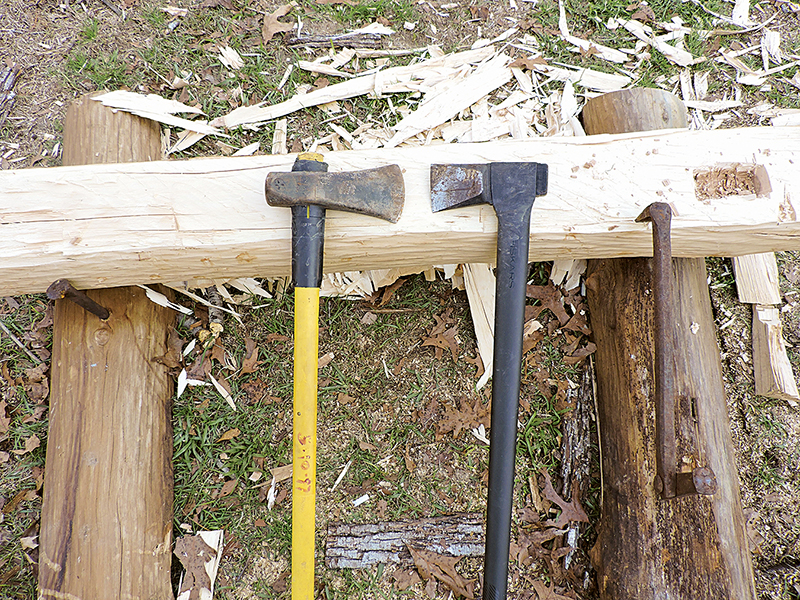
Under the same category of felling axes is the double-bit felling ax. Developed for the professional loggers supplying commercial sawmills, the bits are sharpened at different angles — lower angles for deep felling cuts and higher angles for limbing. However, most felling is done with a chainsaw today and so the specialization of this ax limits its use for most of us. My own double-bit felling ax has been relegated to the brutal work of chopping roots for stump removal, with both edges ground to a very high angle.
Hewing axes
Once a tree is down, the limbs removed, and the log cut to length, other axes may come into play, depending on the intended use of the wood. If a timber-framed building or hewn log home is the goal, the log is made flat on one or more faces with a hewing ax and a process called joggling or juggling.
Balance is very important in a hewing ax. A 17th century French hewing ax with a 14-inch-long bit and complete lack of a poll works beautifully in the vertical plane, but is impossible to use well horizontally as gravity pulls the cutting edge down.
Although there are plenty of hewing axes, the felling ax can also be used for hewing, as it was in America from the earliest times.
With either type of ax, the process is the same. The log is chopped about every foot to a chalk line and then the rounded chunks in between are removed.
The hewing ax leaves a flatter surface than the felling ax because its long, thin bit shears off the chunks rather than splits them as the wedge-shaped felling ax does.
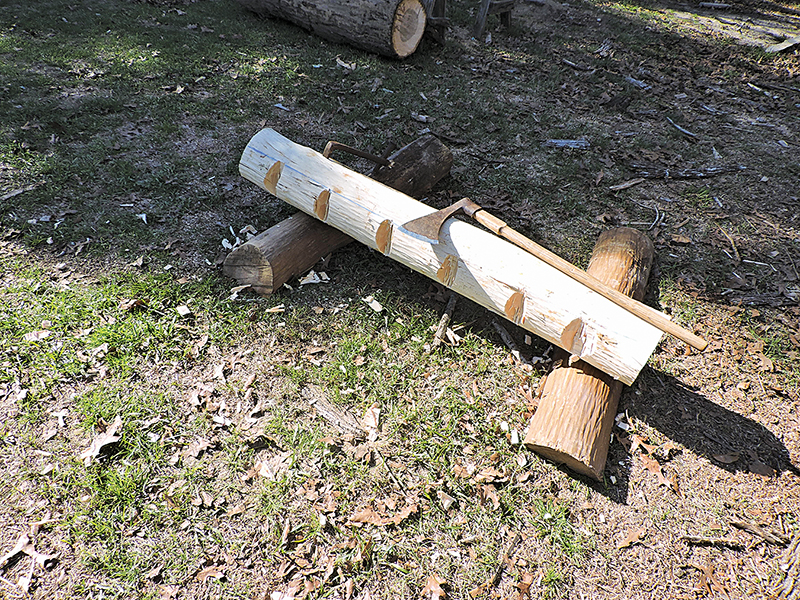
Broad axes
Now that the faces of the log have been hewn roughly square, they can be made very smooth and flat with a broad ax. There are many different styles, but all have a wide bit beveled on one side and flat on the other, much like a wood chisel. Broad axes have short handles that are offset to the head, which allows for clearance between the timber and the hand.
They are “handed” — made for use by right-handed people with the bevel on the right and the opposite for a left-handed person. Which hand is closest to the head is a matter of personal preference; a right-handed person simply hews the right side of the log. European axes have the eye twisted in the head and so are permanently “handed,” whereas American axes have the eye straight and can be right- or left-handed depending on which end the handle is mounted in.
The broad ax is used in a vertical arc, sweeping down the grain to shave off thin flakes of wood. The weight of the ax head provides the force, with the axman guiding it with short and relatively slow swings. Raising the log to a comfortable height is much easier on the back. Roll the heavy log onto shorter logs to raise it off the ground. It is a good idea to pile the joggled off bits underneath to prevent driving the ax into the dirt (which will dull and chip the fine edge very quickly).
Developed over centuries, these features have made the broad ax an ideal finishing tool. Unfortunately, the specialization once again sacrifices general utility.
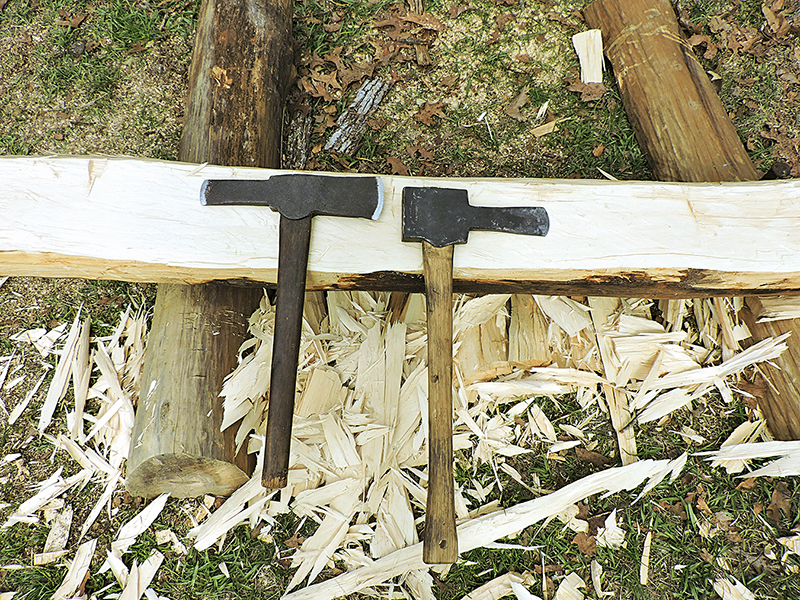
Mortise axes
If the log is intended as post and rail fencing, a mortise ax with its long, narrow bit may be called into service. Its short handle and heavy poll are similar to the broad ax but the handle is aligned straight to the head.
A mortise ax is used with short chops to excavate a two-inch-wide mortise quickly. It can be used as a handled chisel by striking the poll with a wooden club for more precise work.
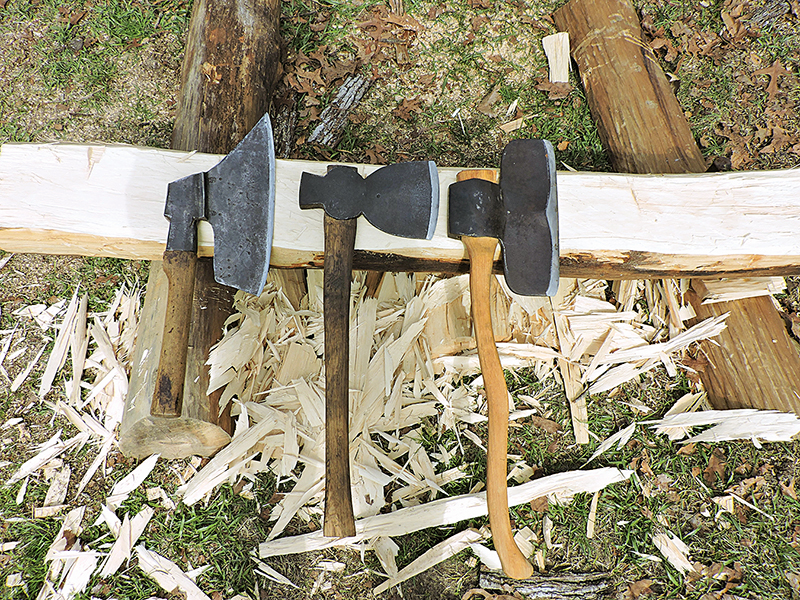
Splitting axes
For converting trees into firewood, a splitting ax (often called a maul) is the tool of choice. While most axes can be pressed into this service, a splitting axe, which is essentially a handled wedge, is much more effective.
Many of the splitting axes I’ve seen are poorly designed with the sides of the wedge being very rounded. This causes the force of the swing to be dissipated on impact rather than driving down into the wood and forcing the grain apart. The shock of the abrupt stop travels back down the helve into the hands. If you already have this type, its performance can be greatly improved by reshaping the head into something approximating a German “Holtzaxe.” To do this, first cut off the flared toe and heel of the bit with an abrasive cutting wheel, then use a grinding wheel to grind the cheeks to a flat and symmetrical angle. These modifications concentrate the force of your blow and make a much more effective tool.
A notable exception among the modern splitters is the Fiskars splitting ax. I have been using it for several years now and been very pleased. The bit is machined to a flat plane and is tempered very well (I have yet to sharpen it), and it is much lighter than the average ax, making it easy to use for long periods of time. On the downside, it does not have a hammer-faced poll, which is useful for driving wedges. It also has a synthetic handle (I loathe synthetic handles). It is rather expensive compared to some axes, but has proven a well-made and efficient splitter.
Another type of splitting ax is a fireman’s ax. With its heavy weight and long head it splits pretty well even though it is too narrow. The pick-type poll is handy for hooking the next round of wood out of the pile. As another advantage, the head may be free for the asking at fire stations. They break axes now and then — all you will have to do is mount a handle.
Finding your ax
Now that we know a little about axes, lets talk about the one we all need: a single-bit felling axe. Typically, axes found in the big box stores are not the best option, but you may be wondering why. These new axes have a long and poorly-balanced head. Thanks to chainsaws, the vast majority of people will never use an ax to fell a tree, so they don’t swing an ax horizontally. Most of the axes available are made for swinging vertically and made for looks rather than performance. But why spend money on a sub-par ax from the store when you can get a great one for cheap?
Yard sales and flea markets can provide a fine tool at a low cost. The trick is identifying a good ax head — handles can easily be replaced. Things to look for on the head are profile, bit quality, and the condition of the eye — sharpness is something we’ll deal with when we get home with the prize.
The next thing to check is the temper or hardness of the bit — typically the standard is between 53-56 on the Rockwell hardness scale. This information is valuable to the manufacturer but not much use to the guy digging through a bucket of ax heads at the flea market. A way to check temper in the field is to scratch the bit with a pocket knife — it should leave a slight mark but not a scratch (if a fingernail catches in it it’s a scratch, if not, it’s a mark). But a too-hard bit is no good either, a metal file should scratch the bit easily, not skate off. Be sure to test the metal on the bit because very old axes were made mostly from iron with hardened steel on the bit only.
Lastly check the overall condition of the eye for cracks and symmetry and the poll for mushrooming (which indicates that it has been used as a sledgehammer).
Shaping & sharpening your “new” ax
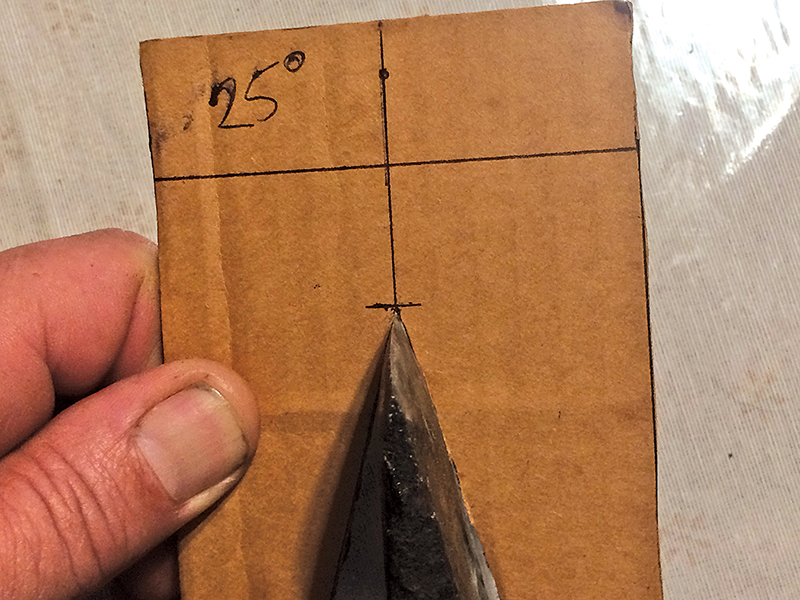
Once you find a good head, it will likely need a bit of refurbishing. The first order of business is to reshape the bevel. The leading edge should be shaped to between 15 and 30 degrees ½-inch from the edge. It is very useful to make a cardboard gauge to check while you are filing so it is consistent the full width of the bit.
The angle is important to the function and durability of the ax, so take the time to get it right — a shallow 15-degree angle will penetrate more deeply than a 30-degree angle, but will need to be sharpened more frequently. For limbing, a higher angle is better because of the tough knotty wood. I like a 20- to 25-degree angle for general use, but your work, species of tree, and frequency of use will dictate the best angle.
Shaping this primary bevel is not sharpening, it is establishing the foundation to sharpen and is something you may do once in the life of the tool. It may require removing a lot of metal — powered grinders or belt sanders can speed this process. Grinding creates friction and friction creates heat, so use great caution not to overheat the bit. If it’s too hot to touch, then it’s too hot! If the metal turns a bluish color, it has ruined the temper and gone soft. Go slow and cool often.
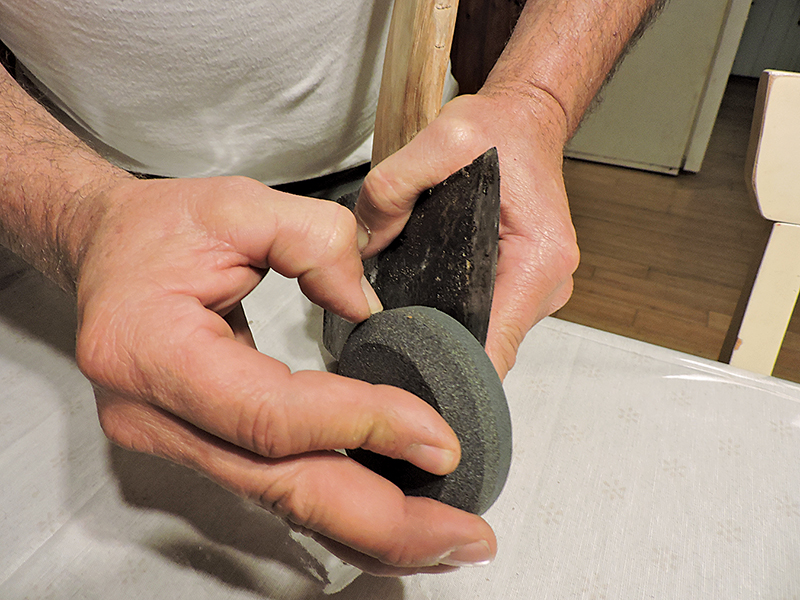
Once this primary bevel is established, we are ready to sharpen. Any sharpening stone will do, but an ax stone, also called a puck, is ideal. These are round, often dual-grit, and about three inches in diameter. You grip the stone in the middle with your fingertips (so you don’t cut them) and work over the edge in a circular motion. I seldom find these stones at flea markets but fortunately they are quite inexpensive to buy new. I purchase mine from Amazon.com for less than $10.
Handles
The next part to look at is the helve, or handle, which provides leverage to increase the force of the blow and shock absorption for the user’s comfort. There are three primary materials used today: steel with some kind of cushioned grip, synthetic (usually a variation of fiberglass), or wood (hickory or ash).
Let’s dispense with steel here and now. It is an abomination that has no place in a woodsman’s inventory. It provides no shock absorption or spring and the cushioned grip is a blister factory!
Synthetic handles have become very common and while I personally don’t like them, I will admit that they have some advantages. Fixed to the head with epoxy resins, I have yet to see one come loose as wood can. They are extremely strong, and breakage is almost unheard of under normal use. While ultraviolet exposure from the sun can deteriorate them, they are impervious to decay or water damage. The disadvantages are found in their use. They tend to vibrate with each blow, which is tough on the hands and forearms. They don’t allow the hand to slide along the handle during a swing nearly as well as wood (and don’t store and release the energy of the swing nearly as well). And, they tend to cause blisters with prolonged use.
I believe wooden helves are still the best. In Europe, they are traditionally made from ash for the simple reason that Europe doesn’t have hickory trees (they carelessly lost them during the Ice Age). All you need to know about ash is that Europe imports a lot of hickory to make handles.
Hickory from young, second growth trees remains the preeminent material for helves because it is strong yet flexible and durable yet comfortable in hand. Hickory is smooth enough to slide well yet has enough texture to ensure a good grip.
As we swing an ax, the head lags behind and slightly bends the helve like a bow. As the swing ends, that stored energy is released like the crack of a whip and helps counteract the shock of the sudden stop. That whip of the wood makes a huge difference by the end of the work day.
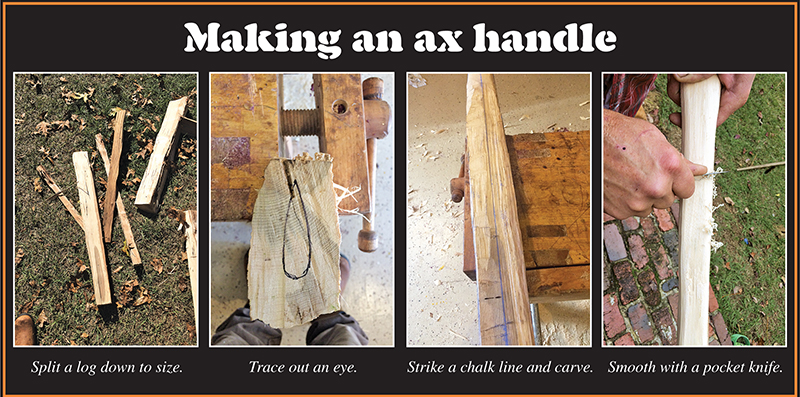
Ax handles are easy enough to make if you have the wood. I enjoy using one I’ve made myself, but there is no particular advantage over store-bought handles.
To make a handle, simply split down a log to rough size, trace out the eye, and strike a chalk line from the front and back to maintain a center line. Carve down the billet with a drawknife and scrape smooth with a pocket knife or piece of glass, then fit the handle to the ax head and secure with a wooden wedge.
Honestly, it’s a whole lot easier to buy a handle. As long as the handle is not bowed from side to side and does not contain knots, it should be good. Most hardware stores carry common replacement handles or they can be ordered online. Seymour Midwest (seymourmidwest.com) is a large supplier of handles and a good choice.
Helves may be straight or curved according to personal preference. I like a straight handle, but don’t have any objection to the curved. Some people believe that the curved handles strike harder, but I’ve never noticed a difference.
One advantage of manufactured handles is that the eye seldom needs much fitting; usually a bit of sanding or whittling is sufficient to get a good fit. Once fitted, secure the handle with a wedge to expand it in the eye. A wooden wedge is better than the small metal wedges sometimes included with the handle. Moisture and the slightly acidic wood make the metal corrode, and since metal doesn’t expand and contract as the wood does, it tends to come loose.
Recently, I have been experimenting with a thin coat of five-minute epoxy on the handle eye for added security. So far, the results are good, but only time will tell if these treatments are worthwhile. All I can say at this point is that they don’t hurt.
Conclusion
I hope this brief overview of axes will encourage you to take a closer look at this classic tool. Even in our current world of electric and battery power, it remains the most useful thing in the shed. If nothing else, it will start every time you pick it up.


An excellent article on axes….
I just love everything axe!