 |
|
| Issue #149 • September/October, 2014 |

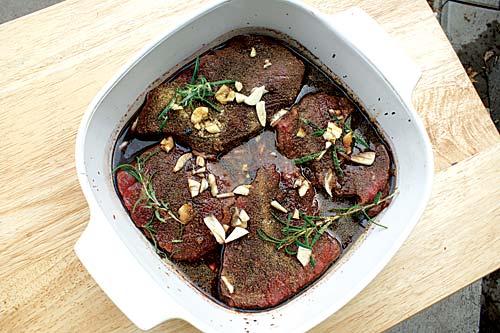
Moose steaks marinating in my special marinade
I shudder whenever I hear a fellow hunter complaining about his meat tasting gamey, high, or, worse yet, ripe (which is a mere step away from being rotten, in my book). It is a sure indication that something went wrong somewhere between the field and the fork! I believe the biggest problems begin in the field.
Field dressing
The most important thing you can do to ensure prime eating is to gut the animal immediately upon shooting. Nothing sours meat more quickly than the retention of body heat. Upon gutting, take extra care not to puncture the intestines with your knife as spillage will contaminate meat.
If intestines have been ruptured, clean off the spillage carefully. There’s an old myth about water harming meat, but I believe if fresh water is available (never use stagnant water from puddles), it does more good than harm to wash away the spillage. Clean snow also does a great job at sopping up fluids. Paper towels or rags can be carried in the pack specially for the purpose of cleaning excess blood from the cavity. Moss can be used if nothing else is available.
After gutting, retrieve the heart, liver, and kidneys. These delicate meats are a special treat that should be eaten as fresh as possible or frozen for safekeeping. I like to vacuum seal them before freezing. Once frozen, these meats will keep up to three months before losing flavor and texture.
If you have to leave a big game animal in the field to go back to camp to summon help for packing, then slide a couple poles under the carcass to lift it off the ground so air can circulate underneath. Use sticks to prop the cavity open so body heat can escape. Drape it loosely with branches to provide shade and to ward off birds and predators.
The next step is to skin it. Getting the hide off is vital for cooling the meat down and I find it is easier to skin a big game animal while the carcass is still warm.

Moose hanging to age before butchering
Hanging
Hanging is done so the meat can continue to bleed out, cool down, and “stiffen up” before butchering. Hanging breaks down the muscle fibers which produces more tender meat. How long to hang or “age” meat depends on the weather and personal preference.
To bleed or not to bleed
I see no need to “bleed” a big game animal that was killed by a well-placed shot. It will normally lose the majority of blood out of the wound and the remaining blood will pool inside the cavity where it can be emptied out upon gutting. If in doubt, or if bleeding is the method your father taught you, then by all means do so.
Deer, unlike moose and elk, have what are known as “tarsal glands” on the lower back of their legs and, like bleeding, many hunters feel it is necessary to remove these as they have a strong scent that can transfer to the meat should your skinning knife come into contact with the glands. I find the practice is not necessary as there is no need to work your knife anywhere near these glands during field dressing, but you can remove them if you believe otherwise just be sure to thoroughly clean your knife after removing the glands to ensure you do not cross-contaminate the meat.
I like to hunt in later parts of the season when outdoor temperatures are ideal for hanging meat. If you happen to get your game when temperatures are too warm for hanging, you might wish to hang it for a shorter period of time to prevent spoilage. If you’re a firm believer in hanging your game for a set number of days, it would be wise to pay to have it hung in a butcher shop at a controlled temperature, rather than chance it going bad. I find about four or five days of hanging suits my liking. I like to think of my dad’s words of advice, “There’s no magic cure in the kitchen for rotten meat.”
If butchering a whole moose sounds like too big of a job to tackle in one day, you can cut the chore in half or even quarter it up. You can butcher half of the animal after four days of hanging and proceed to do the other half on the fifth day. Or, whittle it down into a three-day job. Label the amount of “aging” days on the packages to see if any particular amount of hanging time suits your taste better. This makes the job more manageable and also lets you sample the difference aging times can make.
Butchering
Butchering our own meat saves us a lot of money, as professional butchers in our area charge pretty hefty fees for cutting and wrapping game meat. Doing it ourselves also allows us to make “personalized” packages. Another reason we prefer to cut our own meat is to ensure there is no cross-contamination from other hunters’ game. This is especially something worth considering if Chronic Wasting Disease (CWD) has been detected in your hunting zone or if hunters are bringing meat into the shop from other areas where it may be present.
In the following photos, my husband and I are butchering a young bull moose, but you can process any venison member in the same fashion. The four legs, back, and ribs were hung for five days in our shop where temperatures were ideal (above freezing and below forty degrees). Upon hanging, my husband trimmed and discarded visible shot damage while I used a cloth dipped in vinegar to carefully wipe off blood, stray hair, and bits of bush debris.
Before starting on butchering day, assemble all needed items we have a complete meat cutting kit containing knives of various sizes, a saw, a sharpening stone, and scissors. You’ll need to decide what to wrap your meat in. I like to use heavy-duty freezer paper for larger cuts such as roasts and ribs, taping the seam to lock moisture in and air out. Ziploc® freezer bags work great for stew and ground meat but I also like to wrap them in an outer jacket of freezer paper to prevent color loss and in order to label them clearly. A vacuum sealer is perfect for ground meats since they tend to dry out and suffer freezer burn more quickly than solid cuts. You’ll need a marker for dating and labeling the packages. Round up some bowls for holding meat and have plenty of paper towels, clean cloths, hot water, and soap to keep hands, tools, and work surfaces clean.
Some home meat cutters like to wear gloves to protect hands from getting nicked. If you do choose to wear gloves, make sure they are food safe. My husband prefers to do it the Old World way without gloves.
Meat should be cut in a cool place. If working in the kitchen, turn off the heat and open the windows so air can circulate. Only bring in one piece at a time for processing.
One of the things we learned years ago is that trying to be fancy by cutting rib steaks and T-bones from a big game animal with a hacksaw is a ridiculously hard feat that takes the fun out of being a home butcher! If you have an electric meat saw and are skilled at using it then by all means create these fancier “bone-in” cuts following a meat-cutting guide book.
For old-fashioned meat cutters like us who have never owned an electric meat saw due to the fear of losing our fingers, or for those who have never before attempted butchering, “boning out the meat” seems like a sensible solution that yields table fare as good as any. It also takes up less freezer space. Ribs and soup bones, however, can be cut quite easily with a manual saw.

Follow the natural layer of the meat; work it away from the bone with the knife.
You really should have a team of two to keep things flowing nicely one boning out the meat; the other trimming, tying roasts, slicing, cubing, wrapping, and labeling. If the helper can’t keep up, meat should be held in the fridge or over ice until ready to handle this is a good idea for the pieces that are being set aside for cutting into stew and grinding.
If it’s your first attempt at butchering your own game, don’t fret about achieving “picture-perfect” cuts of meat. They will taste good even if they don’t look exactly as they do at a commercial butcher shop. You’ll get better with each successful hunting season.
One rule of thumb is to cut across the grain for steaks and frying meat. Remember to cut your stewing meat into uniform pieces for even cooking. Grinding scraps should be clean meat (you get what you grind), so trim it well of fat and gristle. It is easier to grind meat when chilled, so save all the grinding pieces in the fridge and process at the end of the butchering day.
Since I am the primary cook in our house, I like to look at each piece of meat as it comes off the bone and picture it in the pot. If it looks like it would make a good pot roast (or maybe two or three) then I cut it to size and that is what I package and label it as being. It is fun to customize each piece and label them according to my intended purpose.
Some pieces are perfectly-suited for rolladens (German meat rolls) and thus are labeled so. Other cuts might get tagged as being a special Sunday roast or a crockpot special. Prime pieces of meat from the larger hind legs are sliced and packaged as being “big steaks” which reminds me that they’ll be a number one pick for company fare. Smaller steaks get tagged as being “moose fry” which means they will be chosen for frying in the skillet or grilling for family meals.
Hind legs yield prime cuts traditionally known as sirloin tip; top, bottom, and eye of rounds; and rumps. These pieces are destined for boneless steaks and “oven” roasts. Front legs consist of shoulder, arm, and shank and are usually a little less tender than the hind legs. This meat is well-suited for pot roasts, stewing, and grinding.
My husband believes in tackling the big jobs first, so he begins by placing one hind leg on the cutting block. Be sure to have a sturdy surface to cut your meat on. We use a butcher block table that was made especially for the purpose, but you could fashion a sturdy homemade table using clean untreated wood for the top and sawhorses for the legs.
When cutting, look at the leg as through it were a puzzle each muscle group needs to be separated from the bone. Begin by separating the top round from the rest of the leg, using your fingers as a guide to follow the natural layer of the meat and slice it as closely away from the bone as possible. When this portion of meat is free from the bone, it is ready to be processed further down into desired cuts, namely nice round boneless steaks.
Next, cut the rump and bottom round away from the hipbone in the same fashion, following the natural seam of the meat. This section of meat can be portioned into roasts, sliced into steaks, or set aside for cutting into stew.
Remove the bottom from the underside of the leg. This choice piece of meat is known as the “sirloin tip” and if your family loves steak, you’ll want to get as many cuts as you can for the frying pan.
Now, working on the lower half of the leg bone, retrieve the shank meat by inserting the knife until it touches the bone at the bottom of the leg, then slicing upwards along the full length of the bone, circling as you cut to free the meat all the way around the bone. This portion of meat is considered a little tougher, so it’s set aside for grinding. Using your knife, continue to trim the remaining meat from the bone and add to the stew pile or grinding bowl.

Cutting the freed meat into portions for steaks, stews, etc.
Once most of the meat has been removed from the entire leg bone (my husband leaves a little on for the soup pot), the next step is to separate the leg bone at the knee joint.
Using your knife, carefully cut the tendons from around the knee. This will allow you to “pop” the knee free from the joint. Now you’ll have two leg bones which can be sawed into pieces that’ll fit into your soup pot or cut into dog bones.
When the second hind leg has been done as above, proceed to a front leg. Insert your knife at the bony edge in the middle of the blade and run your knife flat against the bone to free the meat. Turn over and do the other side. This yields two boneless pieces of meat good for whatever you see fit my picks are pot roast, stew, and burger. Working on the lower portion of the leg, remove the shank which goes into the grinding pile. When all the meat has been trimmed off the blade and leg, separate it at the knee as you did on the hind legs and process the bone as you wish.
Trim the meat from the back and neck and set it aside for grinding. Add the bones to the soup pile. My husband saws the ribs in half crosswise through the bones to make them a suitable size for eating. You can package them as “racks” of ribs or cut the individual ribs into serving-sized pieces. These are delicious on the barbecue.
The last job is to get out the grinder and grind the chilled pieces of meat. I’ve heard that professional game cutters, unless otherwise instructed, add anywhere from 15 to 20 percent beef fat or suet to ground venison meats. Some fellow home butchers go as high as 50 percent beef or pork fat. I like to do it two ways.
I divide the saved meat into two piles. One pile is ground without adding any fat, which produces naturally lean ground meat. I use this in recipes calling for “lean browned ground” such as spaghetti sauce, chili con carne, pizza topping, and so forth. To the other pile of meat, I add about 8 to 10 percent beef suet before grinding. This gives enough “binding power” for making patties, meatloaves, and meatballs.
As you wrap and label, put packaged meat into the freezer and after several hours rotate the packages in order to ensure even freezing. Meat has a prime shelf life of one year in the freezer. Since a moose yields a wonderful big bounty of meat that may not get used up within the year, what I like to do is can what is not used up before it expires. Making jerky is another great way to extend the life of meat that is about to expire its prime shelf life.

Moose steaks from prime back leg meat
Cooking your trophy cuts
When game meat has been properly field-dressed, aged, cut, and packaged to your liking, you should be in for a whole lot of good eating. As a general rule of thumb, the same cooking guidelines can be applied to venison as are laid down for beef, and keep in mind you can use venison meat in place of beef in any recipe, especially those calling for roasting, stewing, braising, and ground meat dishes. There are two main methods of cooking meat: dry heat cooking and moist heat cooking.
Dry heat cooking
Roasting is done in the oven at 325° F without adding any water or other liquid to the pan. This method is good for tender cuts of meat. The roast should be placed on a roasting rack and cooked until desired doneness is reached. Don’t overcook or the meat will become hard and dry.
Broiling/grilling is done over direct radiant heat and is ideal for steaks. Since the heat is high, the cooking time is shorter so tender cuts do not dry out. Place meat on broiling pan and cook thick steaks about six inches from the coil (heat) or thinner steaks about two to three inches from the coil until desired doneness is reached. Brush with butter or sauce during cooking, if desired.
Pan frying on a cast iron skillet produces tender meat with a wonderfully crispy outside. This method is best suited for thinner steaks. On a skillet over medium heat, melt a frying amount of fat; butter is my first pick for gourmet fare but margarine, lard, and oil also work well. Place meat in the heated fat and cook until it is golden brown on both sides.
Moist heat cooking
Pot roasting (also known as braising) is well-suited for tougher cuts of meat. It involves cooking meat in a small amount of liquid. To pot roast a piece of venison, heat a small amount of fat in a large Dutch oven or other suitably-sized roasting pan over the stovetop burner. Brown the meat on all sides. Add desired liquid water, stock, wine, tomatoes to the pan. Do not cover the meat in liquid, just add a couple inches to the pot. Simmer covered over low heat on stovetop or cook in an oven at 325° F until meat is tender, adding more liquid if needed to keep pan from going dry. Onions, garlic, and root vegetables can be added near the end of the cooking time and cooked until tender. I like to thicken the cooking liquid into gravy by adding a little flour and water mixture at the end of the cooking time.
A crockpot or slow cooker also works great for pot roasting. Brown the meat first in a Dutch oven over the stove element, then transfer the meat to the slow cooker, add the desired liquid and other ingredients, and cook on the low setting or according to your manual. The crockpot produces exceptionally tender meat and super rich flavor.
Stewing meat is impossible to get wrong. The secret is to use uniform pieces of stew meat for even cooking. I dust the cubes of meat in seasoned flour, lightly brown in fat, add cooking liquid, cover and simmer gently until meat is tender but not falling apart. There are hundreds of different seasonings, herbs, vegetables, legumes, mushrooms, and what-nots to add to the stew pot, so making stew is never a monotonous job. Try working your venison into traditional Irish stew, Hungarian goulash, Indian curry, or French Bourguignon (Burgundy), to name a few.
Marinating
Marinating is an ideal way to tenderize less desirable cuts of meat and is beneficial treatment for tougher older animals (or those that were heavily pursued during the hunt, yielding flesh pumped full of adrenalin).
The three main ingredients of a good meat marinade are an acid, a moisturizer, and spices. Vinegar, wine, beer, or lemon juice are all acidic, breaking down fiber and rendering meat more tender. Oil, butter, or other fat keeps meat moist while cooking. Spices such as herbs, garlic, and other seasonings instill unique flavors and aromas.
My favorite basic venison marinade calls for mixing together 1 cup red wine, ¼ cup olive oil, 4 Tbsp. soy sauce, 6 cloves minced garlic, a couple of crushed juniper berries, a sprig of fresh rosemary, and a few whole black peppercorns. This is enough for several pounds of meat, and is great for steaks, roasts, and ribs. Put meat into marinade, cover and refrigerate for up to 24 hours. Spent marinade can be used as a basting sauce.

Serve moose burgers with golden fries and you’ll rack up big raves every time.
Recipes
Here are a few recipes that I often call upon to put our delicious stash of moose meat to use. Of course, any meat can be used even beef, should your woodland bounty be running low.
“Anything goes” moose stew
Here’s a versatile delicious recipe that makes the most out of your store of root cellar vegetables. I like to add some of everything, but you can use what you have to your avail in any amount.
4 Tbsp. shortening, lard, or vegetable oil
2 lbs. moose stewing meat
4 Tbsp. seasoned flour
2 chopped onions
5 cloves garlic, minced
6 cups chunky-cut root vegetables of choice (carrots, parsnips, turnips, potatoes)
4 cups (or more) homemade moose stock or beef stock
¼ tsp. dried basil
1 cup frozen green peas
salt and pepper to taste
Heat fat in Dutch oven. Dust meat with flour, fry in the fat until lightly browned. Add onion and garlic, sauté until onion is soft. Add prepared vegetables (except peas), stock, and basil. Bring to boil, reduce heat, cover and simmer about 2 hours until meat is fork tender, adding more stock or water as needed to keep from going dry. Add peas and cook another 5 minutes. Season with salt and pepper. Serve with homemade biscuits or crusty rolls.
Lin’s moose burgers
These patties can be grilled or pan-fried. One pound of meat makes four “quarter-pounder” burgers. I like to thaw the meat the night before, mix and form the patties in the morning, cover with plastic wrap and let them “draw” in the fridge all day until cooking time. This produces a flavor-infused patty.
1 lb. ground moose (I use the ground meat with added fat.)
½ cup minced onion
2 cloves garlic, minced
1 egg
¼ cup moist bread crumbs
1 Tbsp. Worcestershire sauce
salt and pepper to taste
Mix all ingredients, divide into four portions, form patties with hands, and chill until cooking time. Grill over medium heat or fry in hot vegetable oil in skillet until cooked to liking.
Garlicky-good moose spaghetti sauce
This recipe can be the base for many meals, which is why I cook up such a large batch. I use half the sauce for a spaghetti supper, and the other half of the sauce goes into a pan of lasagna. Or I add cooked kidney beans and chili seasoning mix for chili con carne. In our house, homemade canned pork-and-beans is often added to leftover sauce and loaded into crispy taco shells for a quick lunch or supper dish. And it is great sauce for making pizza. Simply spread your pizza dough with the cooked sauce, top with sliced onions, mushrooms, peppers, or whatever you desire, sprinkle with grated cheese, and bake until bubbly.
2 lbs. ground moose (I use ground meat with no added fat.)
5 Tbsp. olive oil
1 large minced onion
1 large minced sweet red pepper
1 large minced sweet green pepper
1 minced chile pepper (optional)
¼ cup minced celery
1 cup sliced button mushrooms (optional)
1 head peeled garlic cloves, minced (or less to suit taste)
3 cans (15 oz.) tomato sauce (homemade or canned)
1 cup tomato paste (homemade or canned)
1 cup water
1 tsp. basil
½ tsp. thyme
1 tsp. oregano
salt and pepper to taste
¼ cup grated Parmesan cheese
Heat oil in large Dutch oven. Add meat and cook until brown. Add onion, peppers, celery, mushrooms, and garlic. Cook until vegetables are soft. Add tomato sauce, paste, water, and seasonings. Simmer covered over low heat for about two hours, adding a little water if the sauce gets too thick. Add Parmesan at the end of cooking time. Serve over spaghetti noodles cooked al dente and pass around a shaker of Parmesan.


