By Steve Maxwell
How many times have you built an outdoor project out of wood, only to be disappointed by the deterioration that hit after just a few years? Solving this problem is why I began using composite lumber for more than just decks. That was more than 20 years ago, and I know from experience that outdoor tables, shelves, frames, and boxes all look better and last longer when made of wood substitutes. Composite lumber is one particular family of wood alternatives developed for deck building. It’s typically a 50/50 blend of recycled plastic and wood fibers, and as I’ll show you it can be worked just like wood to create refined and timeless outdoor “woodworking” projects.
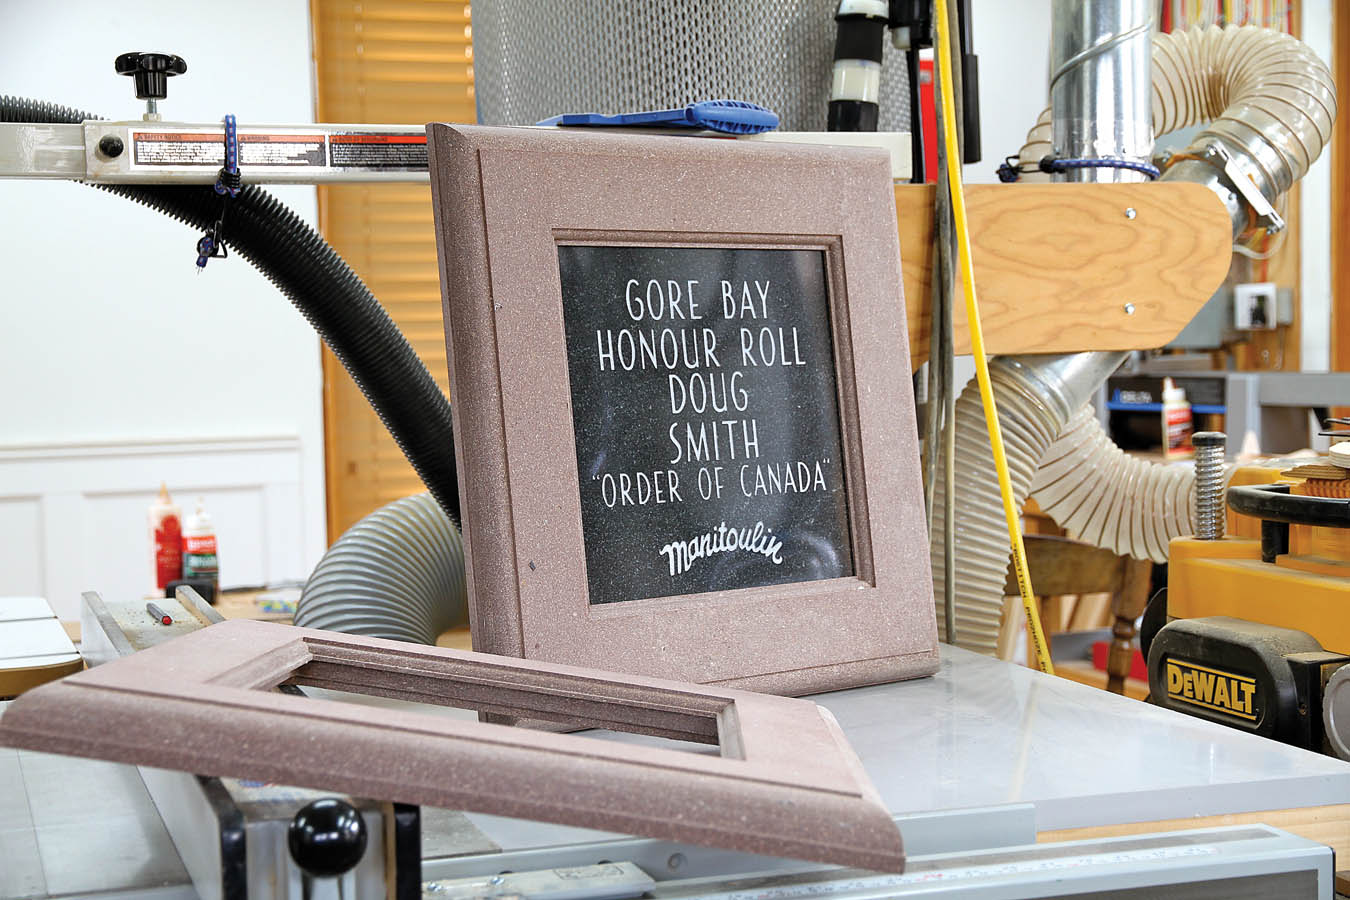
Even though I’d used composite lumber for more than 10 years to build decks, I didn’t realize the full potential of composites until I was asked to tackle an unusual project. Two local heroes were being celebrated in the little town near my backwoods home, and the commemoration included a couple of engraved granite plaques. Trouble was, the ½”-thick stone was too thin to be drilled and mounted directly to a building. Without a frame of some kind to support these plaques and provide a mounting surface for bolts, the granite would crack. Wood was suggested as a frame material, but I didn’t like that. If community volunteers ever neglected to maintain the wooden frames regularly over the years, it would weather, crack, and turn grey. Ratty wood is no way to honor anyone, and that’s what got me thinking about the left-over Trex I had stacked behind my workshop.
Why I like composites
Trex is one of a handful of non-hollow composite lumber deck materials made by various companies. It’s my favorite because Trex is so nice to work with. Made mostly from recycled plastic shopping bags and finely ground old wooden shipping pallets, the granite-like appearance of Trex proved to be a perfect complement to the actual granite of the engraved plaques I was working with. As I’ve discovered since, composite lumber looks great for all kinds of outdoor projects, and of course it does this without any need for finishing and refinishing. Even after a decade of sun and weather, composites only undergo a slight fading of color. But as durable as it is, it didn’t take long for me to discover that the slight warps and cups in each composite board would make any kind of very fine craftsmanship challenging. Though irrelevant in a deck, outdoor table, or shelves, this distortion can be a deal breaker in finer work. That’s what prompted me to discover something new about composites. You can work with them just like you can with fine quality hardwoods, even when it comes to jointing and planing.
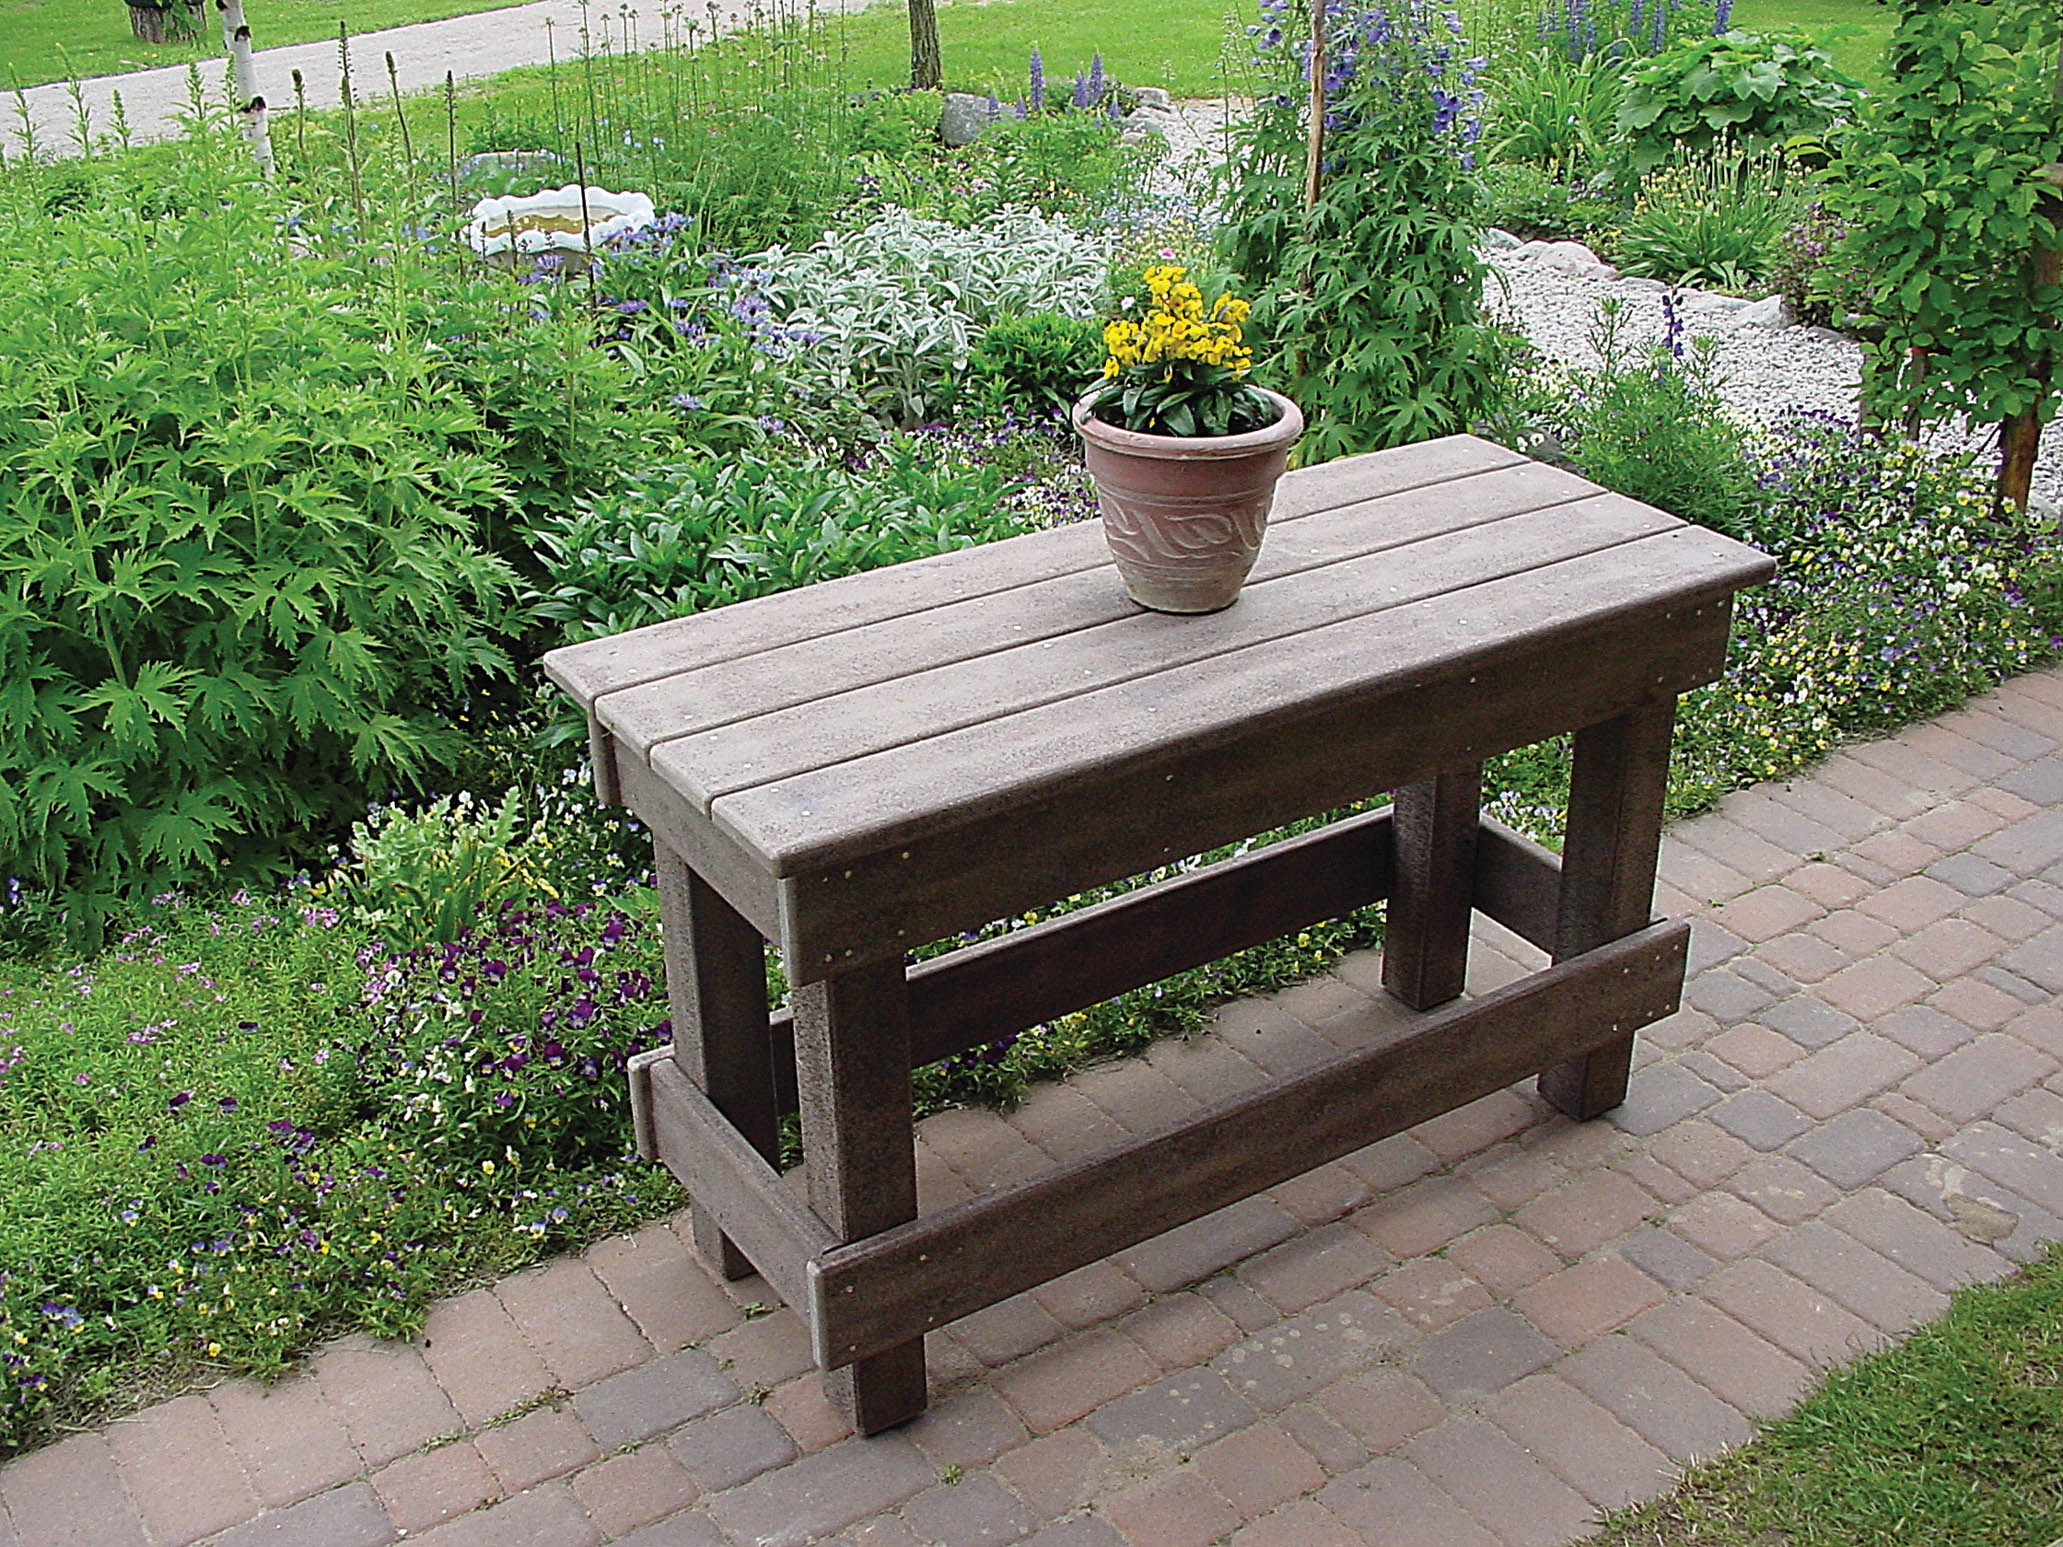
This table will last for years. It is built from a composite lumber called Trex that was designed for decks.
Fine woodworking
The same jointing, planing, and routing operations that create the smooth, flat, square wooden boards necessary for wooden cabinets, tables, and shelves also work on composites. In fact, they work even better than on wood. Composites are so stable, consistent and machinable that they mill like a dream. There’s no melting of the plastic component while cutting, planing, or routing, and composites certainly don’t dull tools any faster than wood. After rough-cutting composite boards to length and width, my jointer did a great job creating flat surfaces and square edges on formerly not-quite-flat concave Trex boards. My thickness planer also milled the planks down to perfect final thickness for the frame project, though I was still left with a big question. How can I securely join outdoor materials that are 50% plastic in a high-stakes situation?
I knew that ordinary wood glue would never hold composites because of the plastic. So what about polyurethane adhesives? How about PVC cement? Construction adhesive? In the end, after trying several options, I settled on long-cure epoxy for my frames because it worked so well in my tests. I originally tried a five-minute formulation, and though it holds composite securely, I needed more assembly time. A four-hour epoxy proved perfect, and that’s what I used on the outdoor frames that got me going with all this. Just give that long-cure epoxy at least two or three days to harden. Try to sand off excess glue any sooner than that and it’ll clog up your abrasives way too fast.
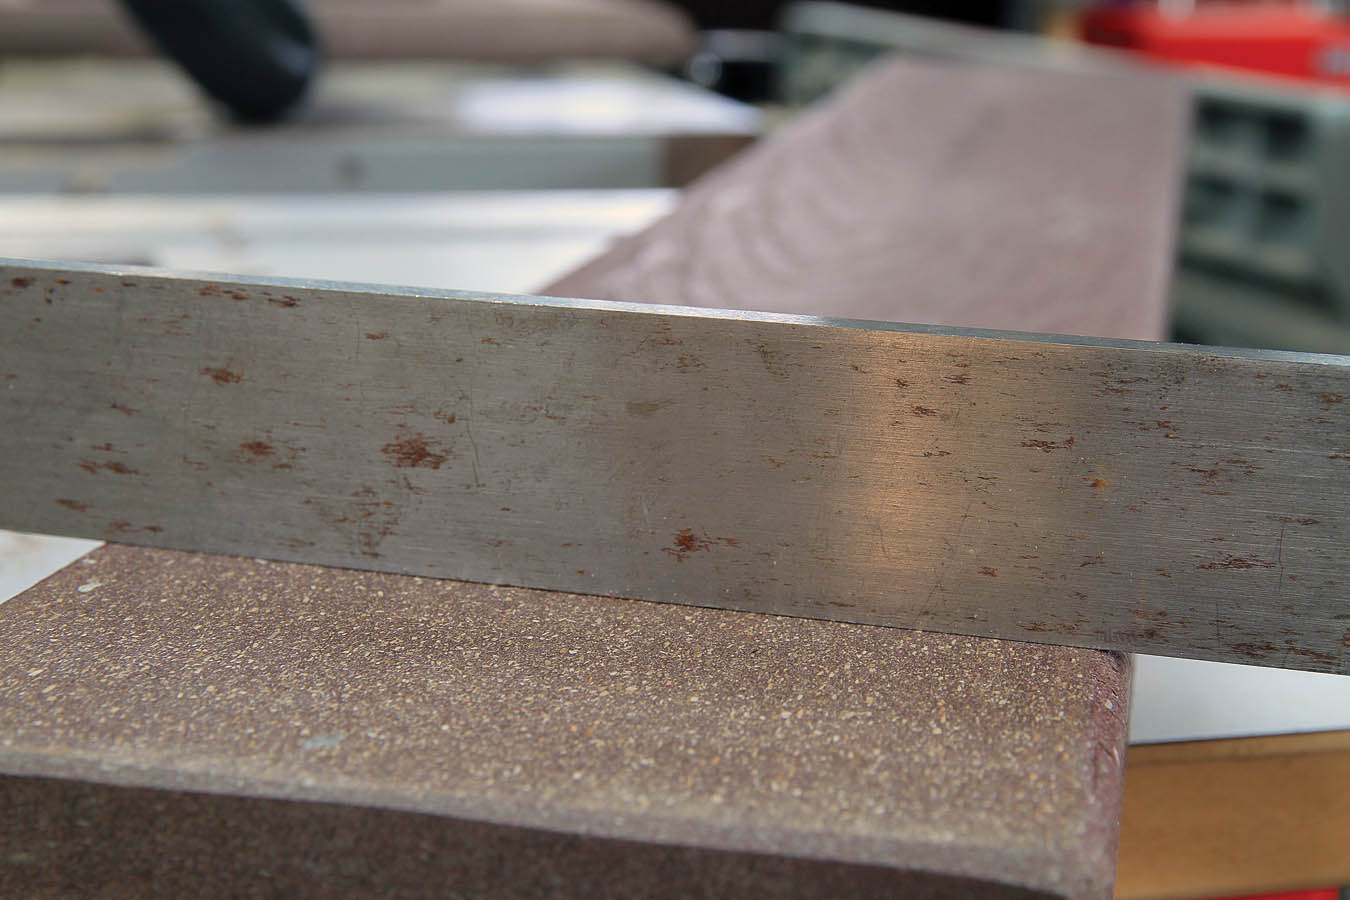
A jointer can be used to make a composite board perfectly flat.
The cope-and-stile joinery I used for my frames needed nothing more than epoxy for a secure interlocking joint. My tests showed that for sure. Even bashing assembled test joints with a hammer could not break them apart. If your projects include butt joints and mitres, you’ll need to add some kind of mechanically interlocking connection like dowels or biscuits.
Hiding screw holes
Screw joints (such as pocket screws) work fine for low-stress situations, and are easy to hide using tapered plugs made out of composite.
You can make your own just as you could with regular wood. Tapered plugs are perfect for concealing counterbored screws and blend seamlessly with neighboring surfaces. You’ll need a special tapered plug cutting bit to make the plugs, and plug cutters like this can only be used in a drill press. Besides these details, you might be wondering what counterboring is. It’s one way of completely hiding a screw that holds project parts together and it’s a useful technique indeed.
Begin creating a counterbored screw joint by boring a ½”-deep hole in your workpiece. The purpose of this hole is to create a pocket within which the screw head will sit and get covered later by a tapered plug. Tighten the screw into the counterbored hole, then get ready to hide the head with a plug that you’ll make.
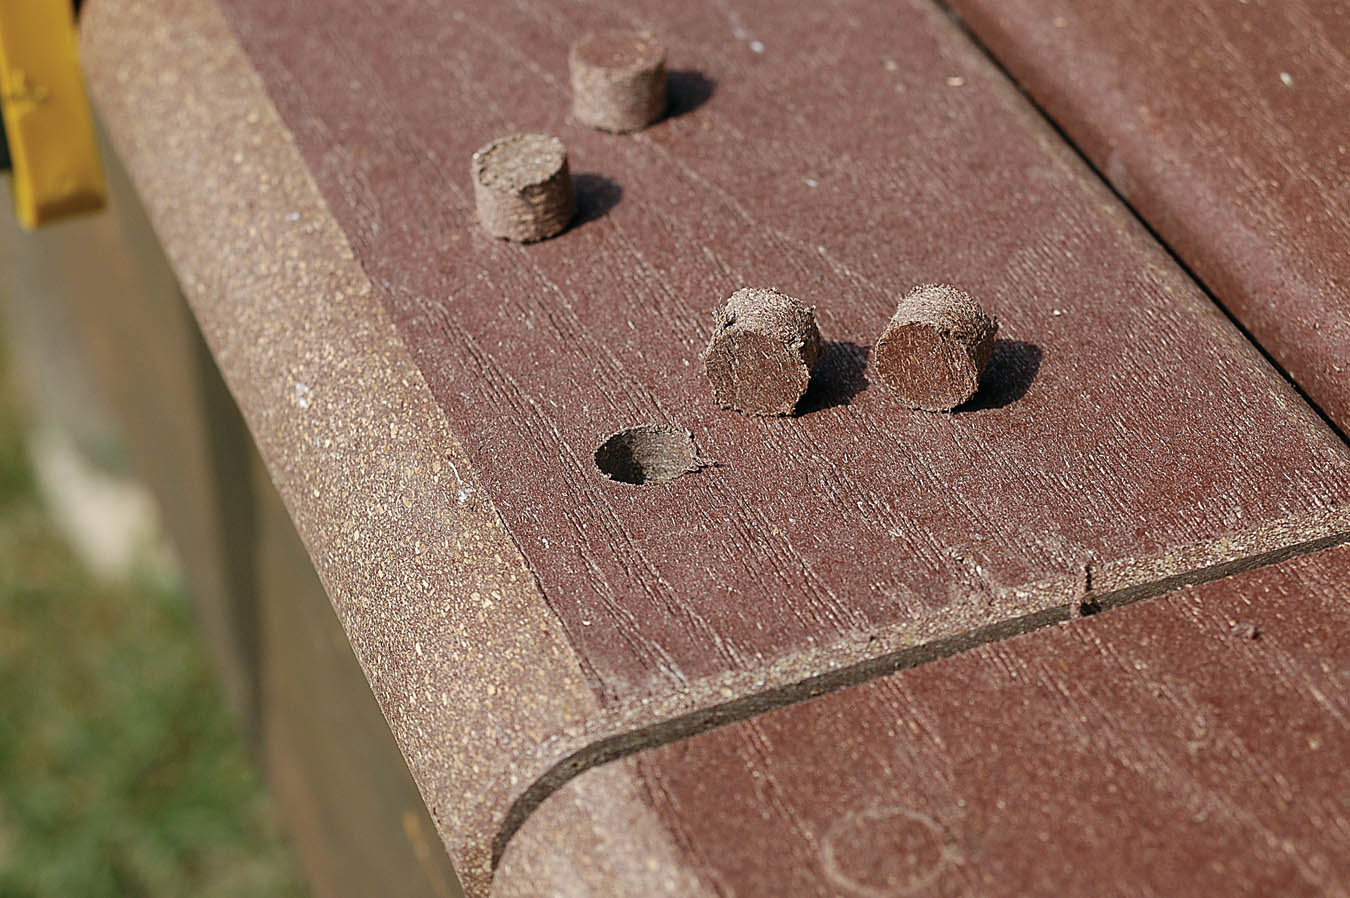
You can cut your own tapered plugs from composite lumber.
Chuck a tapered plug cutter into your drill press, then place a piece of composite underneath that’s about 1/16″ thicker than the length of plugs you’ll be making. Plunge the spinning cutter down into the composite until you’ve cut all the plugs you need, then switch off the drill press, pick up the block, and break the plugs out with your fingers as needed. Although regular wood glue doesn’t bond composites strongly enough for use on structural joints, weatherproof outdoor wood glues such as Titebond III does hold tapered wood plugs effectively in their holes. Single-part glue like this is also a lot handier to use than two-part epoxy that needs mixing. Weatherproof wood glue also endures well outdoors. Tighten the screws into all the counterbored holes you’ve made, swab glue into the inside surfaces of the holes, then use a hammer to gently tap a tapered plug into each one, top surfaces flush.
Maintenance-free table
Start by cutting the legs, skirts, and braces to length as shown in the drawing. Don’t cut the top slats to length just yet. Better wait until you can measure your tabletop, just to be sure of the ideal top slat length. If you’re having trouble finding composite material in the 3½” x 3½” size specified for legs, then make each leg from two pieces of the same kind of 1¼”-thick composite used for other table parts. Join two lengths of this material into one L-shaped assembly for each leg, with both faces of these legs 3½” wide.
Before you go further you need to make decisions about how you’ll join the parts of your table together. You’ll need to use either screws or nails, plus some kind of glue that’ll work on composite material.
I assembled the table in the photo using 3½” framing nails from an air nailer, and these work well. You could also hand-drive nails if you want, but you’ll need to pre-drill holes through the first layer of Trex so the nails can pass through. Same thing if you want to use deck screws.
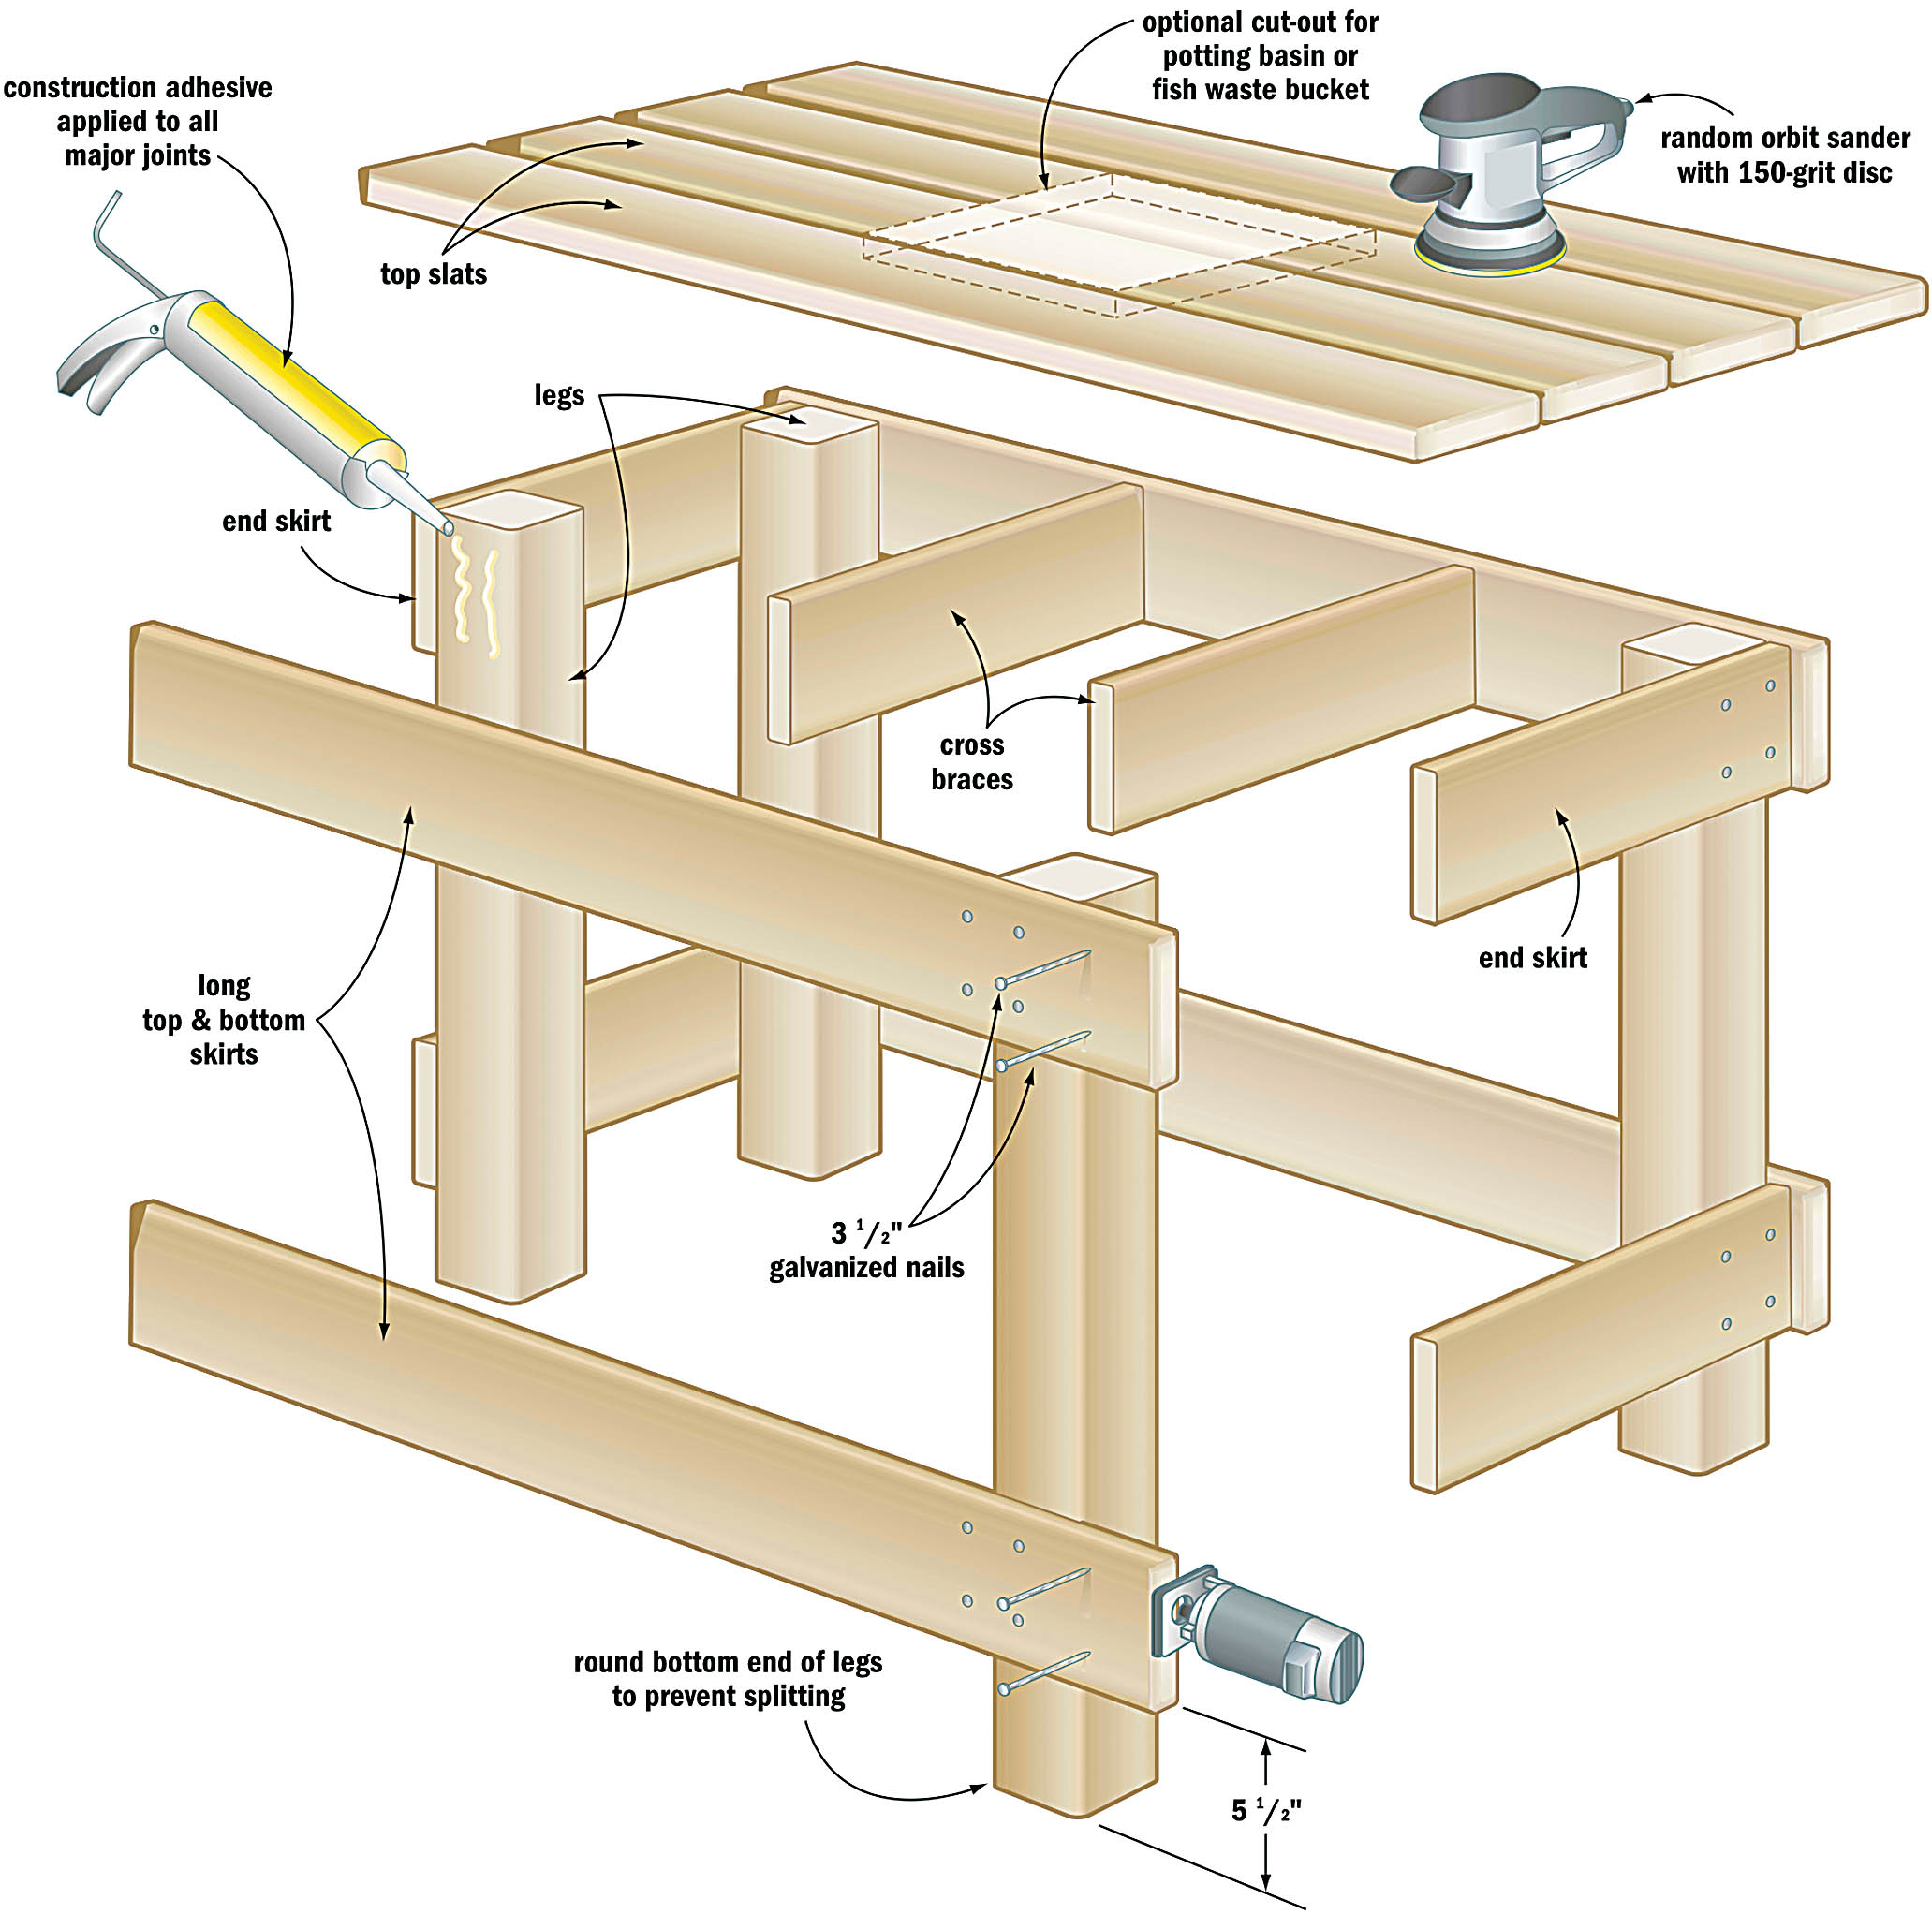
Screws do offer something of an advantage because they draw parts together tightly as well as hold them tight. Just be sure that the diameter of the holes you predrill are large enough for the screw to pass through the skirts and rails without grabbing. The threads of the screw can then bite into the underlying legs and cross braces when the screws get tightened. Regardless of whether you use nails or screws, you should also use glue.
Why both glue and screws or nails? Simply because it makes a much more solid finished project, especially in the case of a table. There are a lot of twisting forces on table legs and skirts, so you need very rigid connections to stop the table from going wobbly over time. The screws or nails bring the parts together, but the glue makes the joints completely rigid and free of flex and movement. It’s a powerful combination.
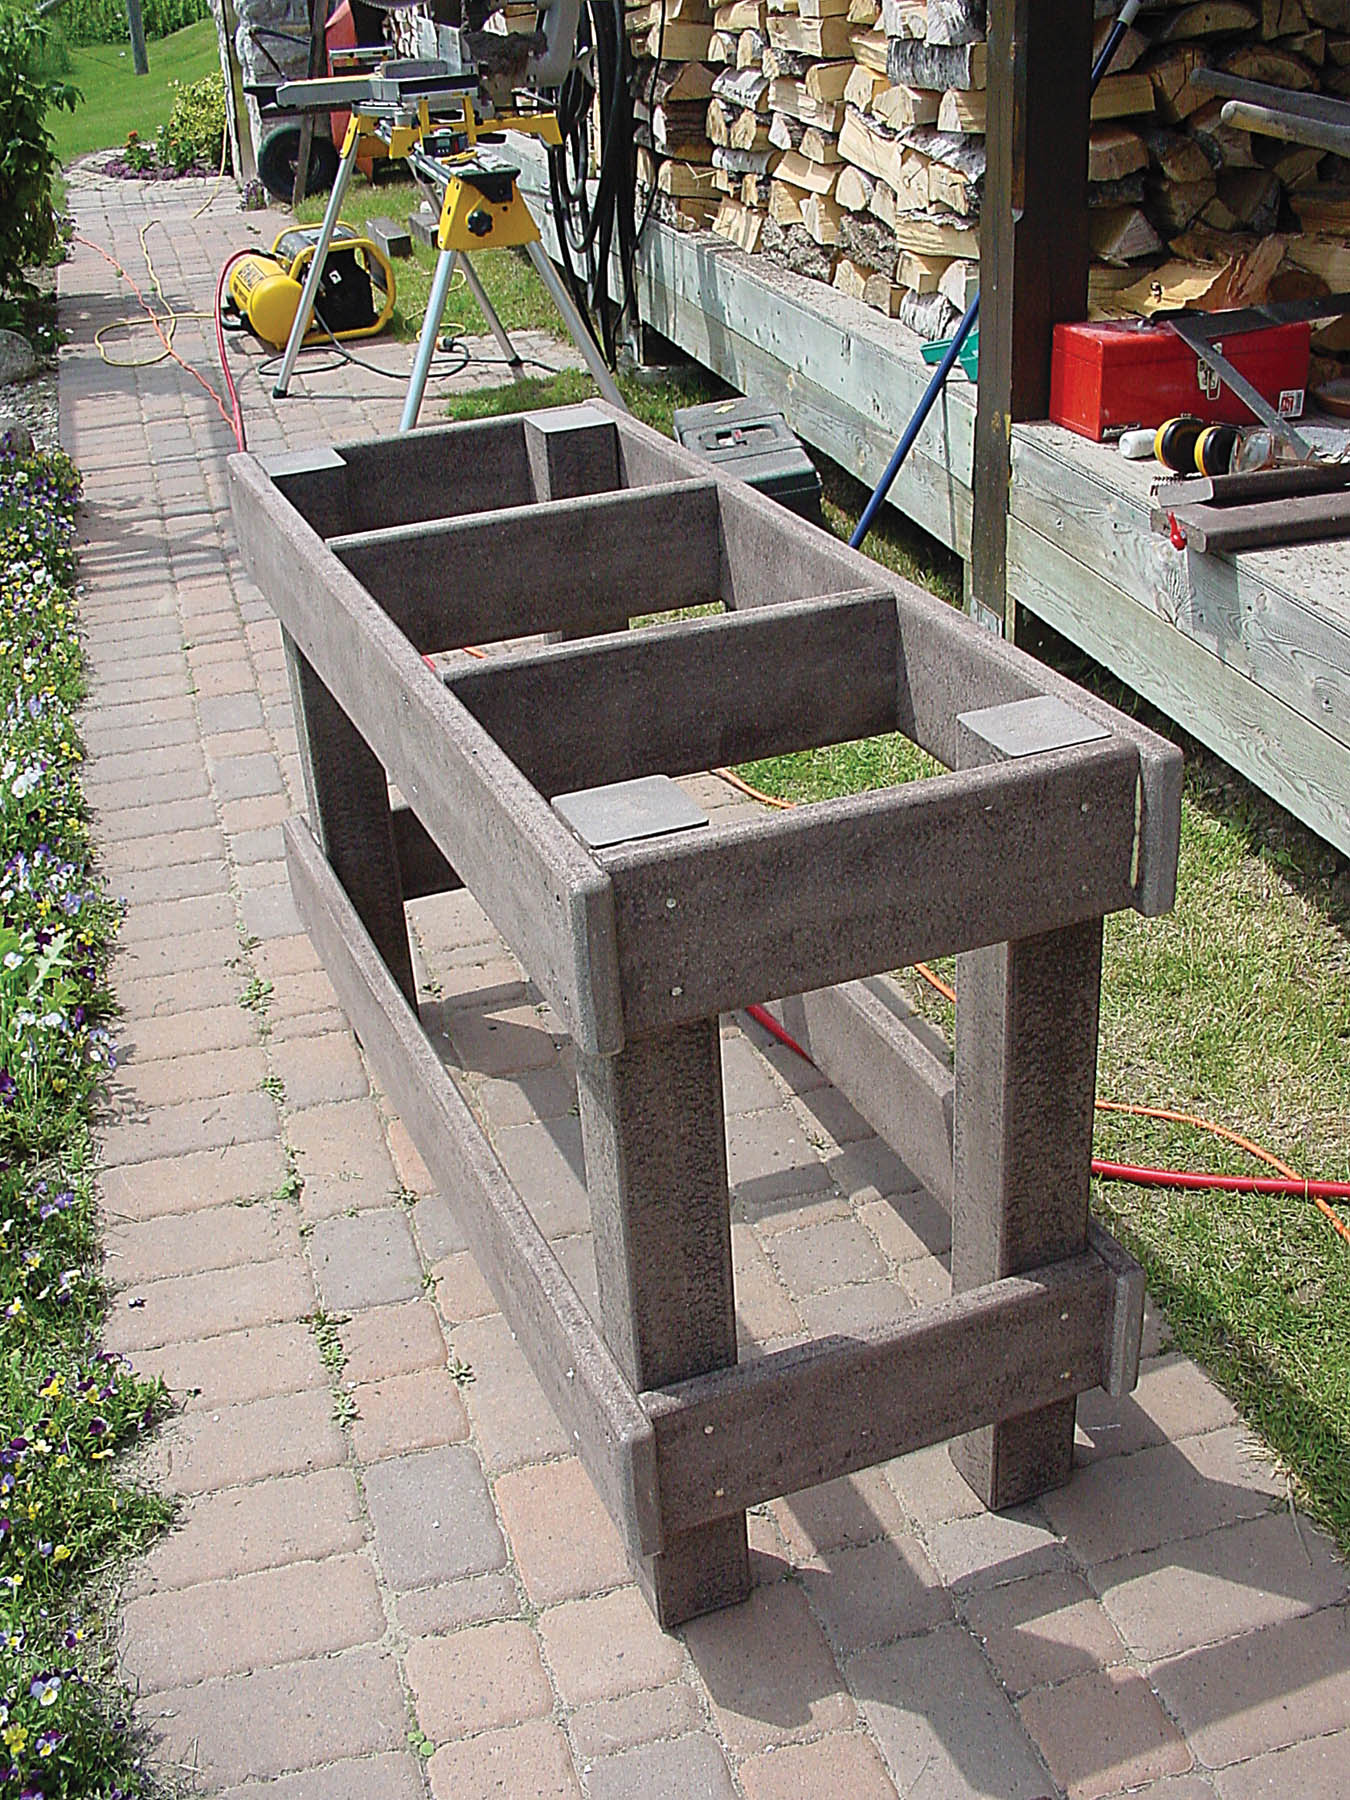
Table assembled except for the top
Polyurethane glue works well to bond composites, and it’s cheaper and more convenient than epoxy for large projects. Gorilla glue is one popular brand name, but all formulations look and act the same. Polyurethane glue comes out of the bottle as a transparent golden brown liquid (looks like late season maple syrup), then foams up a bit as it cures. You could use a slow-cure epoxy to hold your table together, but polyurethane is simpler because it’s a one-part option. No mixing. I’ve had excellent results using polyurethane glue and screws to hold my big composite project parts together, so I know it works.
Begin assembly by joining two legs and two end skirts as shown in the plans. Connect the parts initially with glue and just one screw per joint. Use a carpenter’s square to ensure the parts form 90º corners, then drive three more fasteners into each joint to lock them tight.
Notice how the ends of the end skirts are flush with the outside faces of the legs on the plans? This is to make the rest of the assembly easier. Stand the two assembled end frames on the floor on one side, then place two long top and bottom skirts on the frames. Check parts for square corners, then gently lift the top and bottom skirts off, apply glue, then complete the joints with screws or nails. Carefully flip the assembly over, then repeat the process for the two top and bottom skirts on the other side.
You can work with composite lumber like you can with fine quality hardwoods.
All that remains now is to add two cross braces between the top skirts. These strengthen the table, but more importantly they provide extra support for the top slats. Composite lumber is not nearly as rigid as wood, and it will sag over time in a way that wood doesn’t. The more support the better when it comes to composite lumber. Finish up by cutting and securing the top slats, spacing them all equally for an even overhang all around.
Once you experience the way composites can be jointed, planed, milled, and glued with precision, it opens your eyes to a different way to build weather-tough display frames, boxes, birdhouses, cabinets, work surfaces and even outdoor furniture. Of course composites will never take the place of real wood everywhere, but they’re a pretty good alternative when water, weather, and sun are working against you.


