| Issue #119 • September/October, 2009 |
When my husband and I decided to return to Ohio after living for 15 years in the mountains of Vermont, it was with some trepidation and a little sadness. Our time spent in Vermont had been time we used to plan for our “great escape.” We had moved there as an escape from the crime and population of a large city. We learned to heat with wood, clear the land, grow vegetables in a challenging climate, and preserve all the food we possibly could.
Our plan was to live simply, pay off our debt, and save as much money as we could. By doing this we were going to retire early and debt-free, then start on the second half of our livesliving as close to the land as possible.
After three years of looking for a farm we could afford and that would meet our needs, we found one in central Ohio near family and old friends.
I have become an advocate for local foods, buying locally, cutting out the corporate giants that have infiltrated our lives, and become the counter-culture, do-it-myself person that I’ve always dreamed of becoming.
Being close to our children now gives my husband and me a chance to inform them of what is happening to our food system and why growing your own is becoming more important than ever. If you’re not learning to put in your own garden, can your food, and become more self-reliant, you’re living the good life on borrowed time. This was one of the major reasons we moved closer to the kids and grandchildren. We knew they had no idea how to be self-sufficient and we wanted to teach them.
As soon as the garden started coming in, I began canning. I often would give quarts of beans, tomatoes, and pickles to my stepdaughter. One day, she asked me if I would teach her how to can. A few days later I got a call from an old friend asking if I would like to go in on a bulk order of peaches. We could can them together, save time, split the cost, and have some fun in the process. A few days after this call, my stepdaughter phoned and said that she had mentioned to some of her friends that I was going to teach her how to can. They wondered if they could learn too.
What started as a one-on-one canning lesson had now become a group of very interested women who wanted to learn to preserve their own food. What a great idea! If you’re interested in setting up a group canning session, here is how I did it.
We decided to start with an easy projectcanning fresh peaches. We ordered eight bushels of peaches from a local orchard that would be ready within a week.
|
Getting ready
My kitchen is far too small to easily accommodate this many people, let alone pots, pans, knives, and the mess canning peaches would make.
I decided to set up an outdoor canning kitchen. I have always canned indoors, but the mess and heat that is generated is always a bother, especially in high summer.
Here are some of the things that I did to make outdoor canning a do-able proposition.
Water: I needed access to water. It didn’t need to be heated, I could get that indoors, but I did need something for washing up, filling pots, and cleaning knives. So I ran the outdoor garden hose around the side of the house and attached it to a table that held a large, enameled washbasin. The end of the hose had an on/off knob and rested in the bottom of the filled washbasin.
Table space: For my workstation, I used sawhorses with a sheet of plywood as a table. I covered the top with a sheet of plastic and fastened it securely. It was important to cover with plastic since this table would be washed frequently.
I then set up a large propane cook station that has two burners. I was going to be canning with five people and that meant a lot of jars, so two burners were necessary. My indoor stove would be set up for sterilizing lids and heating the syrup. On the day we canned, there was a slight breezegreat to keep the flies away, but it also would gust and blow out the burner flame. To prevent this I set up a large sheet of plywood (left over from a remodeling project) between the burner and the oncoming wind. It kept the wind off the flame and we had no problems keeping the burner going.
Propane: Because I was using a two-burner propane unit that would run almost all day long, my husband retrofitted each burner to run off a separate tank of propane. I found that having two burners running off one line of propane was not providing enough gas for either burner to get a good high heat. Also, I made sure to have at least one full tank of propane in reserve. You can really go through the propane when you’re canning all day.
My extras list included plenty of aprons, knives, bowls, and waste buckets for all involved. We purchased the peaches and sugar in bulk and all the bottled lemon juice the local grocery stores carried.
Each person coming to the canning class was encouraged to bring their own jars. Some wanted pints and others wanted quarts. Since we were going to divide the peaches equally among all the canners, we devised a “guestimate” as to how many jars each should bring.
Of the women canning that day, four were first-timers and two of us were veterans. This made for a pretty good ratio. There were many questions to answer and multiple processes going on at once. Having an extra pair of veteran hands that knew the ropes was invaluable.
|
Canning basics
On a sunny Saturday afternoon everyone arrived with aprons in hand. One of them had picked up the eight bushels of peaches that we had ordered. We were all set to go.
First we went over the basics of canning. I explained the difference between the hot water bath method of canning and the high heat method of canning. When canning peaches, or any other fruit, all you need is a hot water bath to safely can the fruit. This is because the fruit is naturally high in acid and the hot water bath canning method is safe.
High-heat canning is used when the food has a high pH level. At high pH levels, the natural acidity in the foods is too low to kill harmful bacteria. When you can these types of foods it’s necessary to use a pressure canner in order to achieve the adequate level of heat through pressure to safely kill harmful bacteria.
One of the most important points I wanted the new canners to understand was that when canning anything, it’s important to have a recently published home canning recipe book. Don’t rely on books handed down from family members. The rules for safe canning have changed over the years and it’s not worth the risk of illness to cut corners and use outdated recipes and methods. Also, just because your grandmother canned green beans in a hot water bath and never died, doesn’t mean you should take that deadly chance. Don’t risk it.
Once we had the fundamentals of high acid and low acid canning explained, it was time to move on to our project at hand.
All of the young women learning to can this day were concerned about the safety of the food supply and the over-use of pesticides in so much of the available food. They were all eager to learn how to begin providing for themselves.
|
How we did it
Because there were so many of us, and we were trying to can so many peaches in one day, we set things up on a big scale. We didn’t use the utensils I would have normally used if I were canning by myself. Because we had so many peaches to prepare, I provided five-gallon plastic buckets for everyone to use for disposing of skins and pits. I also provided a large stainless steel bowl where we could all place our sliced peaches. This bowl was filled with cold water and a couple tablespoons of citric acid or bottled lemon juice was added to preserve the color of the slices.
To begin the process, we set up one of the hot water bath canners as our blanching pot. This we set to a low simmer on the propane burner. Another large pot was placed on the table and filled with cold water to be used as the cooling bath.
Each person was assigned a job, and every hour or so we would switch jobs. This way everyone could learn each step in the process.
The flow of the work went like this:
Job 1: Drop the peaches into the hot water and blanch them for about 30 seconds (or until their skins easily peel away), then drop the peaches in the cold water.
Job 2: Peel and slice peaches.
Job 3: Make the simple syrup to be added to the peaches when packed in the jars. This was done in the house kitchen in large batches on the stove. We made a simple syrup from water and sugar. We dissolved the sugar in water and brought it to a slight boil for a few minutes. When the syrup was ready, it was carefully carried outside to the canning table. The syrup maker was also responsible for washing the jars in hot soapy water prior to packing.
Job 4: Fill the jars with peach slices, add syrup to within ½-inch of the top of the jar, cap the jars with sterilized lids, place the jars in the canner, and watch the timer.
NOTE: According to the USDA it is not necessary to sterilize jars for high or low acid canning if you are processing for longer than 10 minutes. There’s not much that I get excited about, but when I learned this fact, I was thrilled. Sterilizing all those jars takes time, energy, and a burner on my stove that can be put to better use. What a relief not to have to do this any longer.
|
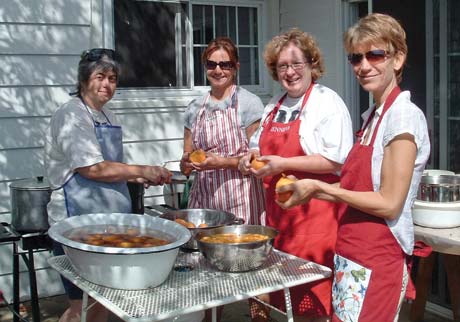
Everyone was responsible for peeling, pitting, and slicing peaches. As we hit our stride, our canning class turned into a well-oiled machine. As one large bowl of sliced peaches was filled it was carried to a nearby table to be packed in jars. The hot syrup from the kitchen was then poured over the slices. Air bubbles were removed by running a chopstick between the inside of the jar and the slices. The opening of the jar was wiped clean of any syrup or peach flesh and a hot, sterilized lid was tightly screwed down. We kept batches consistent by putting only pints together or quarts together in the canner. The quart jars were processed for 35 minutes and pints for 30 minutes, making sure the water covered the top of the jars by at least an inch or more. The timing began as soon as the water started to boil.
As jars came out of the canner we made sure there was a safe place to set them where they could sit undisturbed for several hours to slowly cool down. Because we were outside I made sure to have large beach towels on hand to cover the hot jars. I did this to keep the cool breeze off the hot jars and prevent any cracking of the glass.
By the end of the day we had made new friends, shared canning stories, laughed, and put up more than 10 dozen jars of peaches.
A great web site to visit for anyone who cans is www.foodsafety.psu.edu/canningguide.html.








When canning peaches, set aside your peach skins. Submerge them under lemon water, barely covered. Then, drain off the water and use it to make peach jelly. it is delicious!
I am curator of a small historical museum, and have taught a number of classes on old skills; sewing, quilting, knitting, spinning,and such. I have a large kitchen on the premises,(It was an old school), so it is doable and I have canned for about 60 years. The board of directors had a hissie fit when I brought up canning. How do you manage liability? I guess you could require a signed release, but would that be legal?
By the way, I want to tell you kids, you’re doing a good job. It’s not easy to take what your dad started and run with it in such a different set of circumstances and century. Just know you’ll hear the dissatisfied and ugly letters while the bulk of us are satisfied and never think to write. I’m sure I am not the only one out here praying for your success.