By Jackie Clay-Atkinson
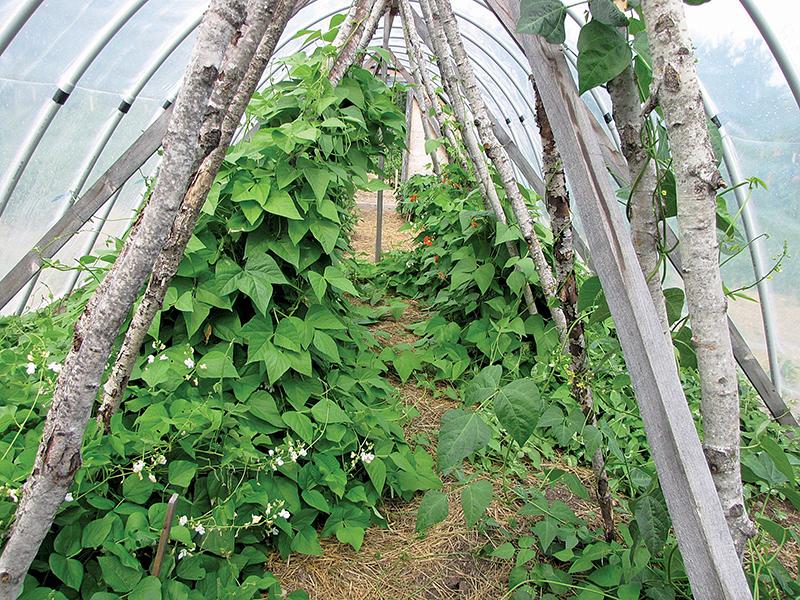
I’ve had my own garden for more than half a century, and I have learned a few things after all these years. One of the most valuable things I’ve learned was to grow certain plants in plastic hoop houses to protect them and greatly increase their productivity.
When we lived in the remote mountains of Montana (1,000 feet above the Continental Divide), I had to shovel feet of snow off my garden in May just to reach soil. By June, we were still getting snow and below-freezing temperatures on occasion, so I resorted to using plastic tents over tender crops, built by driving in sharpened wooden posts on either end of each bed or row and draping plastic over the whole works. As the weather warmed up, I could throw back the plastic in the day and tuck it into place at night when temperatures dove down into the low 30s.
By doing this, I was able to grow decent sweet corn, tomatoes, and green beans where nobody had ever gardened previously. But I wish I had known about hoop houses back then.
Likewise, when we moved to the high plains of New Mexico, spring and summer brought plenty of sunshine but also thunderstorms and hail. Some years it was so bad I tried to think of a way to cover our acre garden with hardware cloth to keep the hail off. If I’d have had a couple of hoop houses, covered with tough greenhouse plastic, I know I would have had much better crops.
Here on our northern Minnesota homestead, we have two “permanent” hoop houses we wouldn’t garden without. True, we do have a 90+ day growing season. But we also have cool nights all through the summer, with temperatures usually going down to the 40s in the spring and 50s during the summer.
This is fine for our beans, tomatoes, pumpkins, squash, cabbage-family crops, root crops, and greens. But peppers and melons do not like cool nighttime temperatures. They will survive, but they’ll produce a very small crop. For years, we’d just get enough to eat during the summer and maybe enough peppers to use in canned salsas and tomato sauces.
One day, I saw a collapsed plastic hoop house in a family’s yard on the way to the spring where we got our drinking water. I stopped and offered the guy $100 for it. It didn’t take long before it was on our truck.
It was made using ¾” PVC pipe, fastened to a railroad tie base into which holes were drilled to receive the pipe ends. There was no ridge beam or other support, which was why it had collapsed under snow and wind.
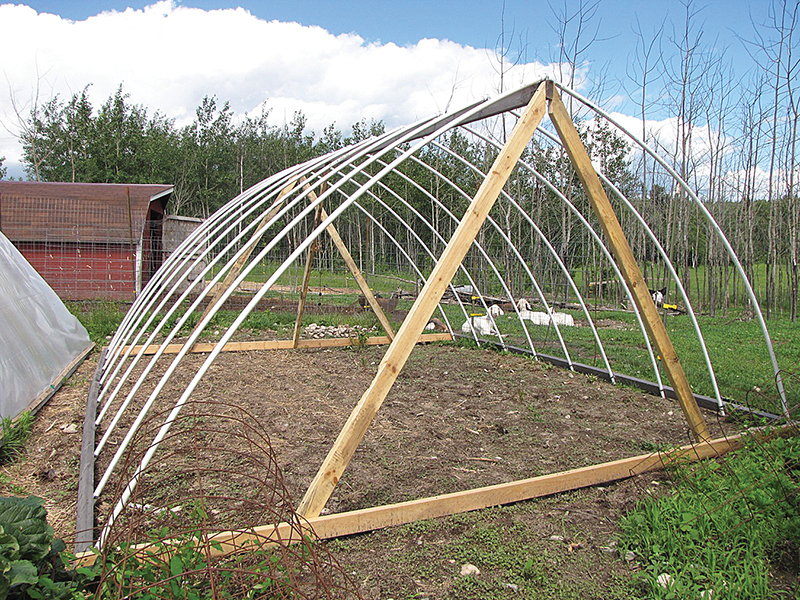
It laid in a pile for a few years until Will came to join our family. That spring, we erected the hoop house, using a 2×4 ridge beam and securing the ends to a 2×4 base with metal conduit clamps and screws. These also held the hoops in place over the ridge beam. We placed the hoops about 24 inches apart all along the 12-foot length. On each end, Will added inverted V braces of 2×4 lumber. Over this, we stretched 4-mil plastic from our local farm store.
Our melons and peppers flourished and we harvested bushels of each.
However, during my son’s high school graduation, a storm blew up. He drove home ahead of us and asked, “Did you put the hoop house in the goat pasture?” It had sailed over the top of the six-foot fence, smashed down two poplar trees, and totally confused the goats.
Luckily, it was still in good shape, so we lugged it back to the garden and staked down steel T-posts on each end, with straps running to the inverted V-braces. No more flying hoop houses!
Then there was the storm later in the summer. The plants and hoop house were fine, but there was a tear in the plastic. The tear in the plastic continued to rip until late fall when we harvested our last crops in the hoop house. The plastic had to be removed as it was flying in tatters.
We thought we’d just gotten some old plastic, so the next year, we used the same type of plastic. It again ripped on the folds, scarcely lasting until frosts came in the fall. If cattle or goats eat the plastic tatters, which they will, it can kill them. Needless to say, we were very careful to pick up any loose pieces, especially as the goat pasture is right next to our garden.
It also bothered us that the ¾” PVC was too flimsy. It wiggled in the wind and didn’t feel very secure. Plus, white PVC pipe can degrade after a few years in the sun. It was time to build a better hoop house.
For our new hoop house, we decided to use gray 1″ PVC rigid electrical conduit, which has the added bonus of not being affected by sunlight (it can be purchased at any hardware/lumber supply store). It comes in 10-foot sections and is $3.80 or less per length. Because this conduit comes with a built-in belled female end, it makes buying extra fittings unnecessary.
For the plastic, we bit the bullet and bought enough Sun Master Pull and Cut Clear Greenhouse Film (6 mil) for two 16-foot hoop houses (it cost about $100 from www.growerssupply.com). And the plastic was guaranteed for five years, leaving it on year-round.
Not only has that plastic been on the houses for three winters so far (and survived a deer running his head through the side), the plastic remains in great shape despite our snow and wind.
Originally, we decided to build one 32-foot-long hoop house that was 14 feet wide. But we quickly discovered that it was better to go with two 12×16-foot houses, for two reasons. First, we move the houses by hand to till the entire area with our TroyBilt tiller or our tractor-mounted tiller. It was impossible to move the big hoop house! Second, being 14 feet wide made the sides less vertical. During the winter, heavy snows would slide off and build up on the sides, squashing them in severely. By narrowing the hoop houses to 12 feet, the sides are straight enough that heavy snow stacks up vertically and doesn’t squash in the sides. In extreme snows, Will takes the snowblower out and removes the snow around the sides of the hoop houses.
Building your own hoop house
If you live in an area with less snow load during the winter, you might want to go with the 14×16-foot hoop house for a bit more room. Or if you don’t plan on moving your hoop house, you certainly can go with a much longer one. (We have tilled inside using our Mantis tiller. Be careful around the sides; it can slit the plastic.)
We built our first hoop houses from scrap lumber but we found it quickly rotted where it was in contact with the soil. So now our lower framework is always built from treated lumber to make it last years longer.
The framework
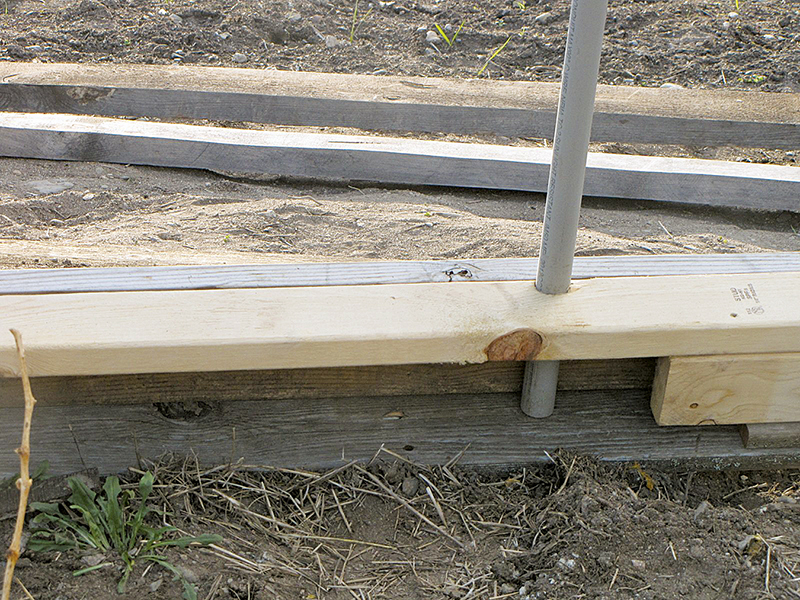
All around the lower base, Will built a U-shaped framework to receive the plastic hoops without the need of clamps or screws. It’s a simple frame built using a treated 2×6 on its side with a treated 2×4 screwed horizontally to the top and bottom of it all along the entire framework. The bottom 2×4 sits on the ground and gives a place for the hoops to rest on securely. The top 2×4 gets a 1¼” hole drilled in it every 24 inches to slip the end of the conduit into. It fits snugly but does allow for a tiny bit of movement. (You do have to measure for your hole placement rather early on so you don’t end up drilling these holes into a screw!)
The 2×6 provides a good place to anchor your plastic covering later on.
Will built a wooden framework of 2x4s including a 4-foot opening for a doorway on both ends. We enclosed the ends using some scrap plywood we had.
On each end and in the center of the 16-foot structure, Will built an inverted V-brace to hold the 2×4 ridge beam and to support the building during heavy snows.
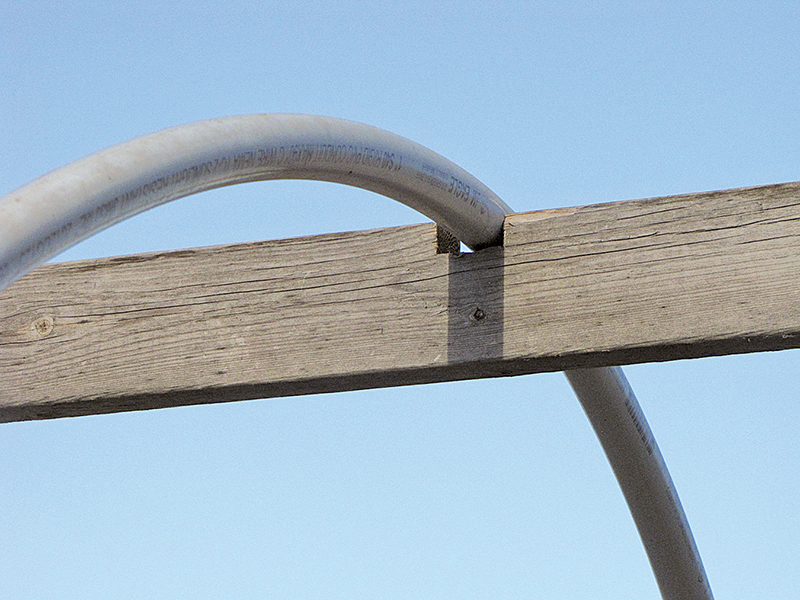
Before installing a ridge beam from front to back, Will measured and cut out 1¼” by 1-inch-deep chunks in the beam every 24 inches for the PVC pipes to rest in. This stabilizes them and holds them in place without clamps or screws (which we found wore out the previous plastic due to movement).
The construction of the whole framework only took a couple of hours one morning.
Placing the hoops
It is a very simple process to place the pipes in after the holes have been drilled in both sides of the top 2×4 and the cut-outs have been made on the top of the ridge beam. Before setting in the pipes, we cut half of the pieces of pipe in half with a hand saw. You don’t want a joint at the top of the hoop — it adds a wear point that can damage the plastic and it weakens the entire structure. You’ll place a whole 10-foot section centered over the top, then shove the bell of one cut section onto the male end of the whole piece. The bell end of the whole piece goes into the male end of the other cut piece. This leaves two male ends on the lower end of the hoop. Shove these through the corresponding holes on either side all the way down to the lower 2×4, which rests on the ground. Then slip the pipe into the cut-out and move on to the next.
Will wrapped the “sharp” edges of each joint with plastic tape to ensure there was no rough surface to rub the plastic.
Not forgetting our first hoop house sailing into the goat pasture, we did drive a steel fence post into the ground on each side of both doors, inside the structure.
Adding the plastic
We unrolled the plastic from the box it came in onto the soft grass of our front lawn so we could measure it for length. Then we folded it gently back up and carried it down to the garden.
As with our previous hoop houses, we decided to use wood lath with 1½” screws to secure the plastic skin to the wooden framework of the hoop house. There are more expensive ways to do this, such as using metal channels in which special wire, called “wiggle wire,” is clipped to hold the plastic firmly in place without piercing the plastic. But we’re pretty frugal and low-tech around here.
On a very still day, we stretched out the plastic smoothly all across the framework, front to back, carefully squaring it up. We began fastening it first to one side with strips of lath, screwed in with five or six evenly-spaced screws per piece. We were very careful to pull the plastic tight between pieces as we moved along the side.
Once one side was secure, we stretched the plastic over the top and, working from center to the front, anchored the plastic with lath strips as we had on the opposite side. When it was neatly in place, we pulled the plastic snug in the front. Will slipped ½” soft pipe insulation (foam with a slit in one side) over the plywood to cover the rough edges and protect the plastic from scraping in the wind. Then we used more lath strips and screws to anchor the material to the plywood front, working top to bottom.
Repeating this on the back, we finished the other end and were happy with the result.
We cut two pieces of plywood to use as temporary doors for both the front and back.
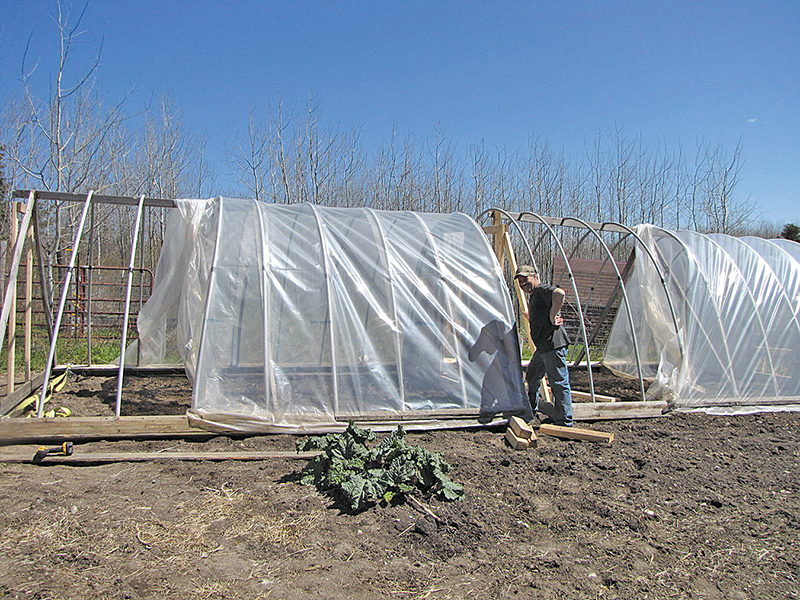
Will built these two 12×16-foot hoop houses in less than a day and boy, do we get use out of them! We spent about $100 on each hoop house, although if you didn’t have any scrap lumber around, you could conceivably spend a bit more. And when you figure you’ll get at least five years out of each one, that’s a great deal.
Using the hoop house
While the hoop houses are really wonderful, I have a few tips on how to properly use them. First off, remember when it gets cold, they won’t protect tender young plants from freezing if the temperature gets much below 30° F. They will protect against a light frost but if the weather forecasters predict a clear night in the spring with near-freezing temperatures and you have newly transplanted plants or seedlings, it’s a good idea to throw a propane heater in the house. We’ve had transplants and seedlings freeze when we didn’t expect temperatures to dive quite so low.
On the opposite end of the spectrum, that same hoop house can turn into a sweltering, humid oven in the summer without ventilation. This is why we added a door to each end. By simply opening both doors, we’ve never had plants “cook” during very hot spells. But if you live in a hotter climate where temperatures get over 100° F, hang a box fan at one end of the hoop house.
As a hoop house is limited in space, only use it to grow crops you have difficulty with out in the garden. Don’t fill them with greens, broccoli, and Brussels sprouts, which prefer cooler growing conditions. While a lot of folks in our area grow tomatoes in high tunnels to sell at farmers’ markets, we grow them right in our gardens. By starting them inside early, then transplanting them into the garden (using Wall’O Waters for protection), we can easily grow tomatoes … even 90-day tomatoes. Plus, each tomato plant can grow 7 feet tall and 3 feet in diameter. We feel our hoop houses are better used for smaller plants.
Likewise, squash and pumpkins have vines that can reach 30 feet long. Growing them in a hoop house is out of the question. Instead, I’ve had great success by using mini 4×4-foot hoop houses which I set over hills of longer-season squash or pumpkins. This acts to charge the seedlings and get them up and growing much faster than if they were just left on their own. When the vines get bigger, I simply lift off the “hoop houses.”
Unless you are gardening in northern Canada or in Alaska, save your hoop house for other crops that don’t do well outside. (Unless you have wind or hail problems.)
Insects in the hoop house
Some folks are troubled with insect pests such as aphids or whiteflies in their hoop houses, but we are not. We do our best to provide nearby attractants to beneficial predatory insects. On the edges of our garden, we have wildflowers, and right in the garden I always plant flowers of all kinds.
Once I had flat after flat of tomatoes and peppers which had been raised in the house. Unfortunately we had an aphid infestation from hell. We sprayed, squished, and gave our plants daily showers in the bathtub. But when we set them out, they were still aphid-infested. I was getting frantic and was starting to think about using toxic sprays. But after three days, the beneficial insect army arrived, and after four days, there were no more aphids. I could practically hear ladybugs burping contentedly throughout the garden!
Remember, if you use toxic sprays (or even many organic sprays), you’ll be killing all insects, including pollinators and predatory insects that you want around.
Final thoughts
I hope you’ll give a hoop house a try. They’re a great place to grow crops and it’s wonderful to hang out in one early in the spring, where you can smell the green things growing and feel the soil beneath your feet. I often find myself sitting on a stool in our hoop house, enjoying the sound of the rain outdoors.







Thinking about following the crowd to Idaho, during this California shut-down. Here, we are in zone 9 and are growing year ’round, outdoors. But in Idaho, nope. Would have to use a hoop house. This is such good information, Jackie, because you’ve actually done it. Thanks for going to the trouble to write an article. I really appreciate it.
To run the “BUG’S” away, use cedar sawdust.. Bugs of all kinds don’t like it, gone… lol I had a back yard infested with Fleas and my dogs couldn’t go out back without getting eaten alive.. Threw cedar sawdust up in the breeze and covered the yard.. bout two days later—— GONE .. Stayed gone for nearly two yrs..
Just redone this year at start of summer.. Been fine all summer, worked for me== twice… lol
Is it possible to get a “Bill of Materials” ( ie. how much pipe and what size)?
This came just in time! Wanted to make one of these this summer. Thanks a million!
Wow, this is great and it sounds so easy to do! I have 4′ x 25′ raised beds that are parallel with each other, and I could conceivably put a hoop house over 2 of them, or a portion of 2 of them. Could really help even out some of the temperature swings we’ve been dealing with the last couple of years.
Katherine.. we put welded wire fence over the house it deflects the hail and holds the plastics down . We live east of Colorado springs “flatlanders” 4 tpost and some wire to strap it together and then to the t post . It’s not pretty but it works (3years now)
Katherine.. we put welded wire fence over the house it deflects the hail and holds the plastics down . We live east of Colorado springs “flatlanders” 4 tpost and some wire to strap it together and then to the t post . It’s not pretty but it works (3years now)
Thx for writing this. We get hail here, new for me. We just started building our hoop houses and while we are using regular plastic for now we had used the flexible pipes, which I’ve been worried about blowing away. Love the way you put this together and we will be implementing this advice right away!